I emailed Emily the other day telling her I wanted to start chatting with all of you about my kitchen renovation which is (!!!) starting in February. She immediately emailed back that we should cover my house’s Airbnb listing because the home has changed so much since I got it and there are a lot of good takeaways in it. I wasn’t really expecting that reaction, mainly because I’ve been so inside my home’s updating that I haven’t always been able to see how far it’s come since I moved in.
Do you ever do this to yourself? Like not give yourself credit for what you’ve done? I have a perfectionist streak that can be really exhausting – nothing I do is ever good enough (for me). But sometimes you’re able to look back on what you have done and appreciate it. It can be so nourishing to realize you’ve made progress by seeing it all in one place. Like in a posting on Airbnb!
I’m sorry, this is going to start off a little heavy but I PROMISE it has a happy ending. The past two and a half years have been some of the most challenging in my life. I know I am not alone in this and that is why I talk about it whenever I get the chance. We need to tell our stories so other people feel less alone in theirs.
While I was in the process of buying Londo Lodge, my HGTV show was unceremoniously canceled. Which was tough because I shot the second season of it into the middle of 2020, with little to no Covid protocols. Because HGTV doesn’t pay much, I was relying on the type of sponsorships and endorsements that normally make doing that kind of show worth it. But because of the pandemic most of those shut down for the remainder of 2020 and into 2021. I had a moment where I thought I should try to back out of the house. Could I actually afford it? But as a freelancer, it’s nearly impossible to qualify for a loan because you don’t have a “salary” per se. And 2019 was my highest income year to date (oh man, do I miss those days). So I was worried that if I didn’t take the house, my opportunity to own a home might never come.
When I moved in I imagined I’d renovate the kitchen and have everything ready to put on Airbnb in a year or so.
…LOL!
Don’t be fooled babes! Even people like me that are part of the industry can be fooled by the quick turnaround we see on the internet and on TV. For those like me (ie single income, no money from family) renovations often take a LOT longer. While I do have the ability to get *some* things sponsored, which I understand as a huge privilege, it’s pretty likely that my master plan for the house will take five to ten years given how complex it is and how little money I have post-home buying. I spent all my savings on the down payment, so I don’t really have much to throw at the renovations. And because my income plummeted over the past few years, I can’t get a construction loan, which would help to get things done more quickly. But with some setbacks come some opportunities – this is a chance to show people things you can do cheaply to improve your house.
I broke my home’s renovation plan into two phases: Phase I (Liveable), Phase II (Dream Home Status). It’s now looking like it’s going to be more of a 27 Phase project but I have decided that while I’d love to walk into my house right now and have it be exactly what I want, the act of designing actually brings me so much purpose and hope for the future that I need to just learn to enjoy the process. I am now happily done with Phase I and the house is a well-composed and comfortable place.
Updates around the house took a LOT longer than I expected for a number of reasons. Firstly, I didn’t have any money to put toward hiring help for, well, almost anything. I did have a plumber come that first year to install some toilets (they’re super cute!) and someone help me with the stairs/flooring, but otherwise, I did literally everything myself. This led to a lot of stress and at least one VERY GROSS stress-related injury. I’ll explain later.
The main gist? I am so thankful my house is finally a place that I can go to and be happy. A place I can hang out in without giant stacks of wood all over the place or piles of carpet I have to haul to the dump. The first two years up there, I could never relax because there was always so much work to do. And those two years, I’d never like to do ever again. They were legit awful. Productive, yes. I am thankful for them, yes. But just literally awful. I can say that now because my life is, by contrast, totally effing great (it’s not perfect but compared to 2020-2021 IT’S PERFECT BABE).
So to summarize: my life basically fell apart in 2020 and is JUST coming back together in 2023 so if you’re feeling like you’re the only one who’s still climbing out of a Covid hole, you are NOT alone. As a content creator, I’ve had a hard time figuring out what my tone should be the past few years. I want to write and share things that make other people feel better about what’s happening with them. But is that sharing the happy stuff in my life? Or will that make people feel bad? Or do I share just the hard stuff so people who are struggling know they’re not alone? Or is that just a bummer for everyone? It can be tough, I know people compare themselves to the content they see, on Instagram or otherwise. And I’d never want to be a part of something that made the viewer/audience feel bad. I’ve kind of landed somewhere in the middle, trying to express positivity while also acknowledging there’s a lot of people struggling out there.
Anyway, there are roadblocks ahead but I am endlessly grateful to be out of the doldrums of the past two years. Here’s what I did to get my house liveable!
The Kitchen

Wall Color (Original to house) | Stools | Woven and Wood Accessories | Metal Sculpture
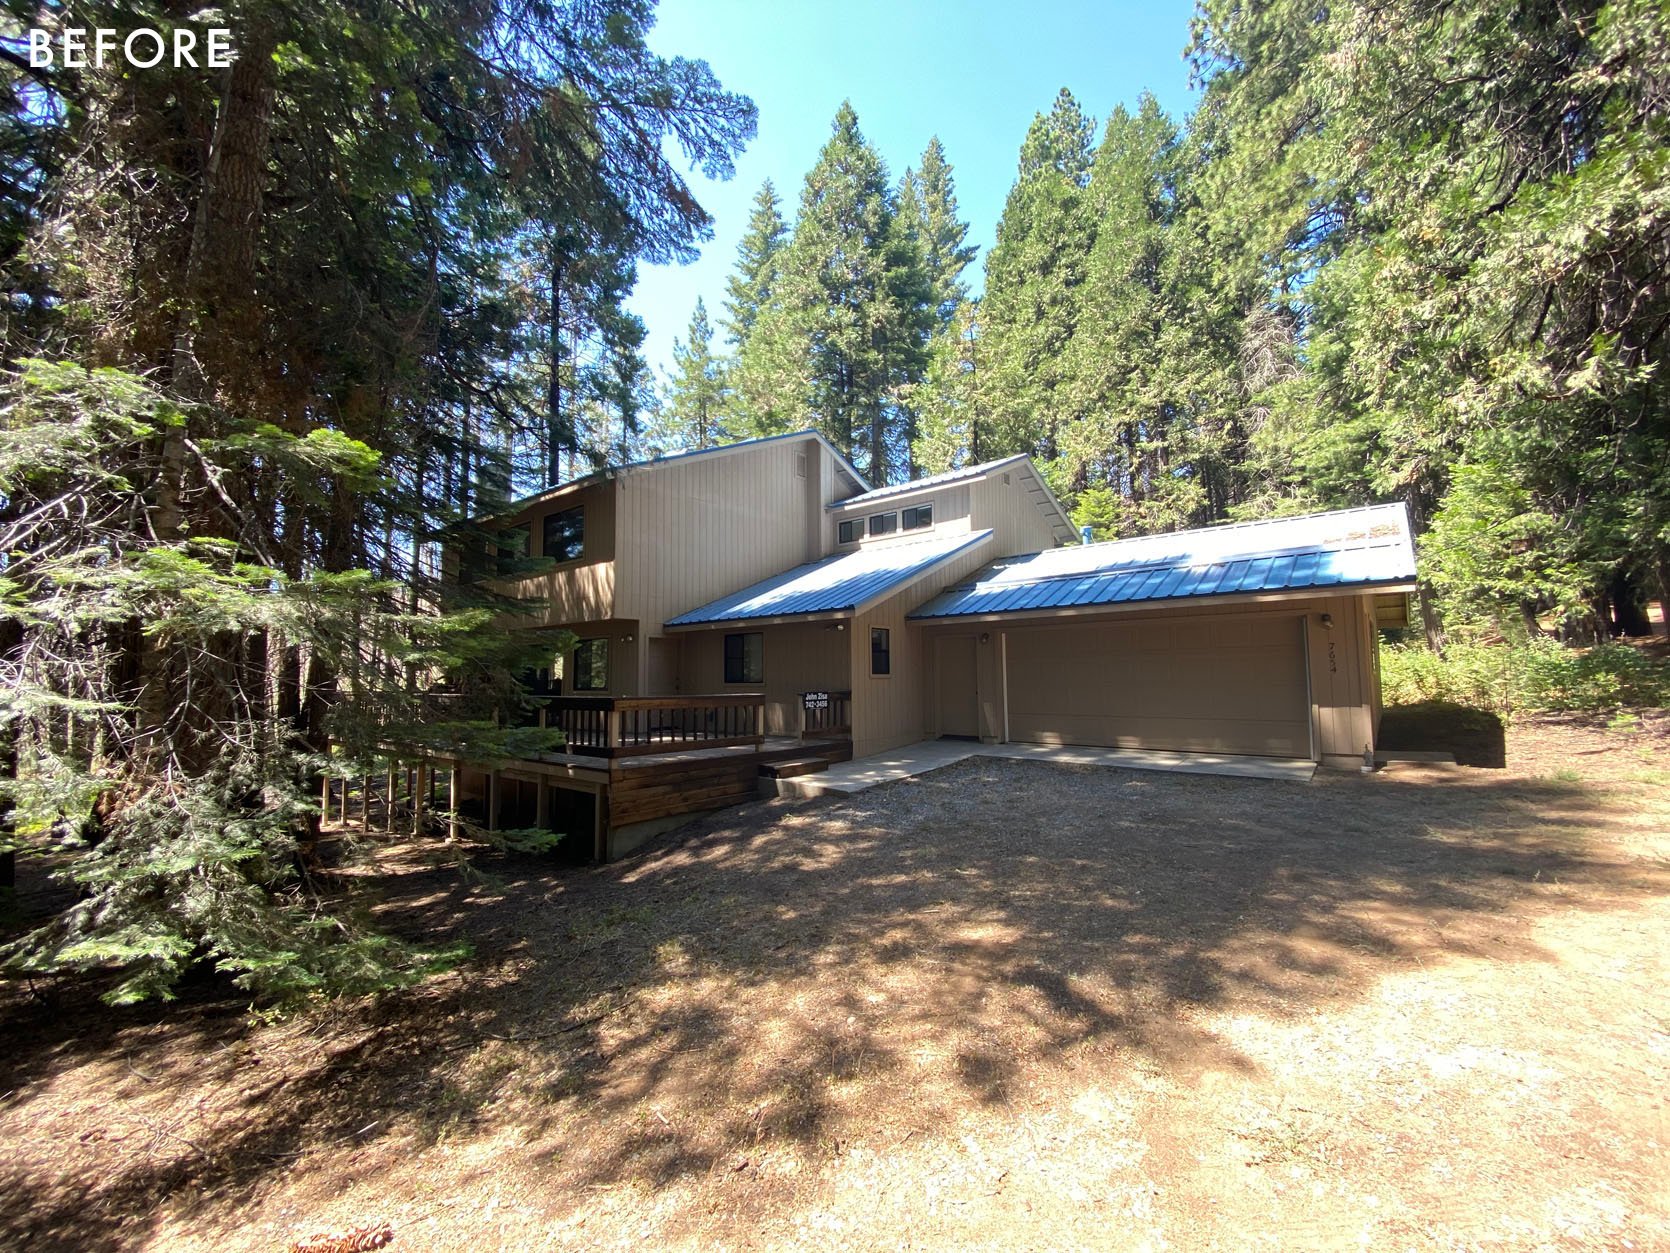
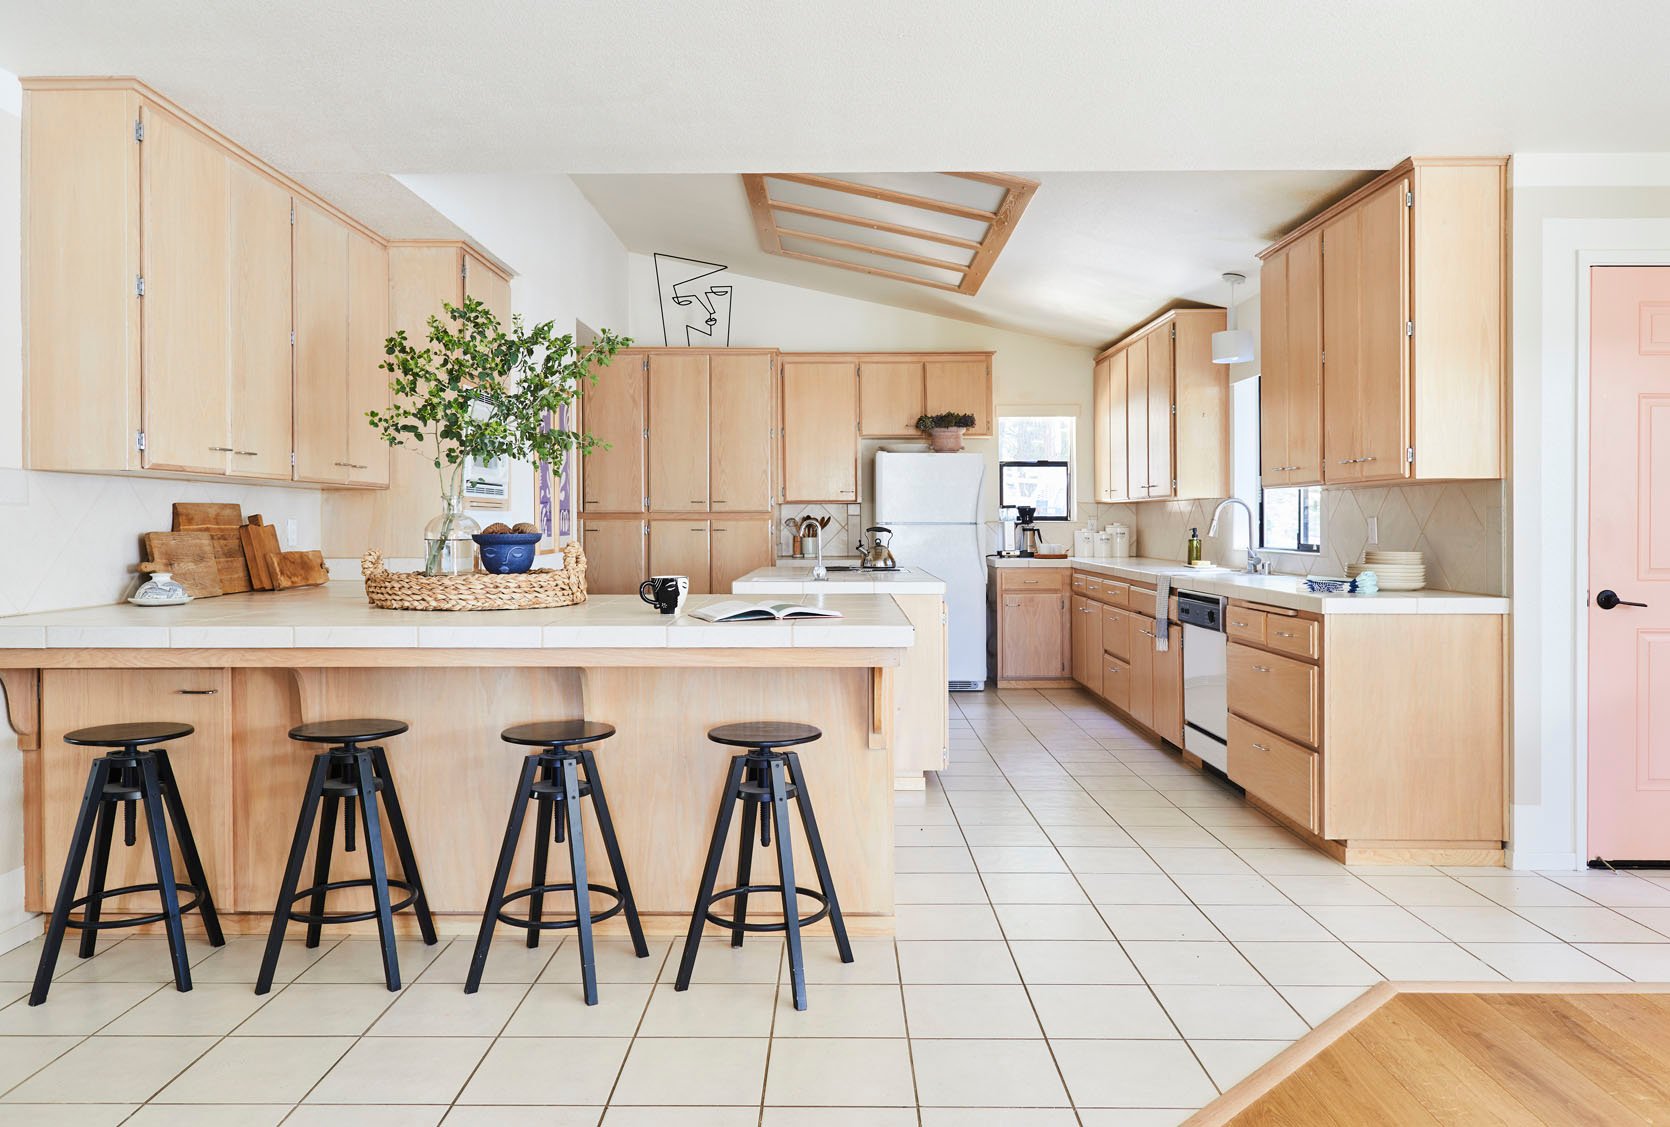
When I first toured this house, which is located near the southern gate to Yosemite National Park, I was immediately in love with the kitchen. It’s huge. I love the layout. I love the color of the cabinetry (though the quality is terrible). It’s a really nice room and the people who built this house had great taste in wood finishes. Of all the rooms in the house, it’s the one that has undergone the least changes.
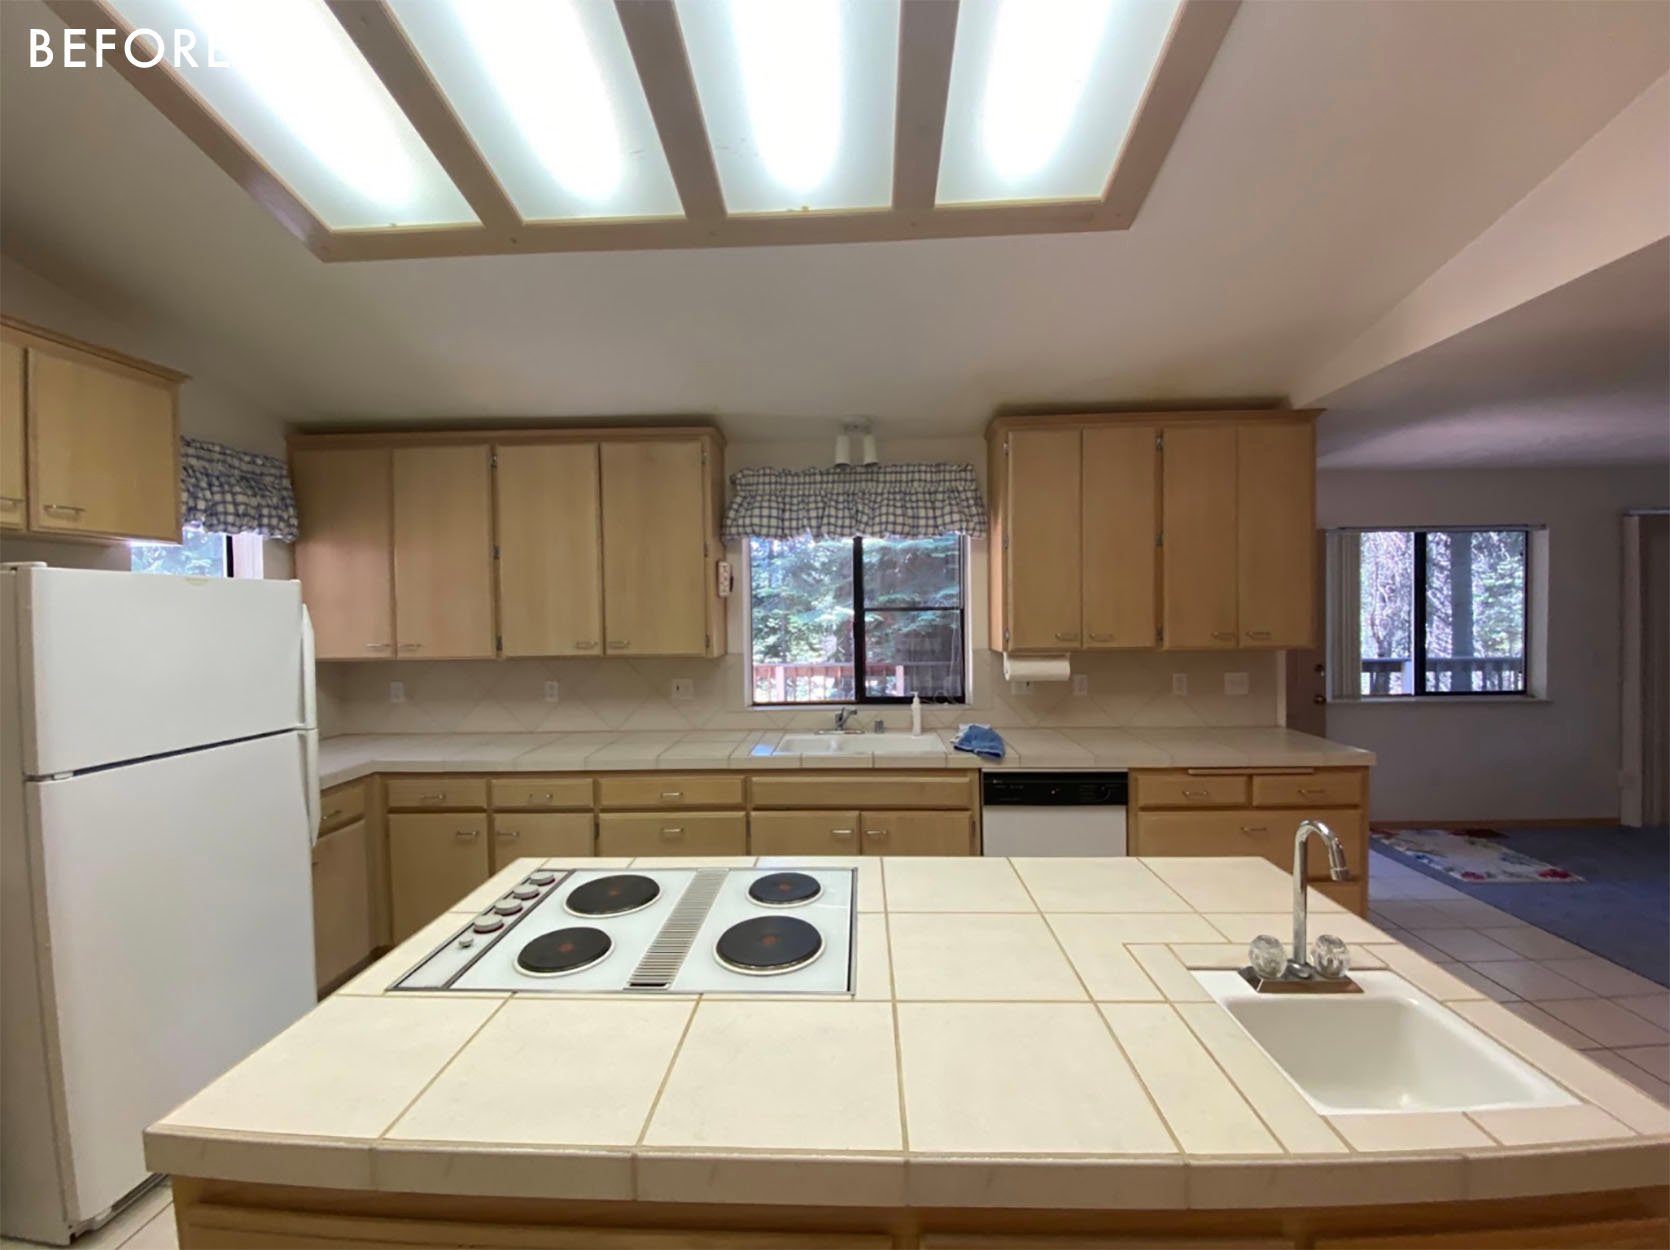
If you look at the difference between the before and after, it’s mostly styling. The only minor adjustments I made involved removing the fully bonkers valances that were over the windows. It’s hard to see in the photos, but I replaced the valances (which covered mini blinds) with a simple piece of 1×3 pine. I painted it white and it became a much simpler, more modern valance. So if you’re in a home that has inside mount mini blinds you don’t want to look at, that’s a super easy solution to not having to look at them when they’re open. Honestly, I love the functionality of mini blinds and some (usually the wood kind) can be really cute in the right space. But they never look good pulled up so creating a modern valance for them is a nice way to clean up the look.
The Diego Cabezas sculpture on top of the cabinets is my favorite thing in the room and helps make the 80s vibe feel more intentional. He’s a Spanish artist I love who does really beautiful metal sculptures. Some of them reference the Memphis style, which was popularized in the 80s/90s and while this house was built in 1992 it is undeniably 80s in its aesthetic. I plan to buy more pieces from Diego Cabezas when I can afford to because they belong in EVERY time period of home.
The Family Room

Wall Color | Ceiling Color | Rug | Side Chairs | Coffee Table (Vintage) | Tansu Chest | Roman Shades | Loveseat | Pendant
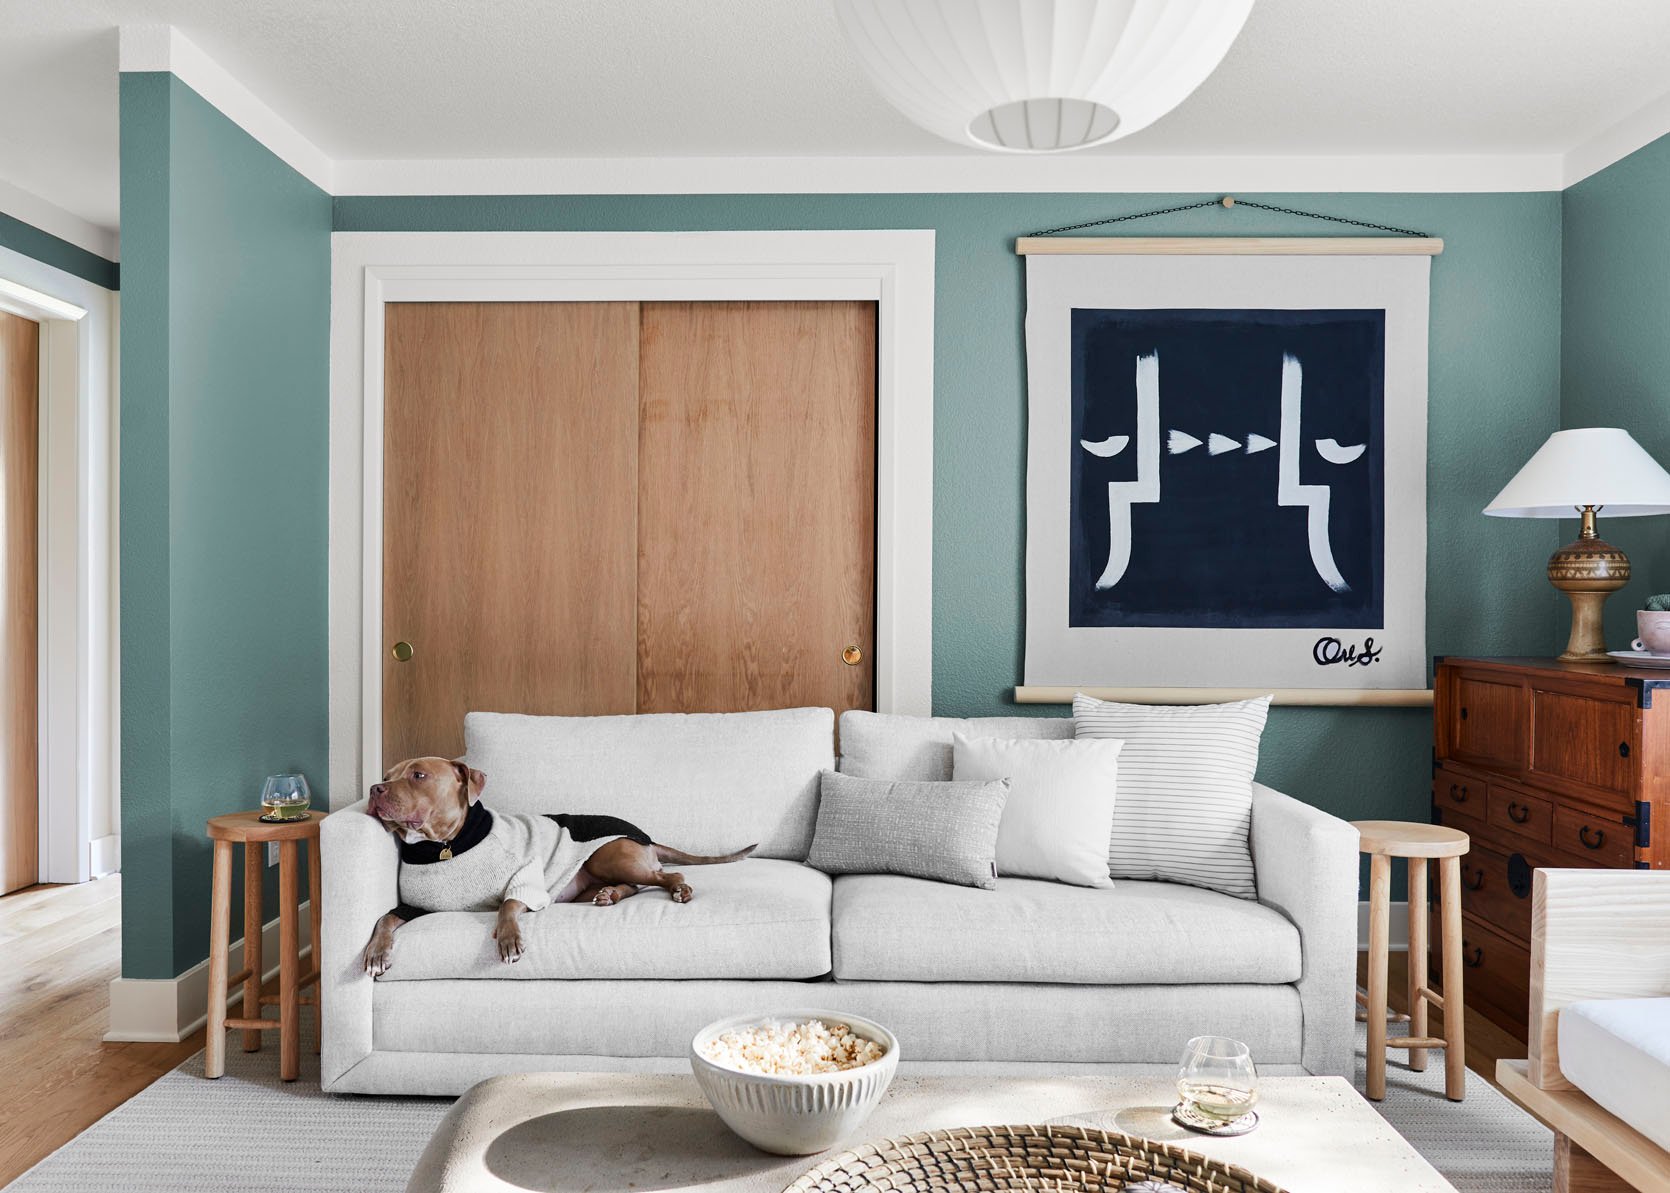
Sofa | Side Tables | Art | Lamp (Vintage) | Console (Vintage)
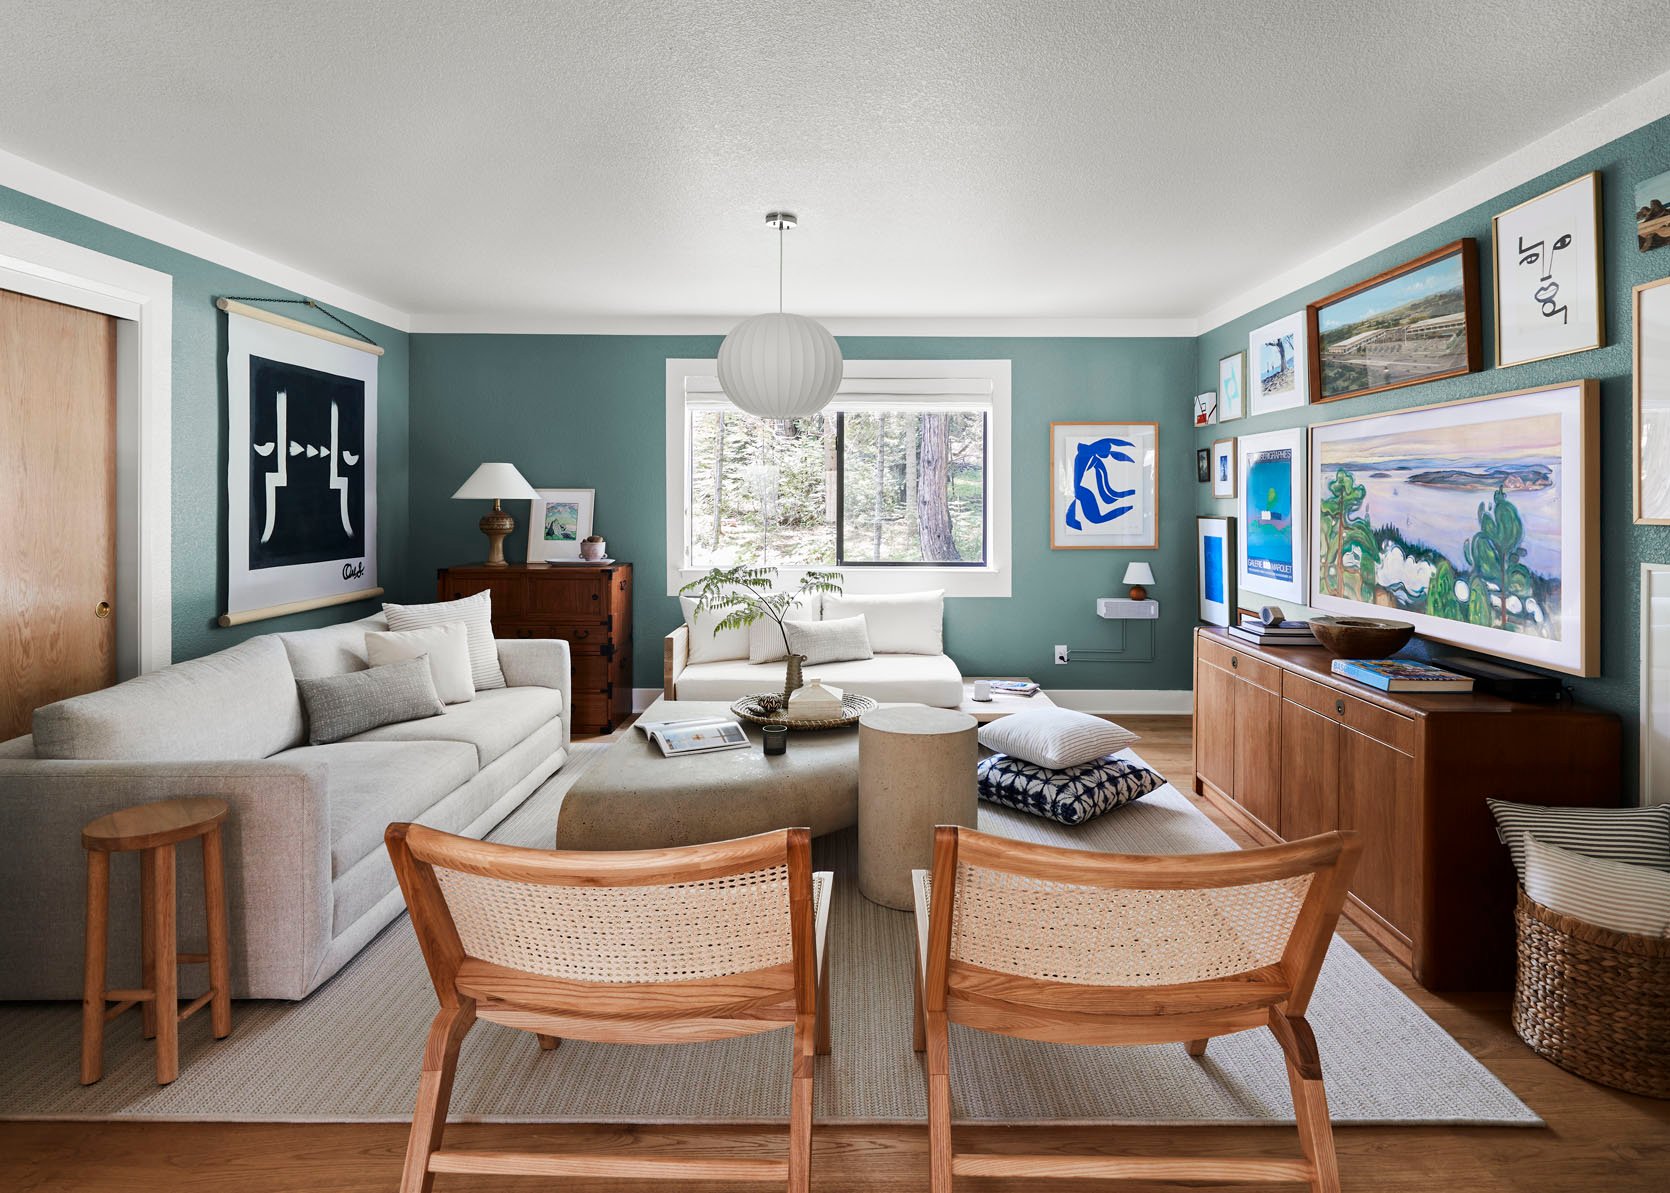
When I moved in, the family room was set up as a dining room. The reason I swapped spaces is that the room they had set up as the living room (pics in the next section) was literally built wrong. Like the architect didn’t think about where furniture would go. So there was no place to put a TV, a sofa, or a chair. I’m gonna be honest, when my whole family is up at the cabin, I wish the family room was bigger. Per county regulations, I’m only allowed to rent this out to six people. But the house has enough beds to sleep 10-12. So a living room this size really doesn’t cut it if I have a lot of guests. The master plan for this house involves building a new living room in what is currently the garage and adding a new garage onto the house. For budget reasons, it’s likely that will happen for at least a few years. So my goal here was to make it as cozy and beautiful as possible, which I did completely with paint and furnishings.
I did my go-to paint trick for houses with boring architecture in this room. The trick is to add “moulding” by painting it on. I measured a 4” border from the ceiling and painted it the ceiling color to give the space a bit more definition. The wall color is Make Waves by Clare and the ceiling is Whipped by Clare. My favorite pieces in the room are the media console which I got from Wertz Brothers in LA (RIP, I loved that store!) and the weird pottery lamp I got at the thrift store in Oakhurst, the nearby town where I do my grocery shopping.
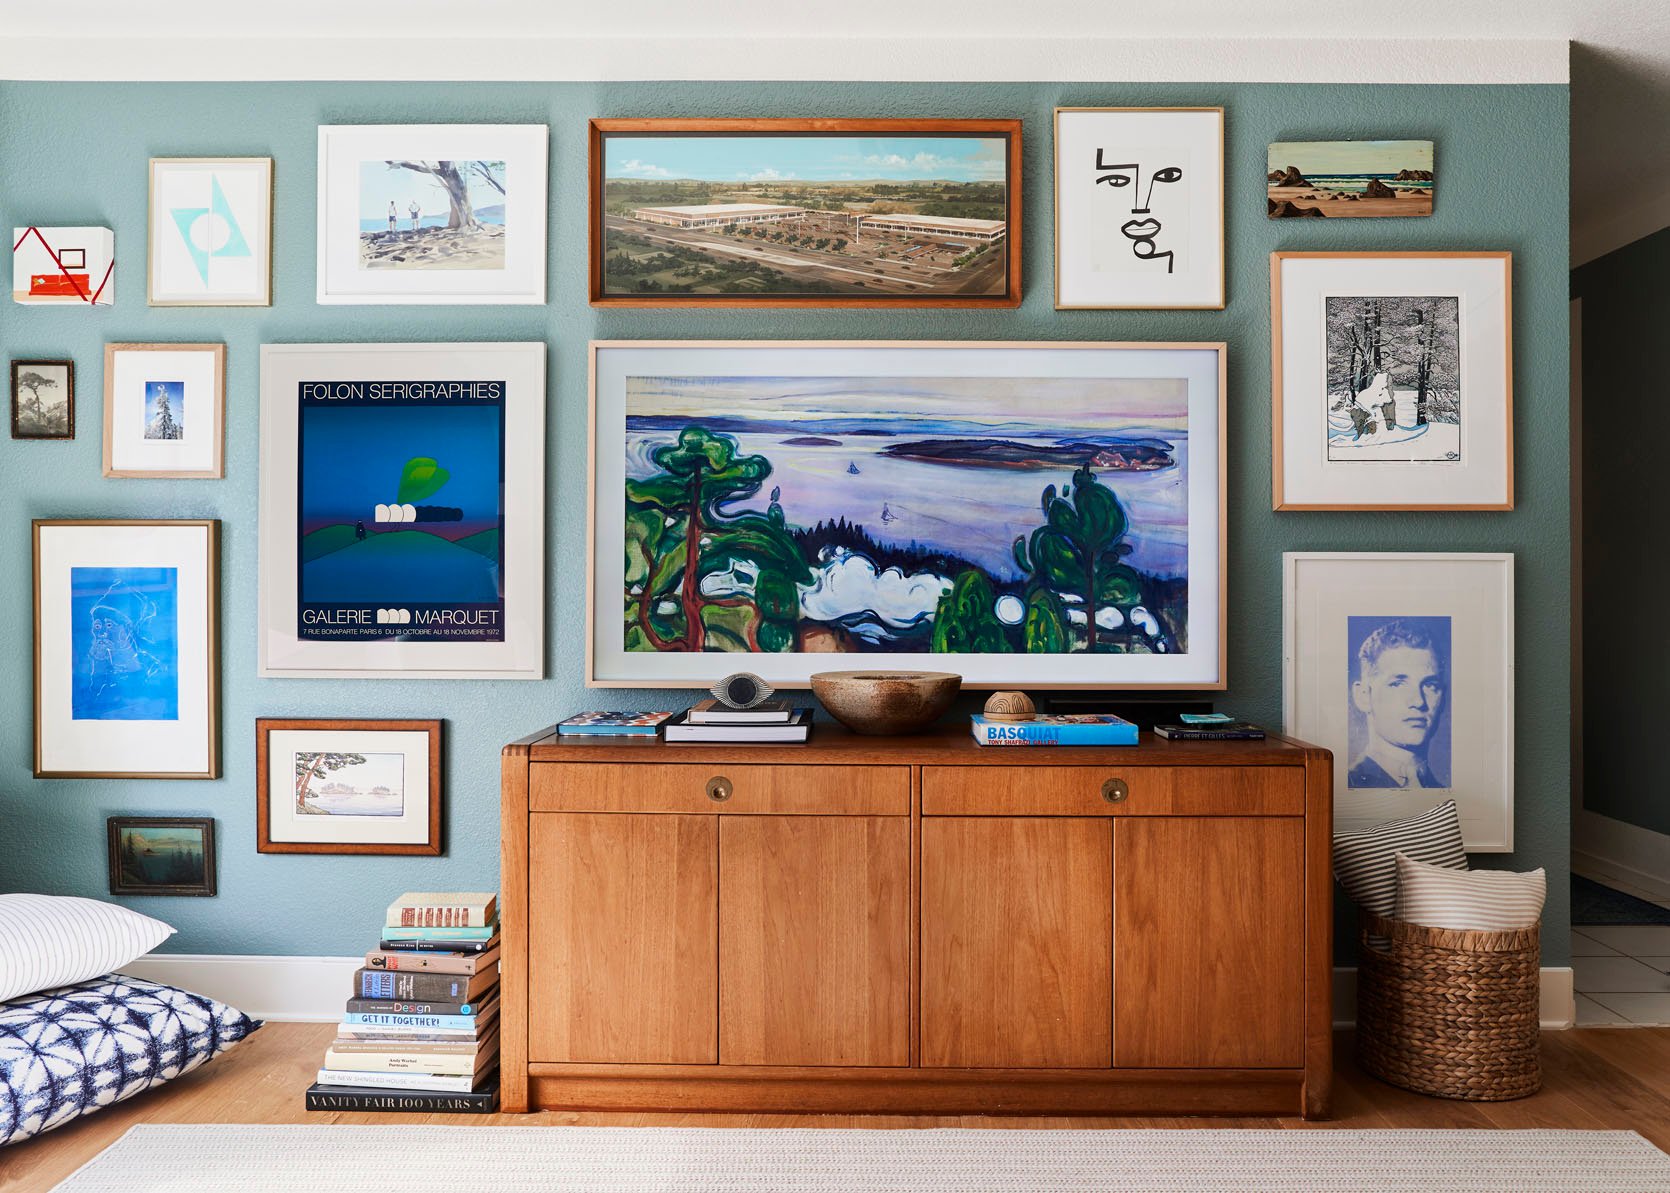
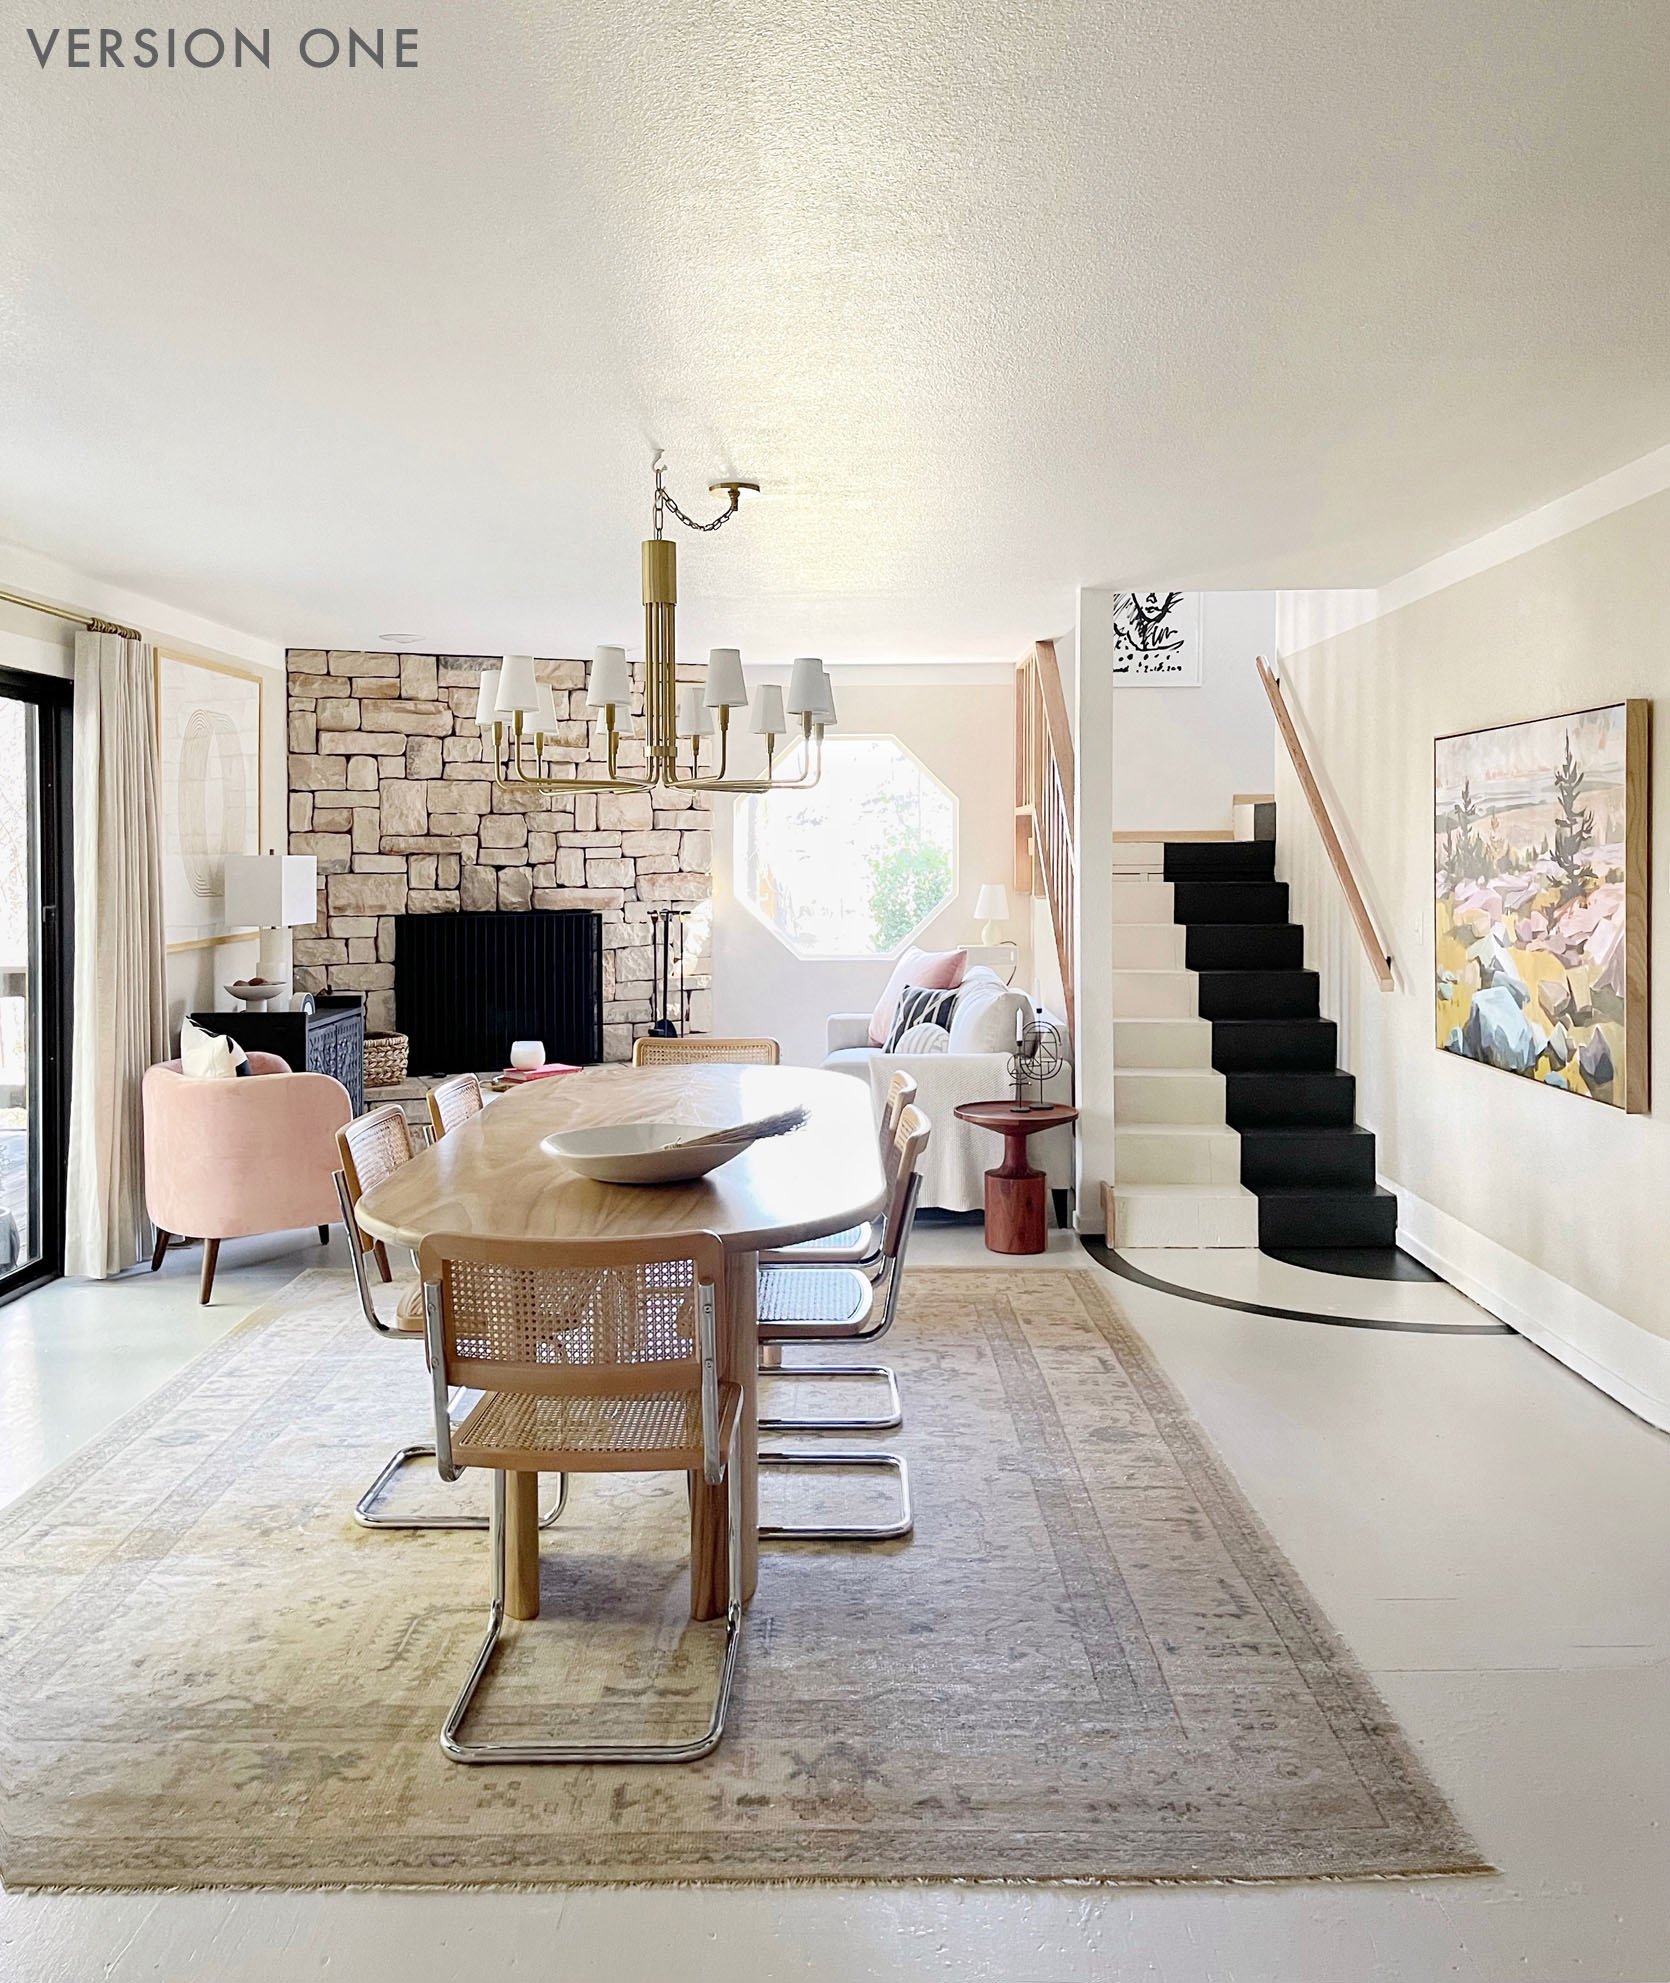
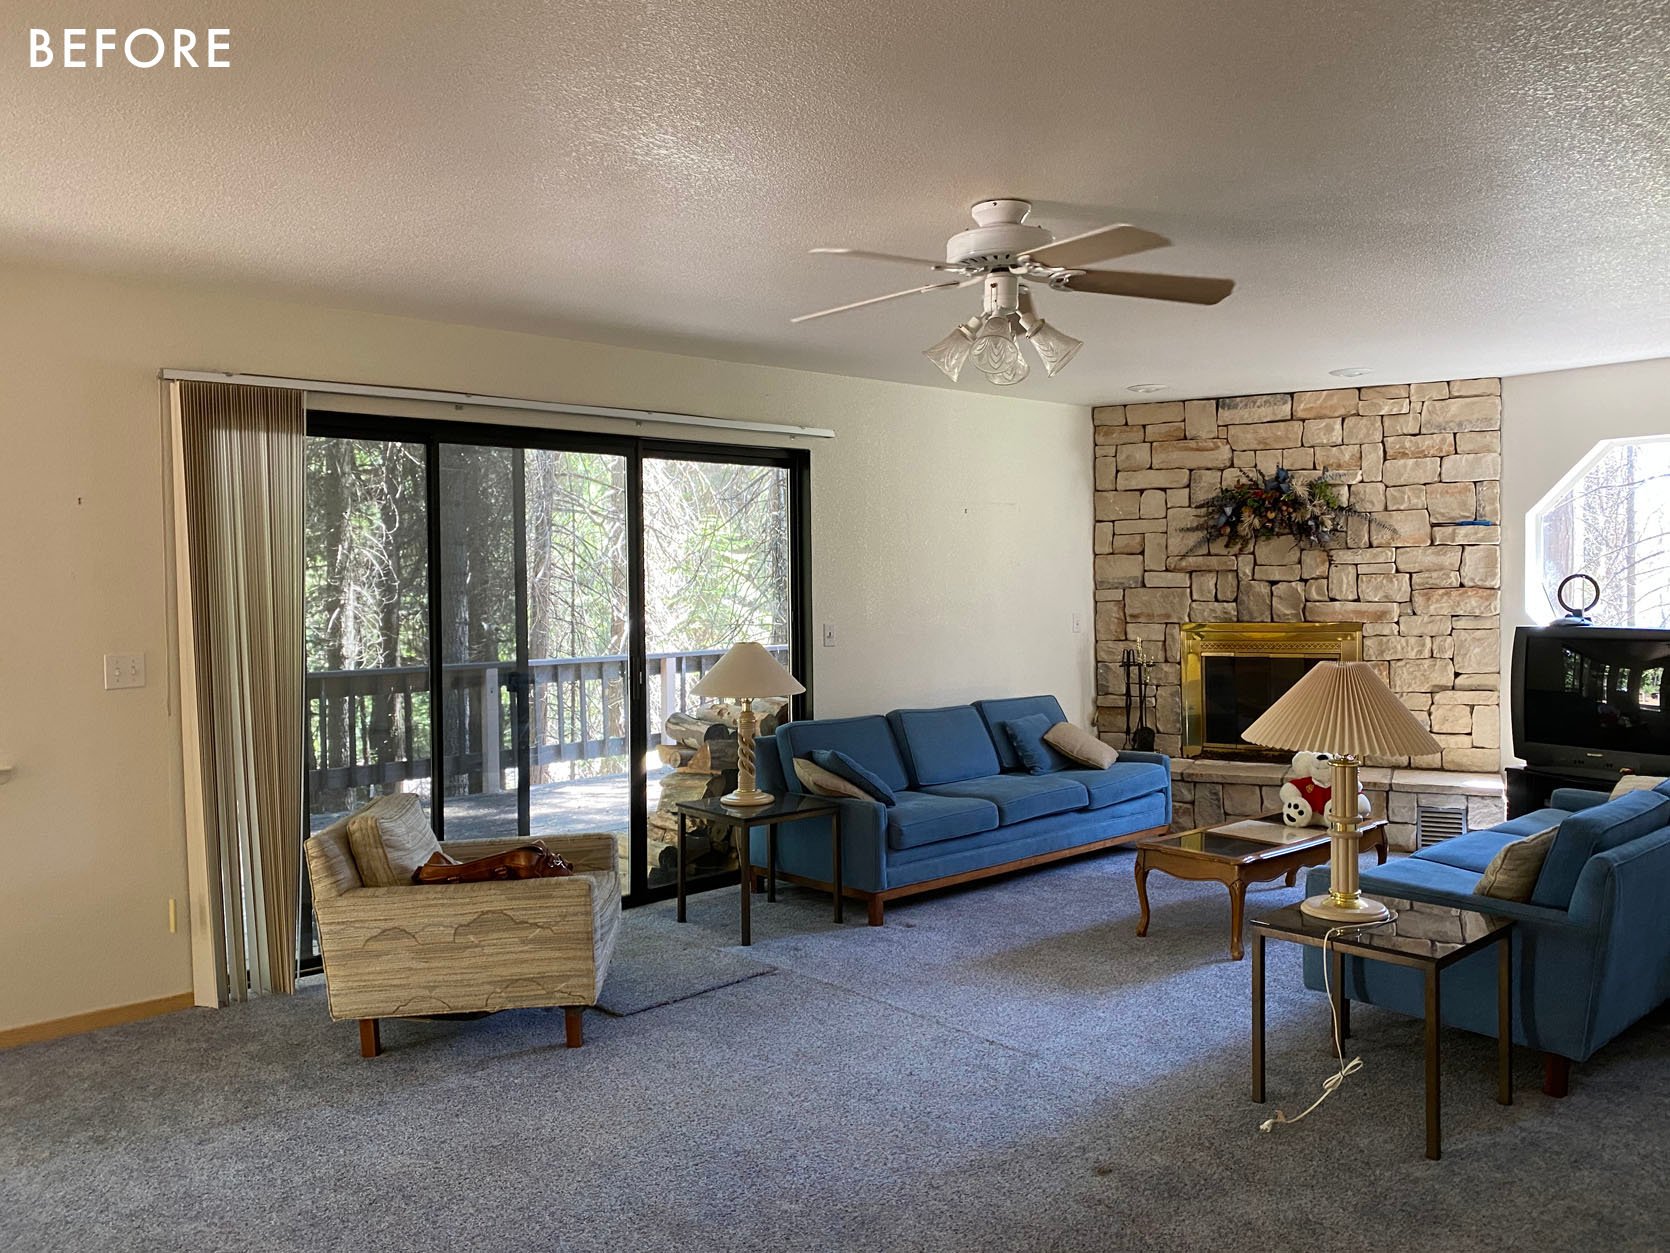
The Dining/Living Room
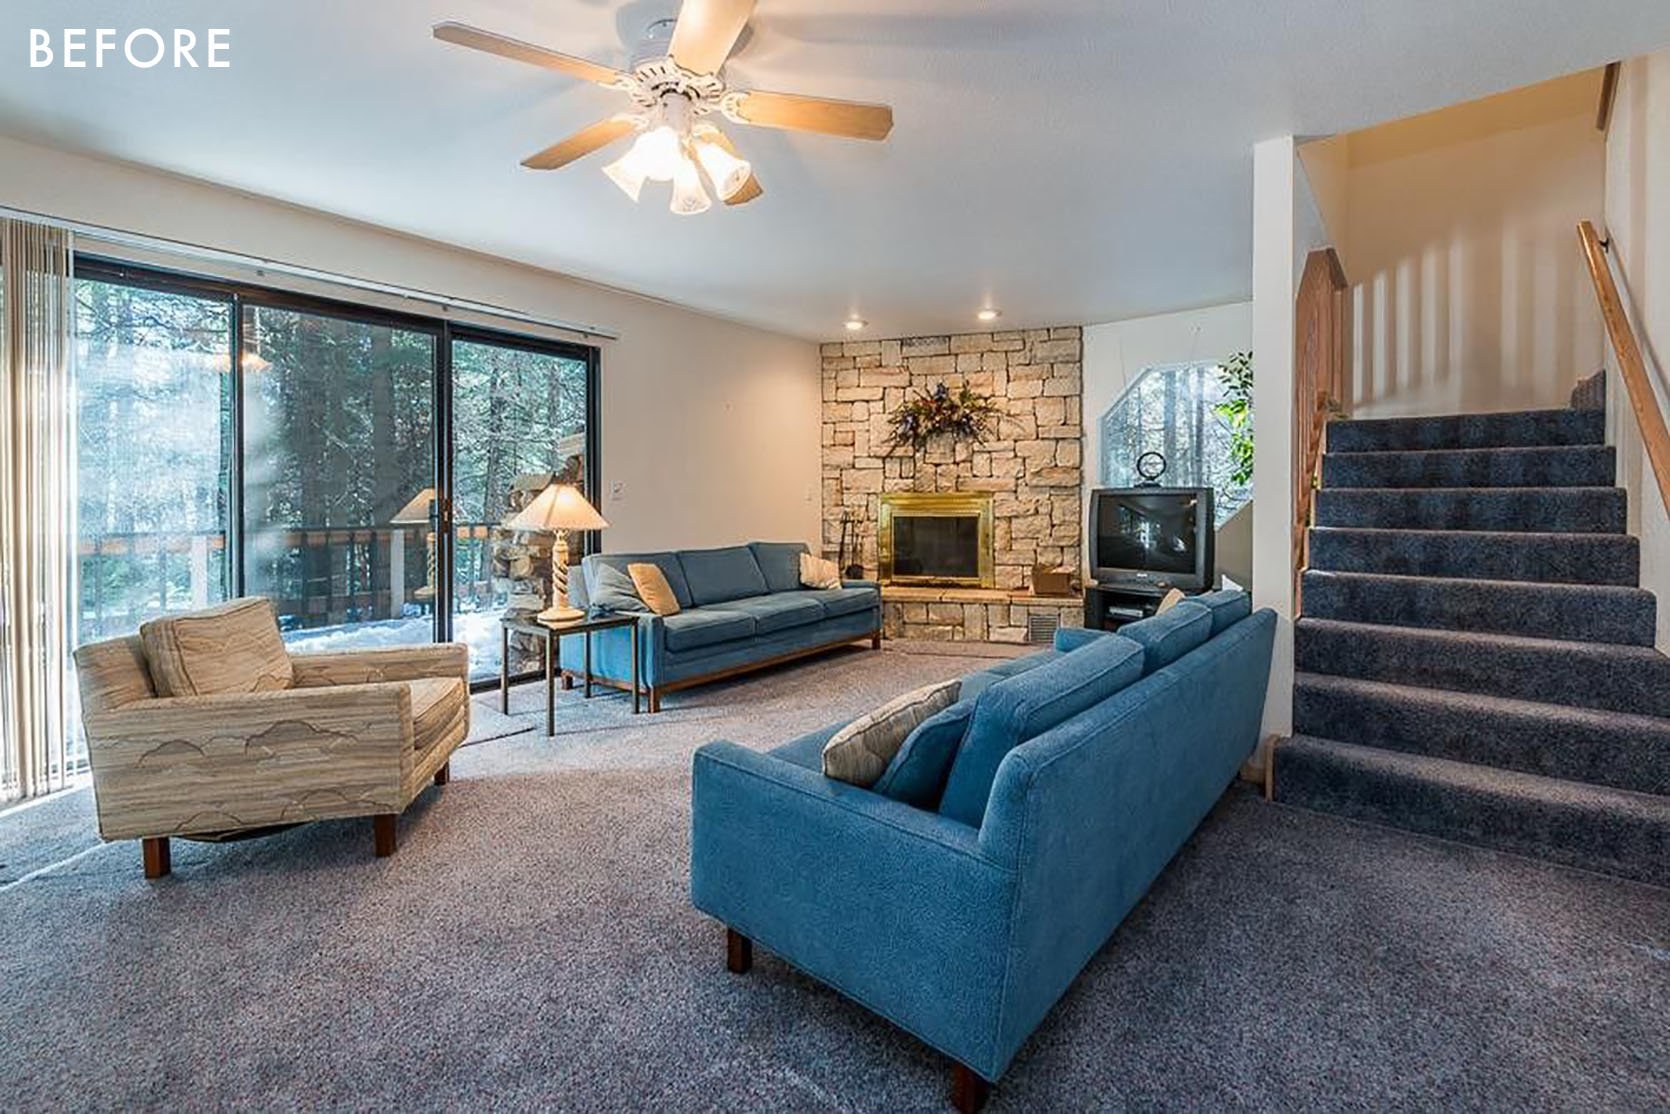
On the architectural plans for this house, this room is listed as “The Great Room.”
…
…
LOL! (again)!
As you can see from the staged real estate photo, there was literally nowhere to put furniture in this room that wasn’t in front of a door or pathway to another part of the house. Girlfriend, this is NOT good design. So I decided to turn this room into a dining room since it’s in the same space as the kitchen. While I am sad there’s no fireplace in the room where the TV is, I love a dining room with a fireplace!
This room is a good place to talk about what I did to my floors. When I moved in, they were all covered in blue carpet. I am in no way anti-carpet but that color was impossible to work with. Keep in mind, the way I make most of my money is by creating marketing assets (ie photographs and videos) for brands. So I couldn’t shoot in this house without doing something about the floors. My solution was to go room by room ripping out the carpet.
Removing carpet is one of the easier types of demo out there. You just cut it with a blade, and tear it out bit by bit. I cut mine into 4’x6’ strips, rolled them up, and put them directly into the car to take to the dump. The hard part of removing carpet is getting the nail strips and the NINE MILLION STAPLES out of the floor. This is what led to a stress injury on my knee from banging it on the floor too many times which led to it eventually EXPLODING because I couldn’t find medical help in time. I got a bursitis that got infected and it did not end well. It was really cute!
It was also during this time that I developed planter fasciitis on both my feet. Planter fasciitis is a condition where tissue in the feet gets inflamed and hurts when you walk on it. In my case, I got it from running up and down my stairs barefoot while simultaneously gaining fifty pounds due to the stress and depression of everything I was dealing with (mostly extreme financial panic on a daily basis). I have since cured my planter fasciitis by losing forty pounds and always always ALWAYS wearing shoes. I love being barefoot inside but I also love not having planter fasciitis. Anyone dealing with planter fasciitis: get yourself some inside Birkenstocks and some Hokas for everywhere else. Those two types of shoes have healed me.
Anyway, now that I’ve explained how removing the carpet did permanent damage to my human body, let’s chat about the results. I love the way the painted floors turned out and I think this is a great option for anyone who, like me, can’t just yet afford to put in wood flooring. I used regular house paint in a semi-gloss finish because I knew I was going to replace it relatively soon with wood from Riva (I procured that sponsorship soon after I got the house). If I were going to do this as a more permanent fix, I would have done deck or floor paint. Full disclosure: the real reason I used wall paint to paint the floor is that Clare paint was willing to send me paint in exchange for photos and they don’t make floor paint. I couldn’t afford to buy all that paint so that was a solution that worked for me. For anyone considering doing this: you can use semi-gloss wall paint to paint your floors. But if you choose a lighter color like I did, be ready to do touch-ups every 3-6 months. It’s super easy to do that and the floors were much easier to clean painted than they were when they were just rough unpainted sub-floor.

Wall Color | Ceiling Color | Chandeleir | Dining Table | Art | Drapes + Rod
Version One: Dining Chairs | Beige Rug
Version Two: Dining Chairs | Gray Rug
This house has been a fun place to experiment but some things I’ve done probably aren’t things I’d do permanently. The color block stairs are an example of that. I wanted to give them some movement and life but in-person the black and white stripe gave people vertigo.
I love the DIY mantel I made, which is basically a pine board mounted to the ceiling with 1.5” dowels and L-brackets. Removing the fan and replacing it with that cute Mitzi fixture also helped make the room feel more refined. The window coverings throughout the house are from Everhem and the drapes in this room were a MASSIVE improvement from the vertical blinds that were in here before.
To engage the space, I decided to make a dining area and a lounge area near the fireplace so people could enjoy the fire. You might think I’m nuts for putting a white sofa next to the fireplace but this one is from Sixpenny and you can take all the covers off and wash them. The coffee table is another fave in here, it’s from Lightology and its legs move so you can reconfigure it to have an asymmetrical look.
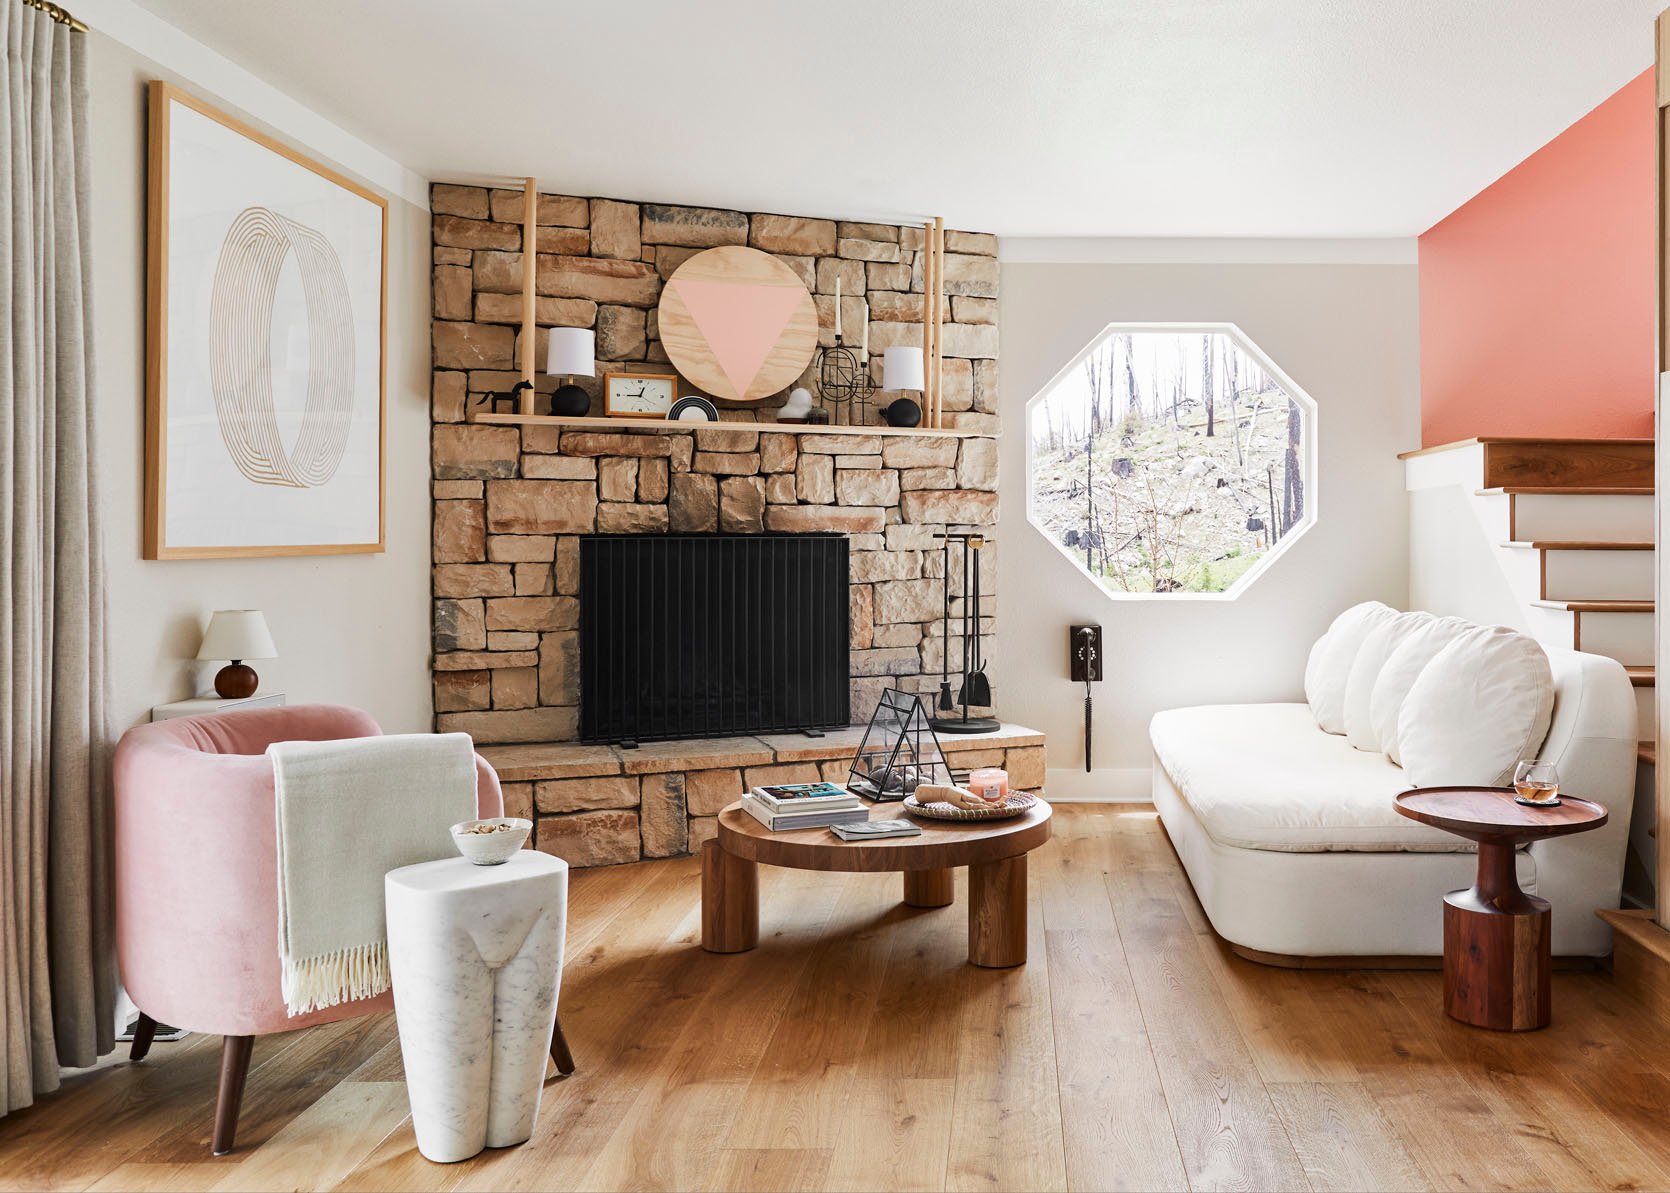
Wood Mantle (DIY!) | Circle Art (DIY!) | Tiny Lamps | Clock (No Longer Available) | Fireplace Screen (No Longer Available) | Fireplace Tools | Pink Chair | White Sofa | Coffee Table | Stone Side Table | Wood Side Table
The Powder Bath
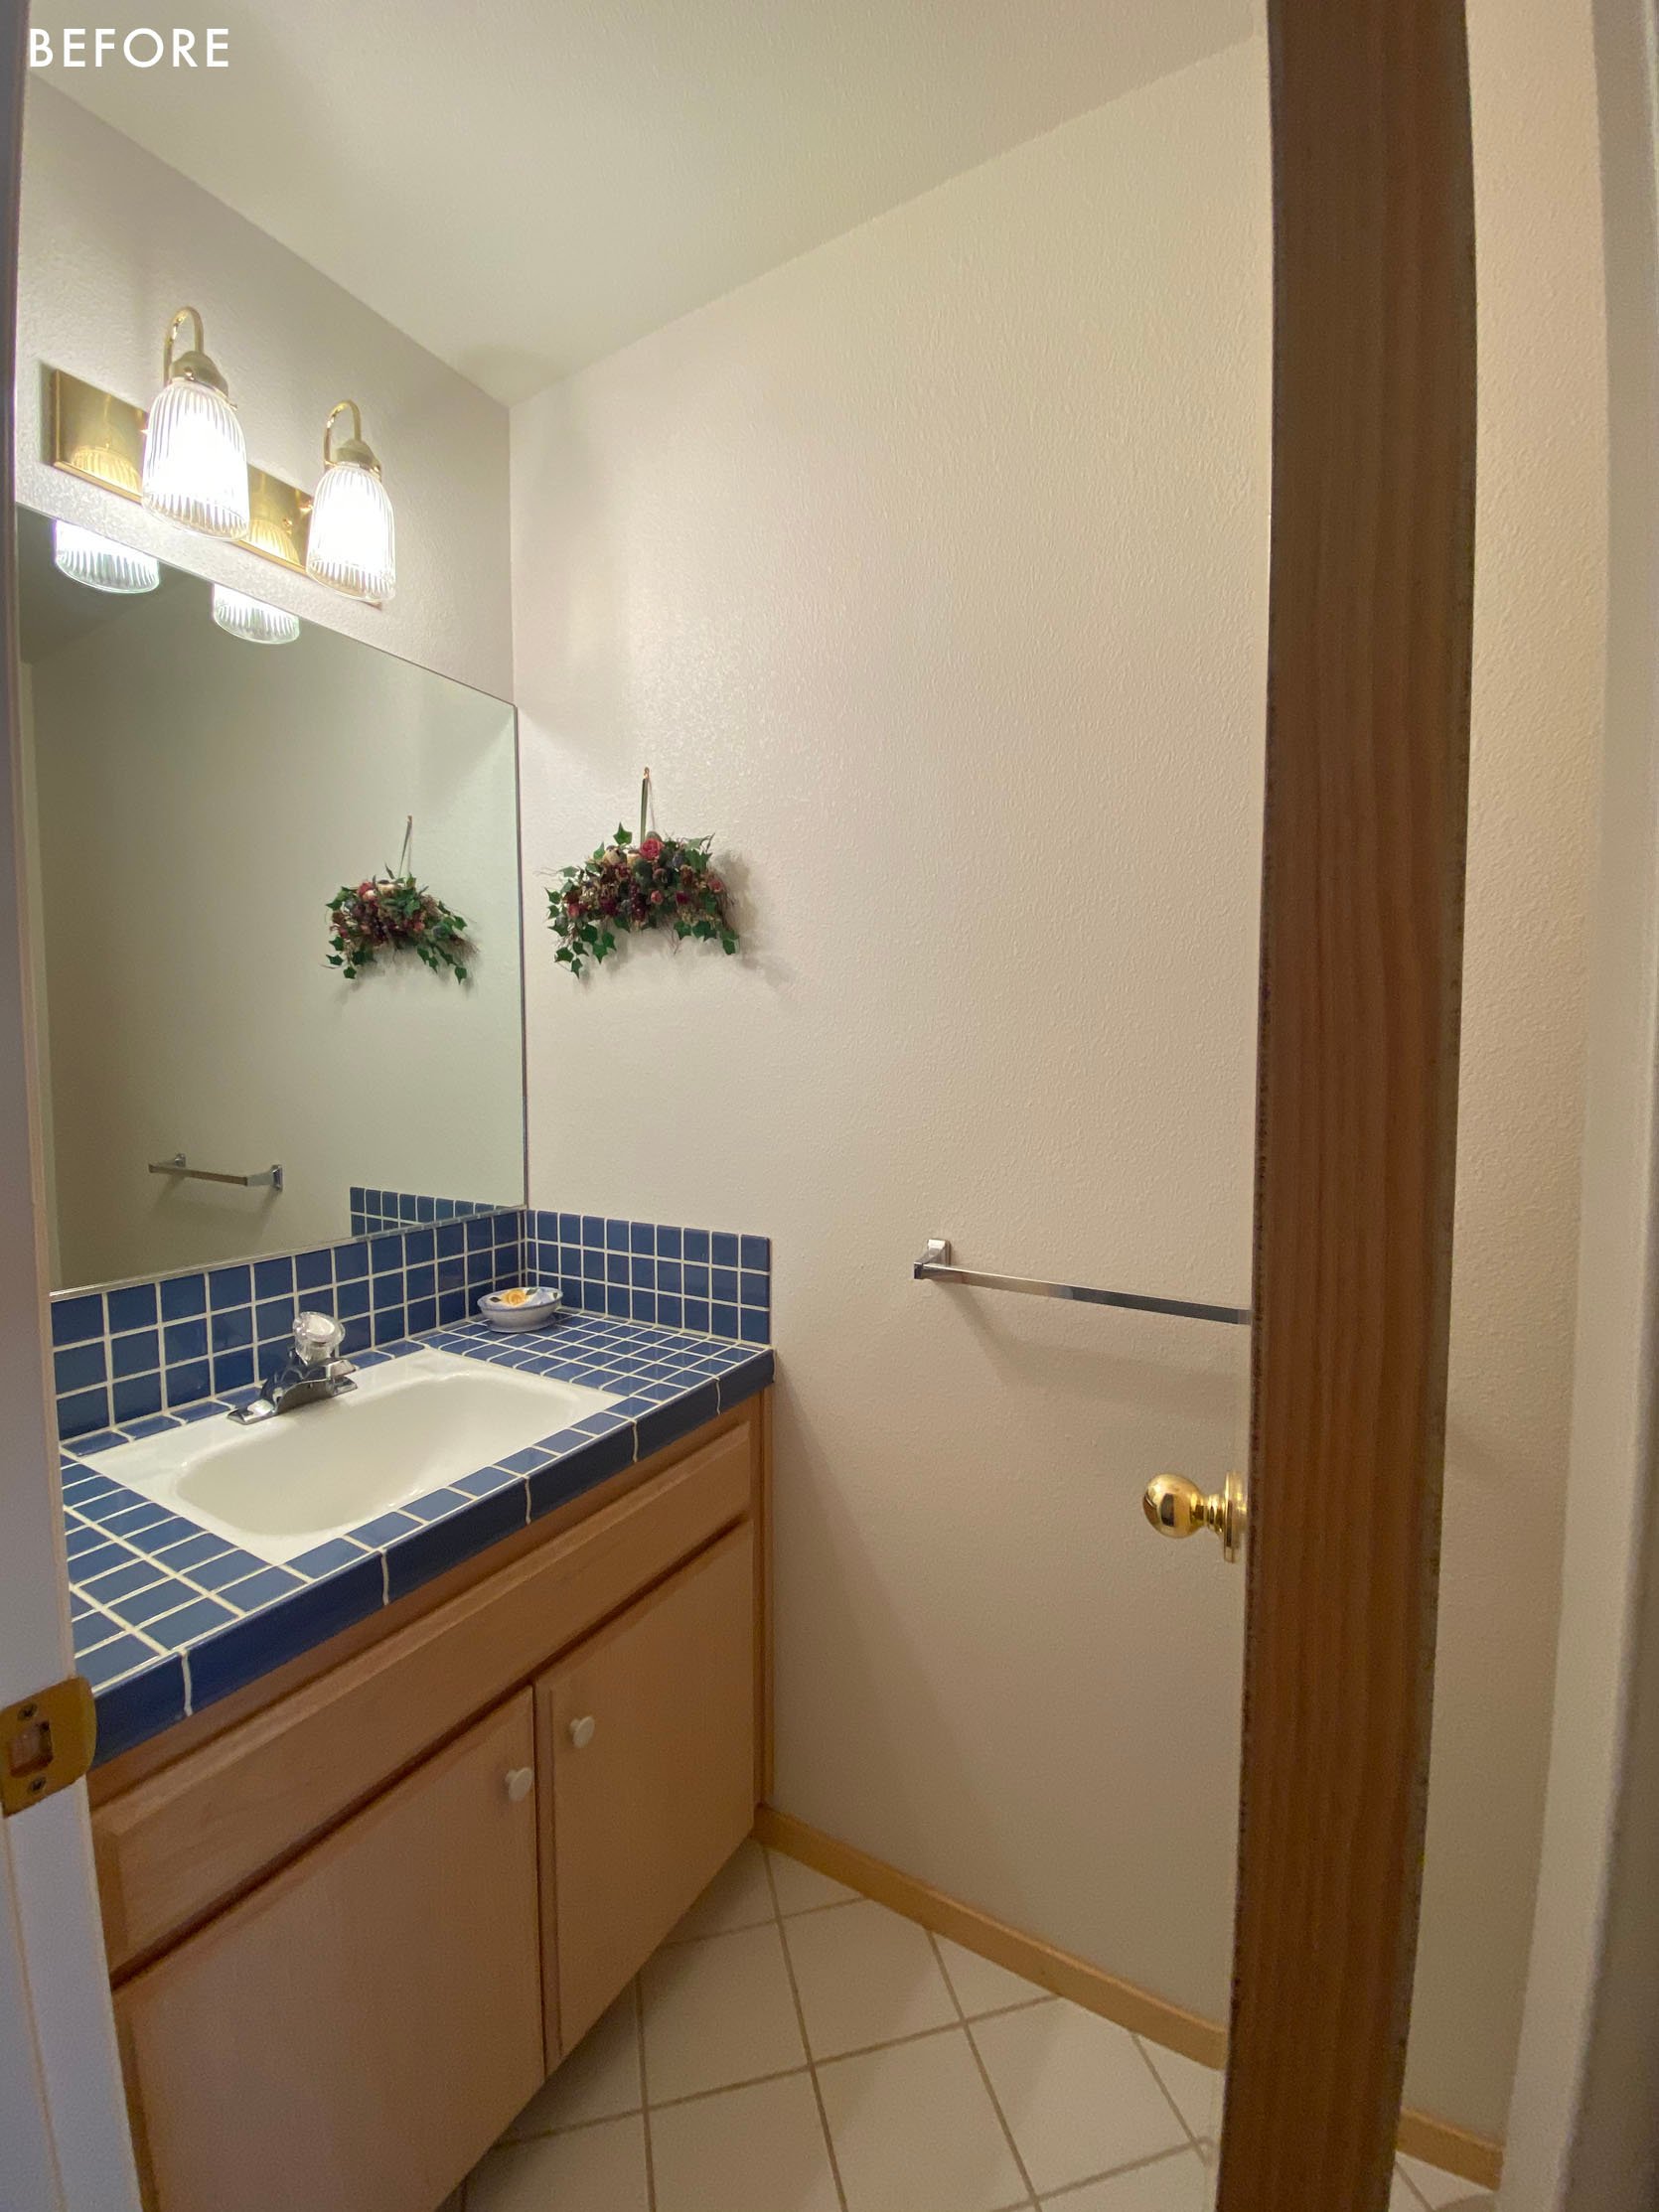
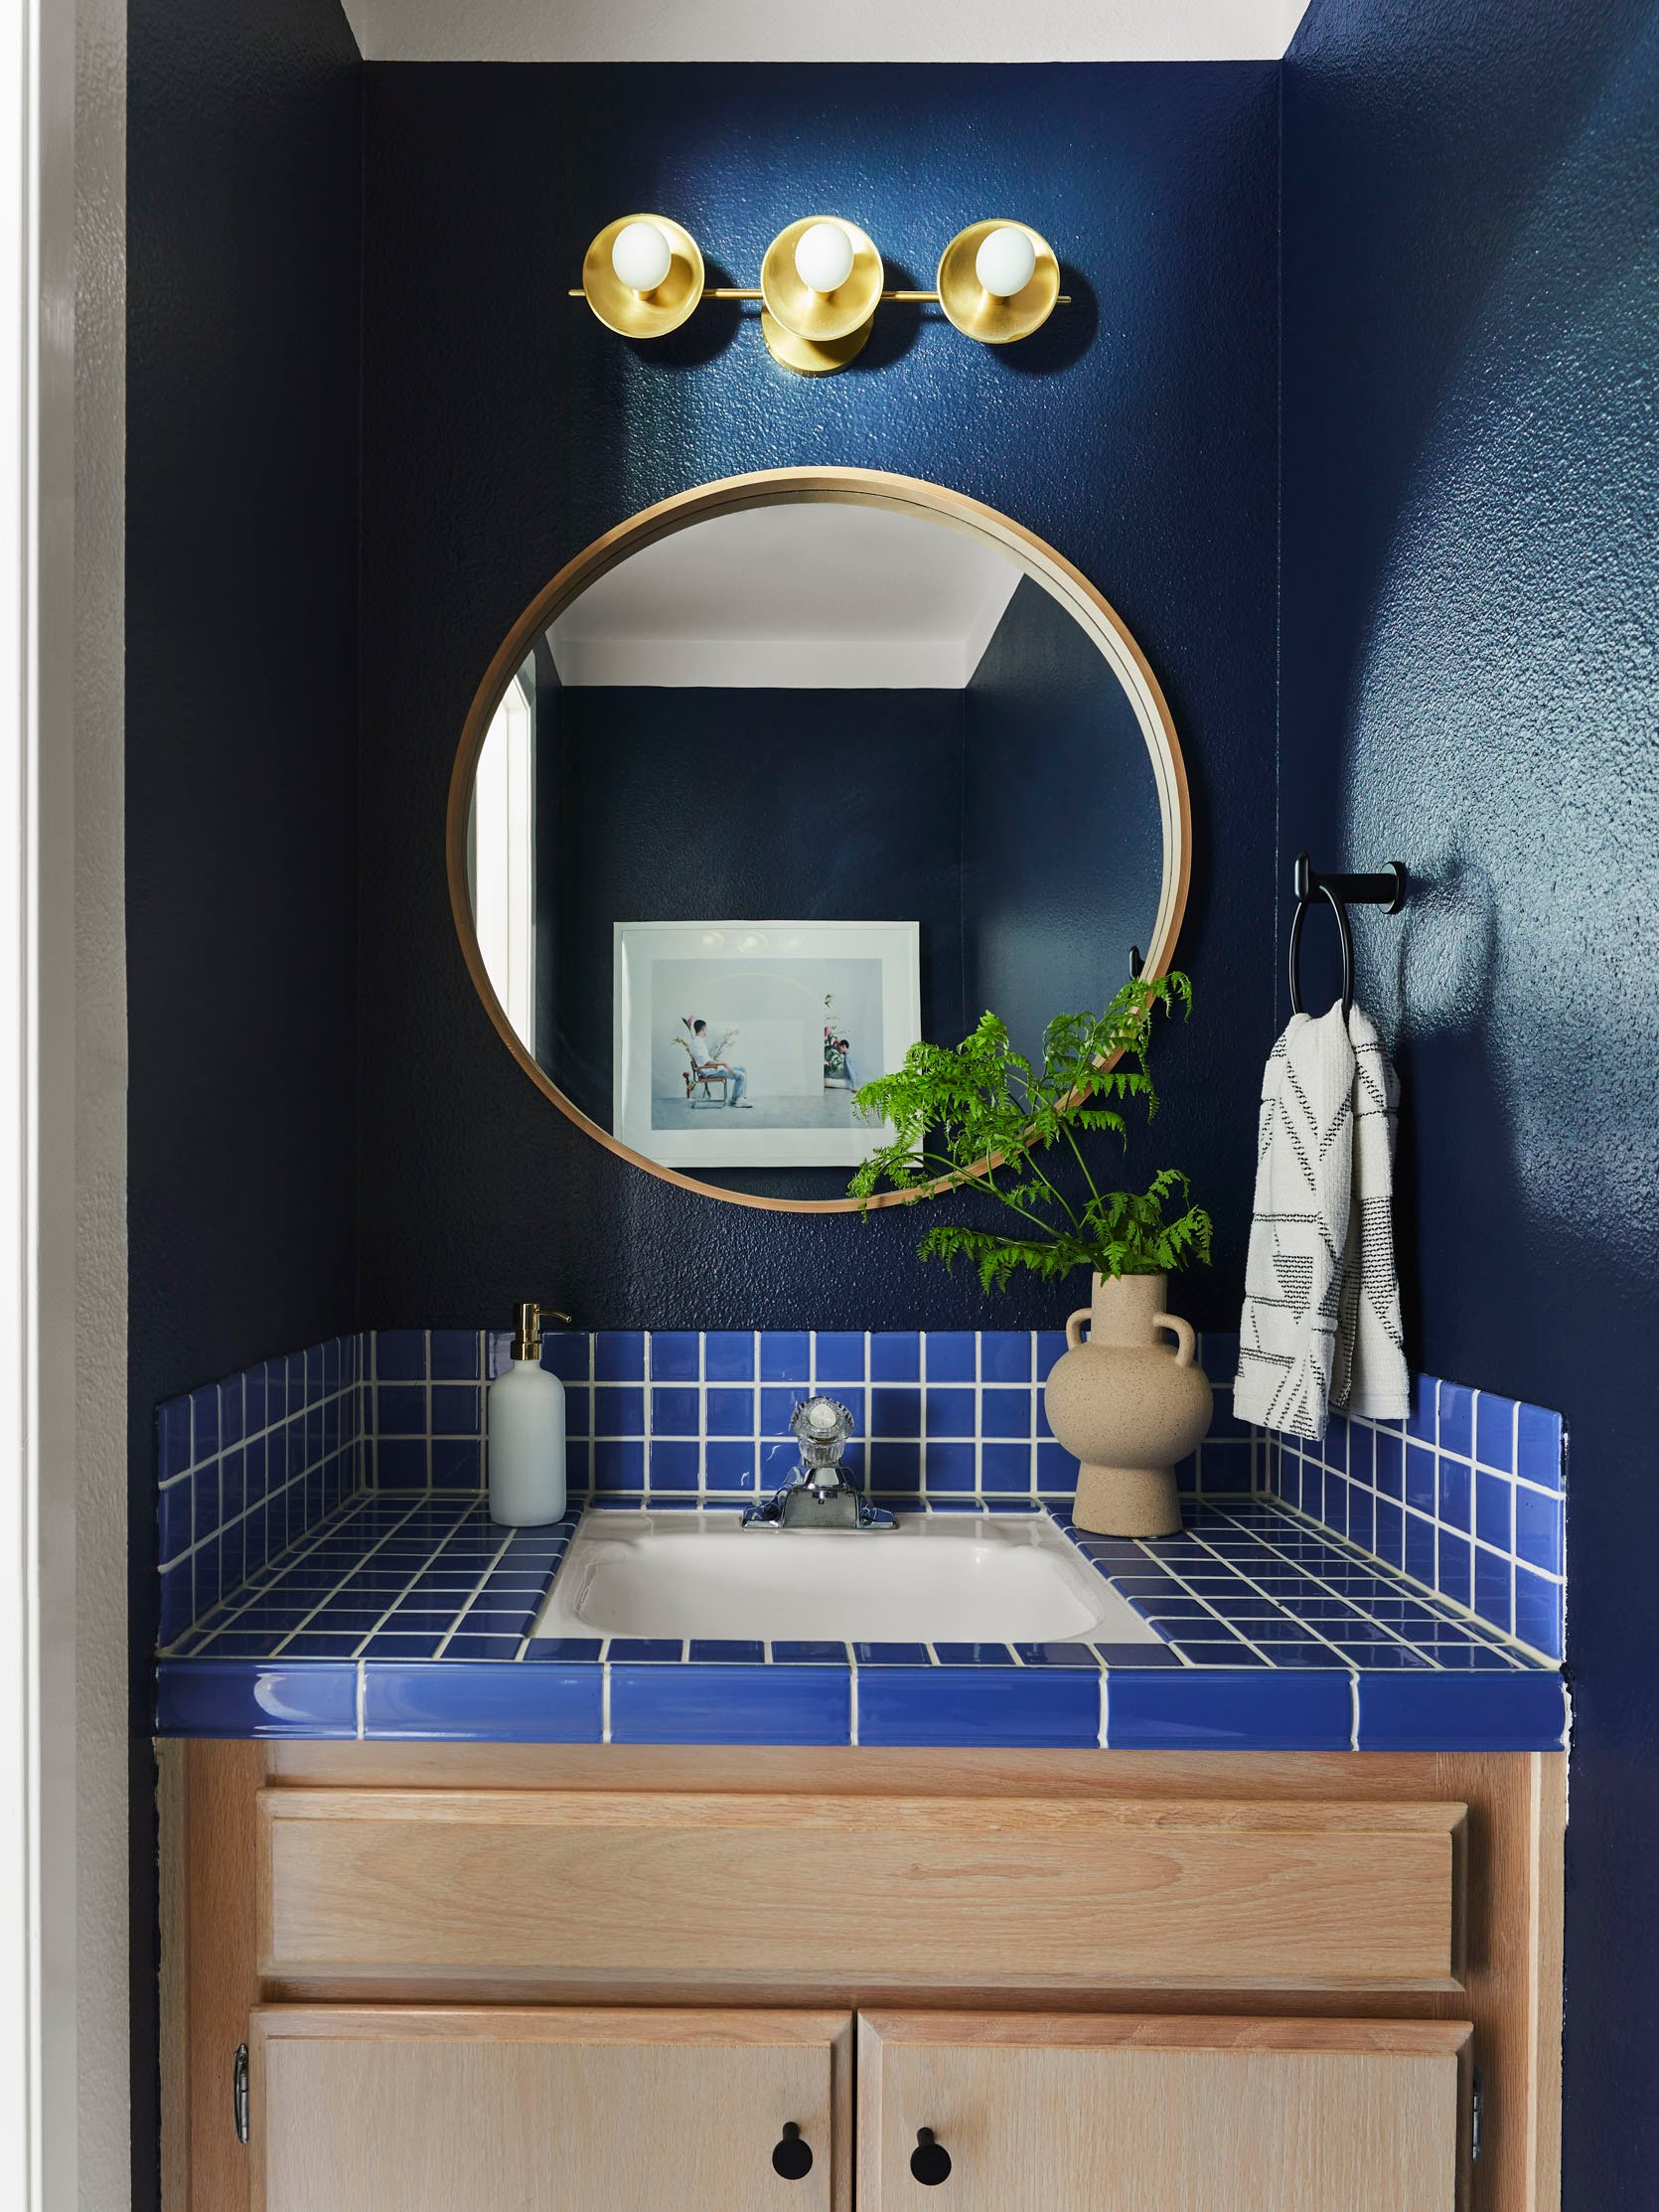
Wall Color | Ceiling Color | Sconce | Mirror | Towel Ring
This house kind of has too many bathrooms. Technically, it has three bedrooms and 3.5 baths. I don’t really know what the purpose of this powder room (right off the guest room I designed for my parents) is since there’s another full bath down the hall. But my plan is to eventually expand it a bit, make it into a full bath, and make it into an en suite for the bedroom it current sits outside. My plan for the house is to create four bedrooms with en suite bathrooms so that people staying all have their own bathroom. That’s kind of excessive but this is my dream home. And also for vacation rentals, no one wants to share a bathroom, and having your own is a lot more private and luxe.
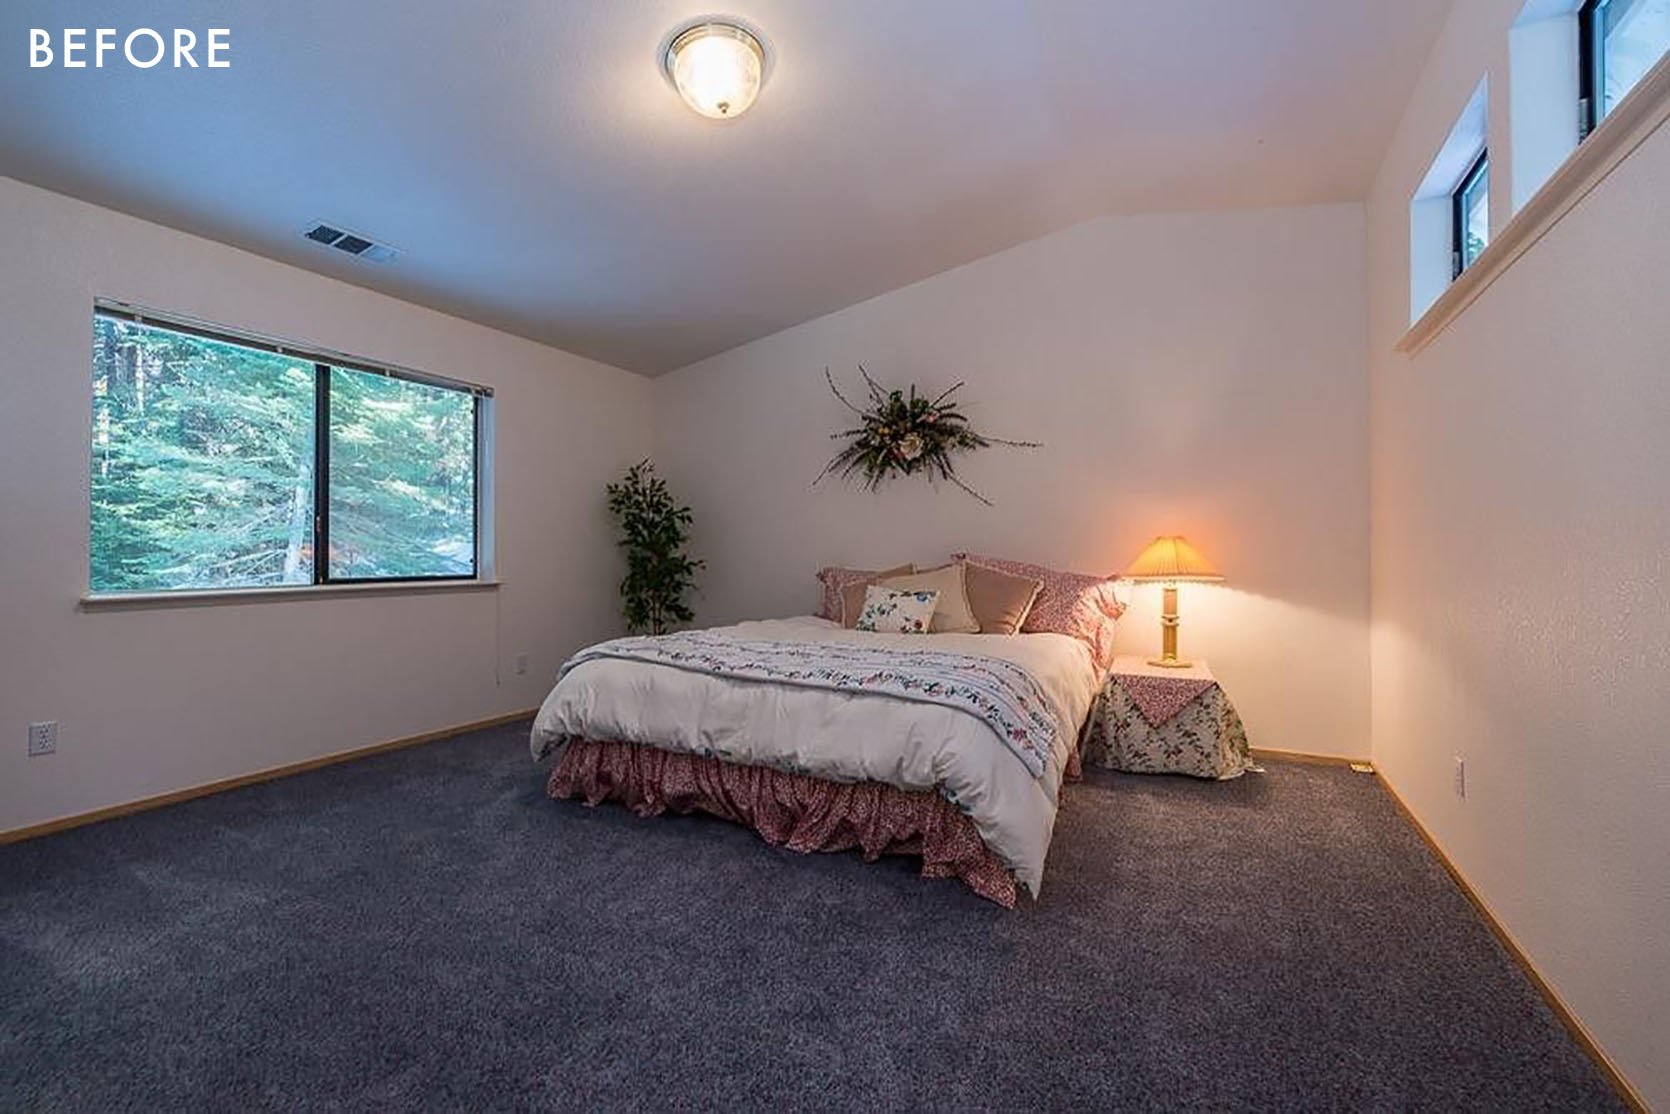
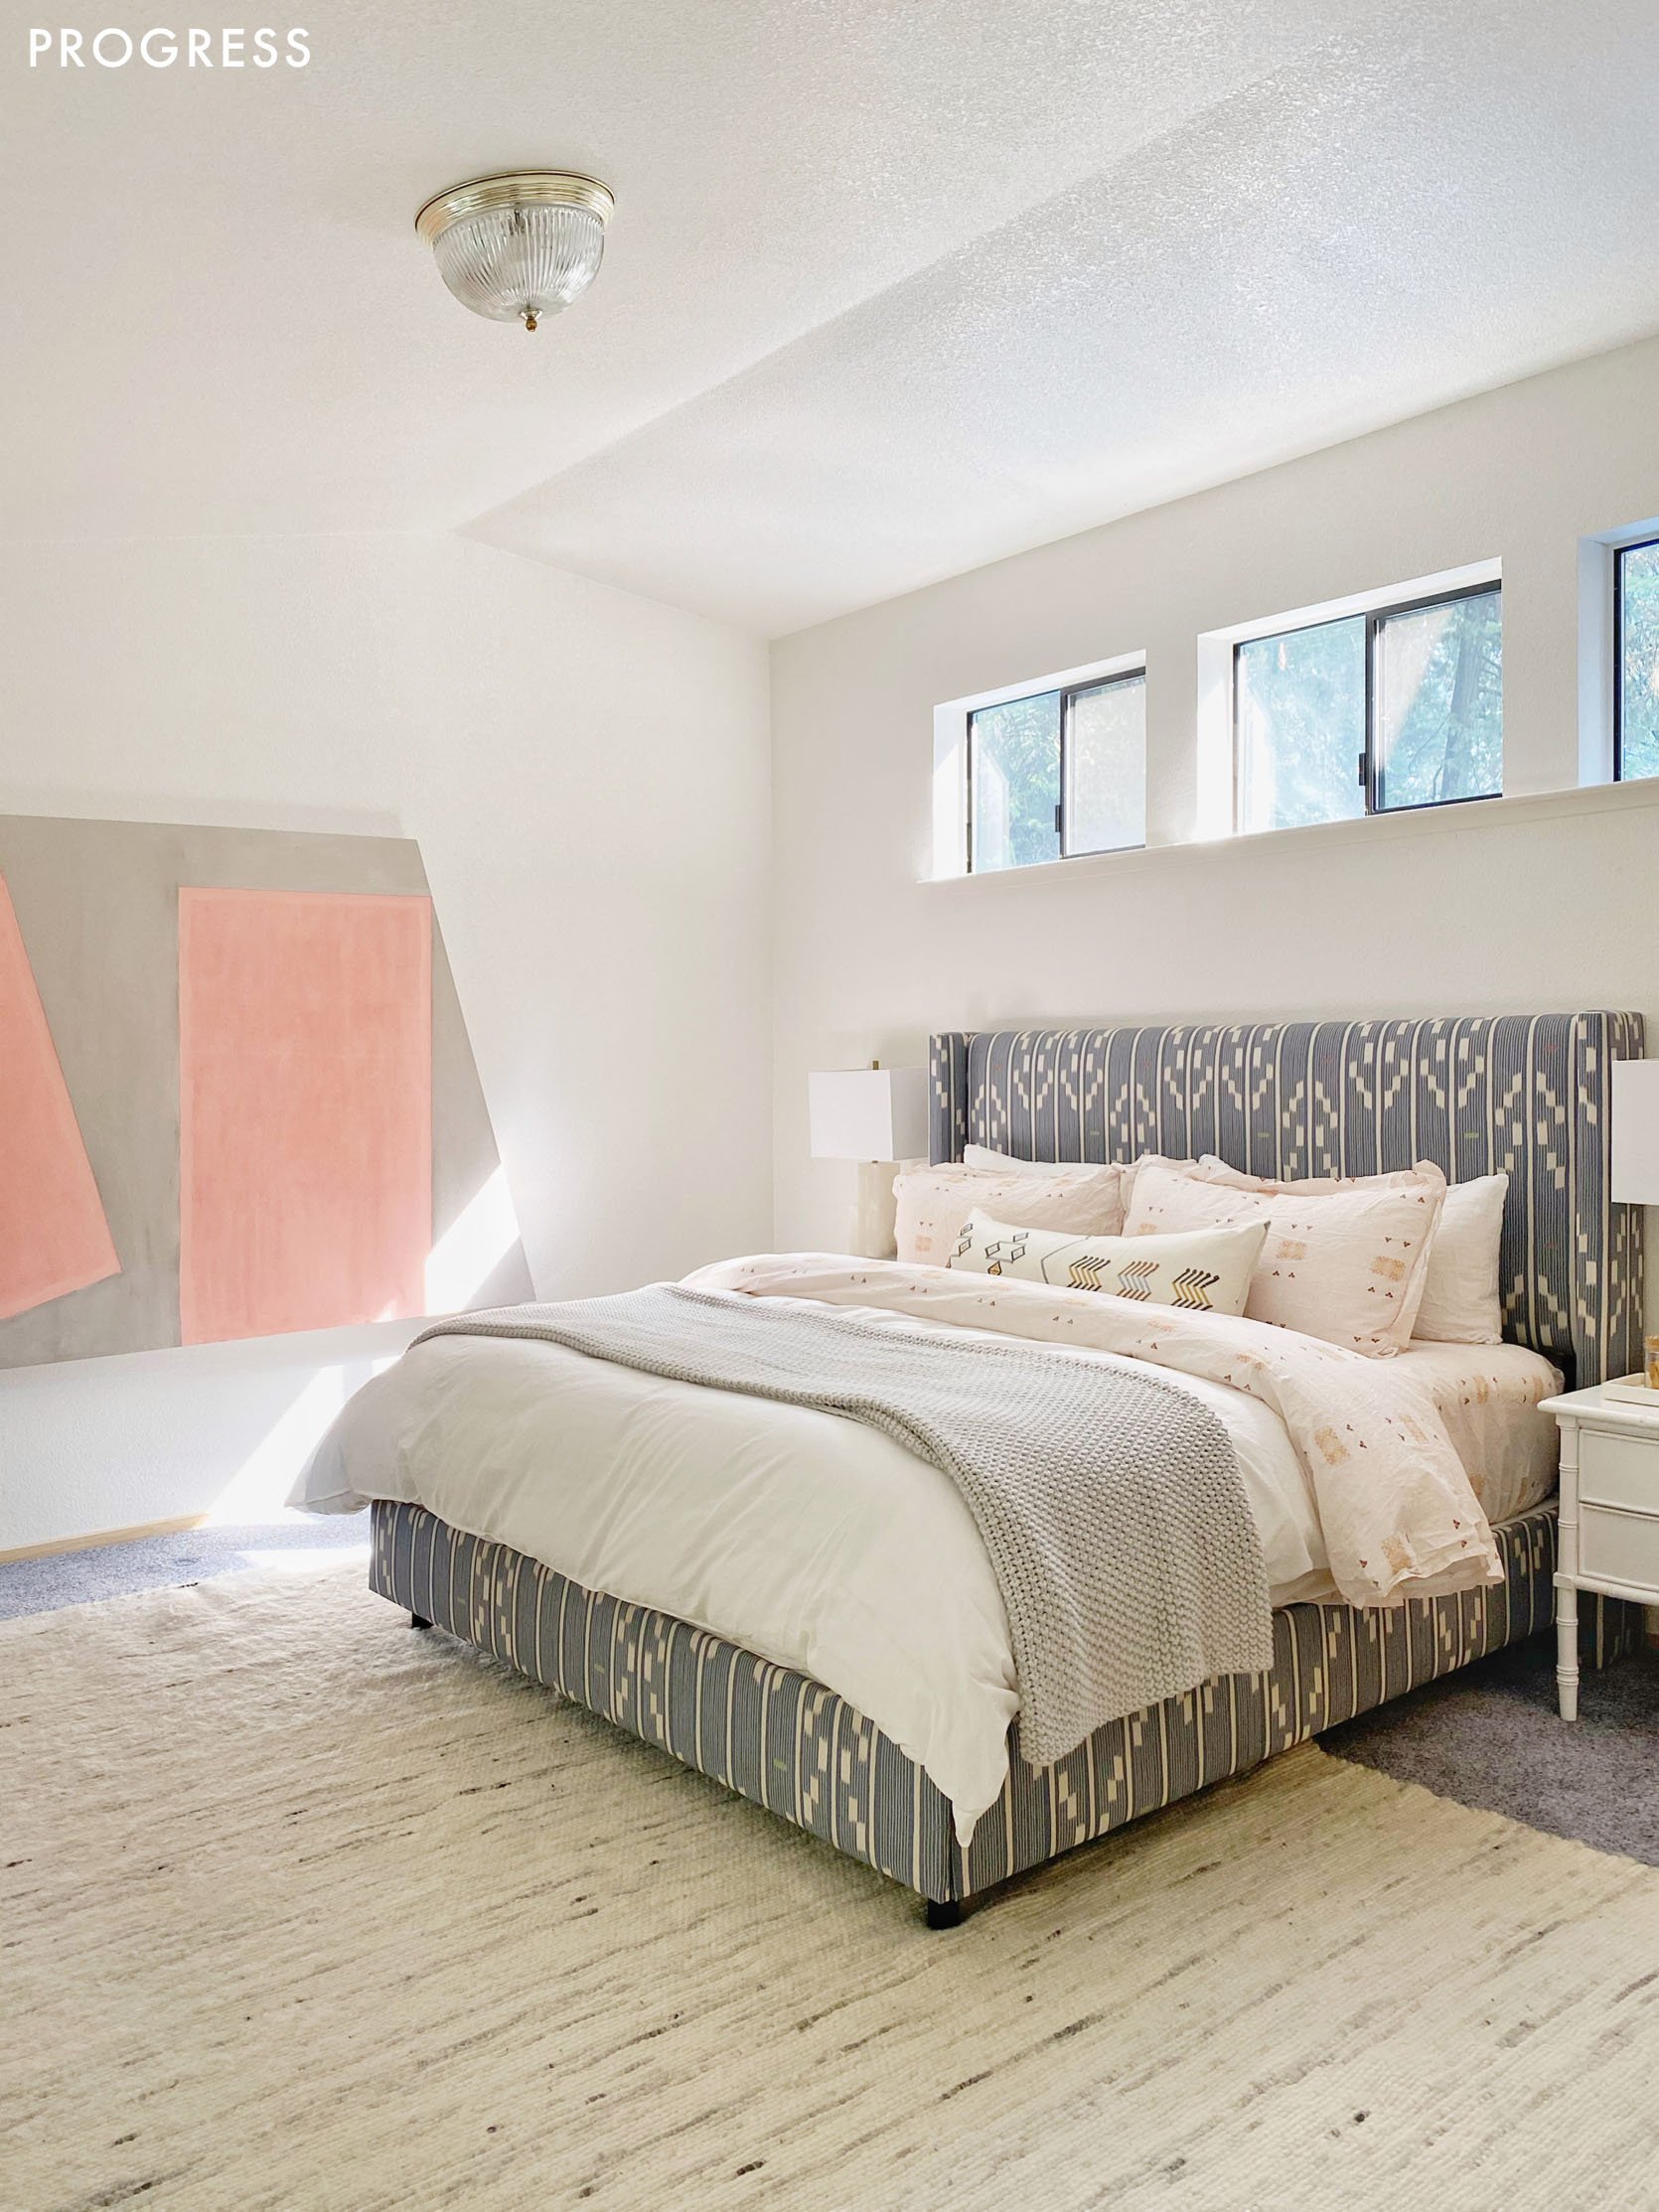
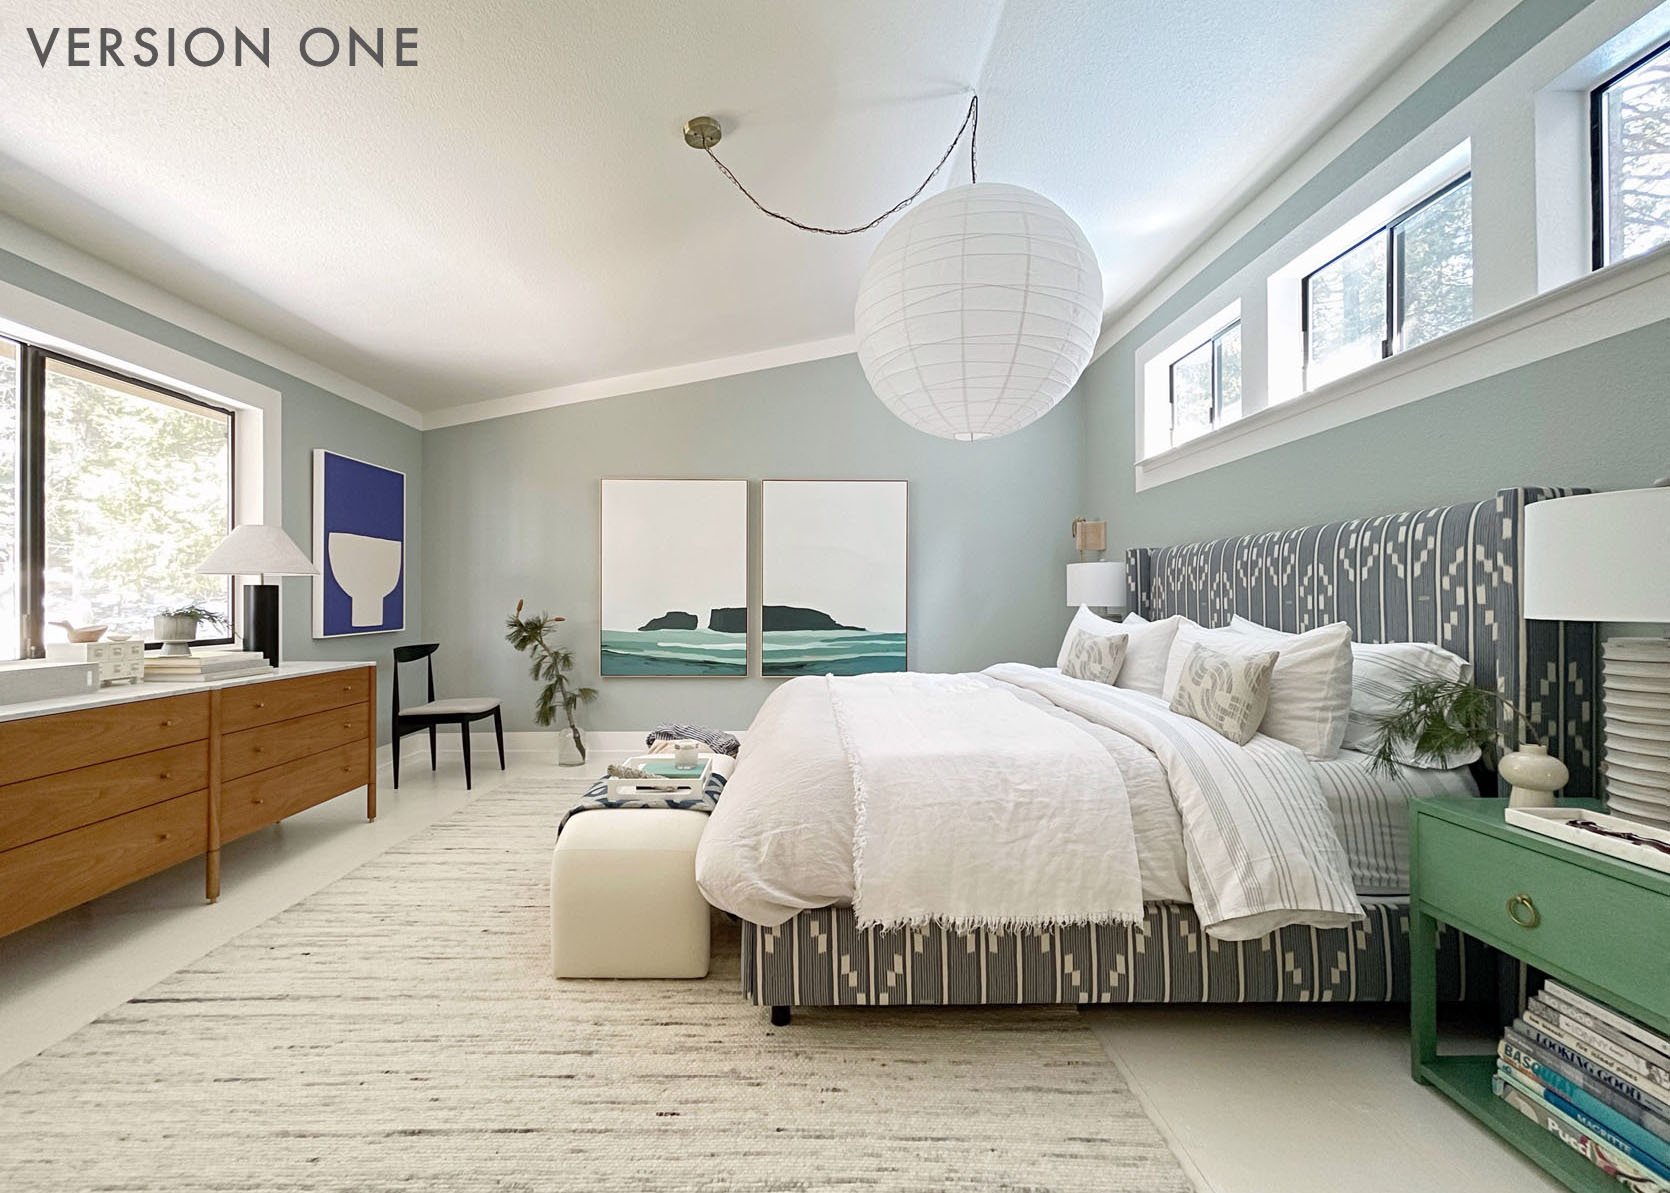
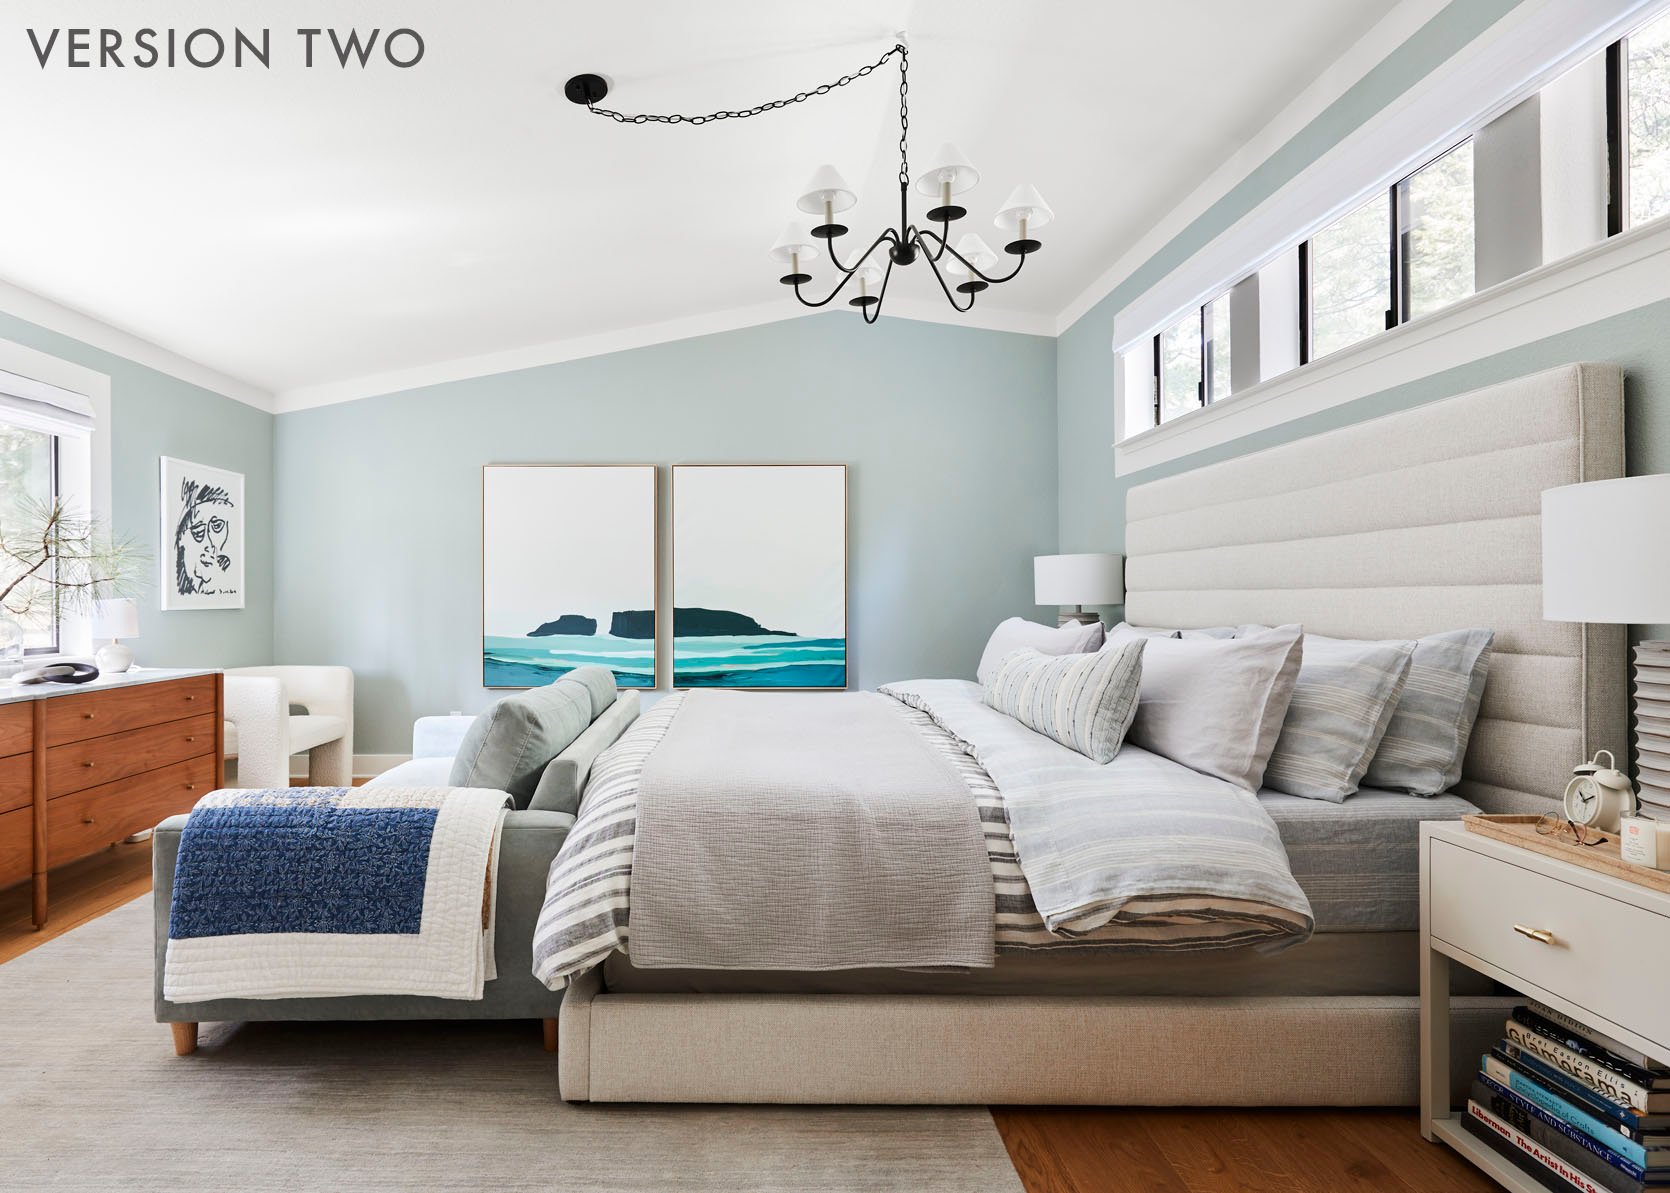
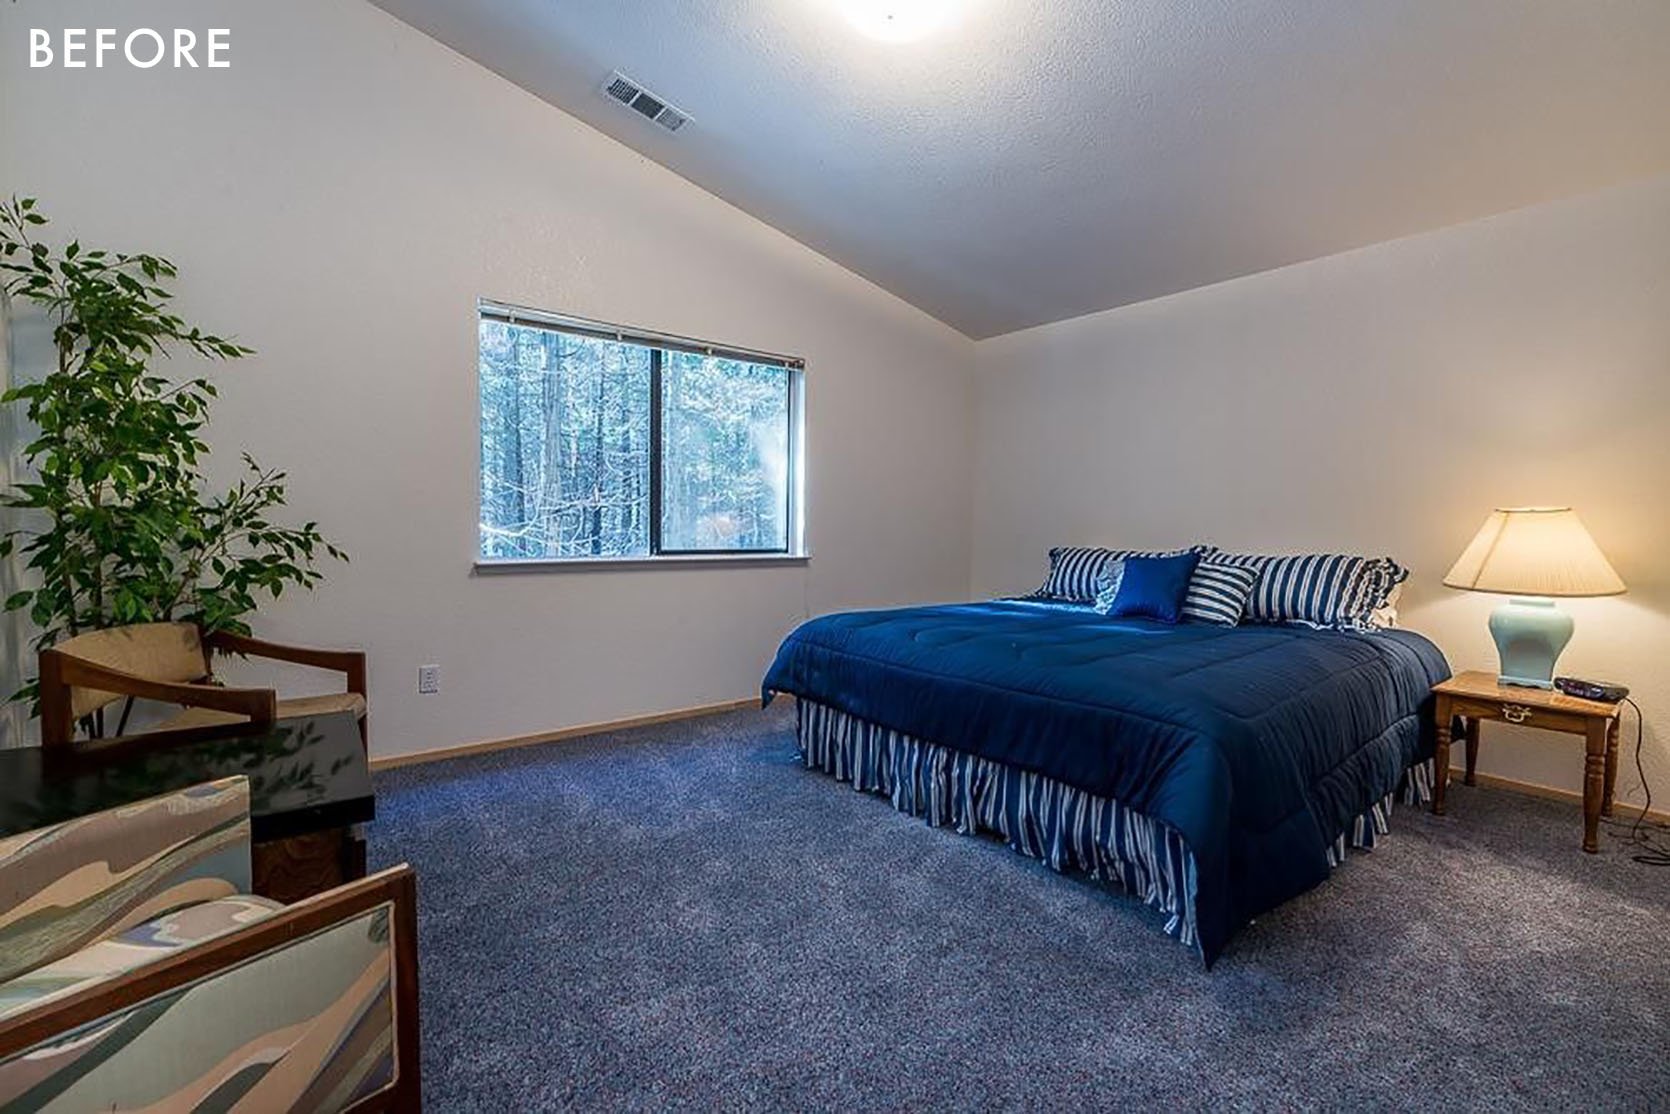
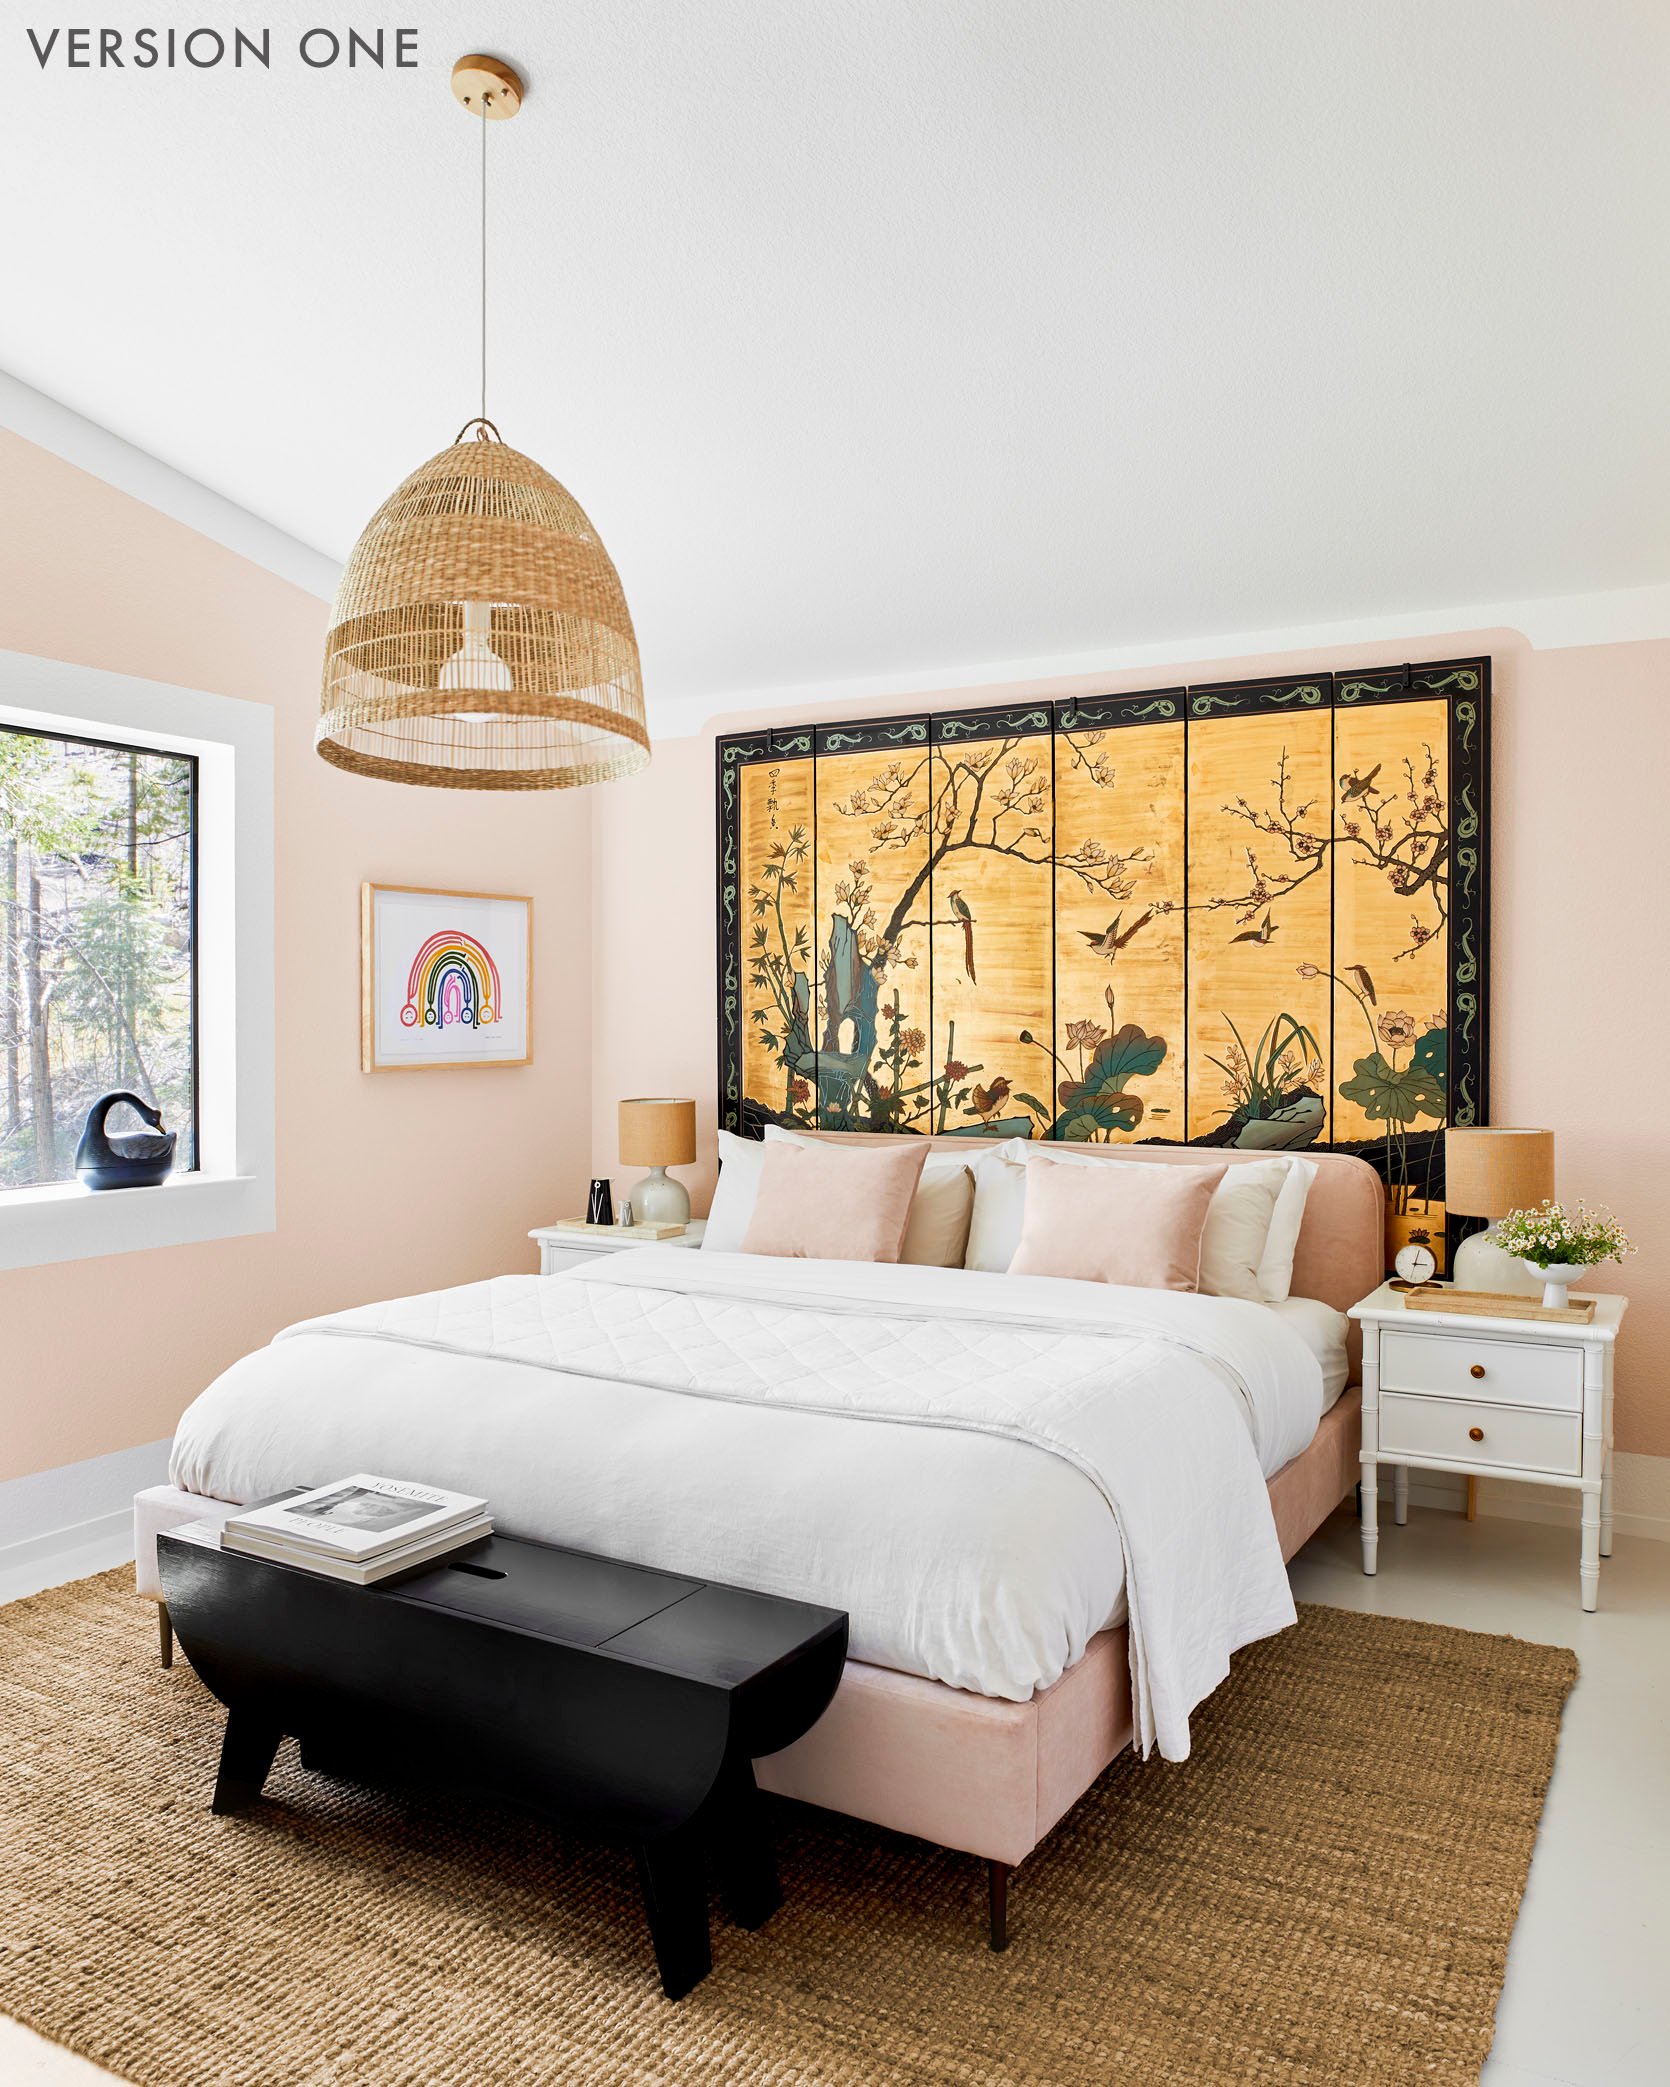
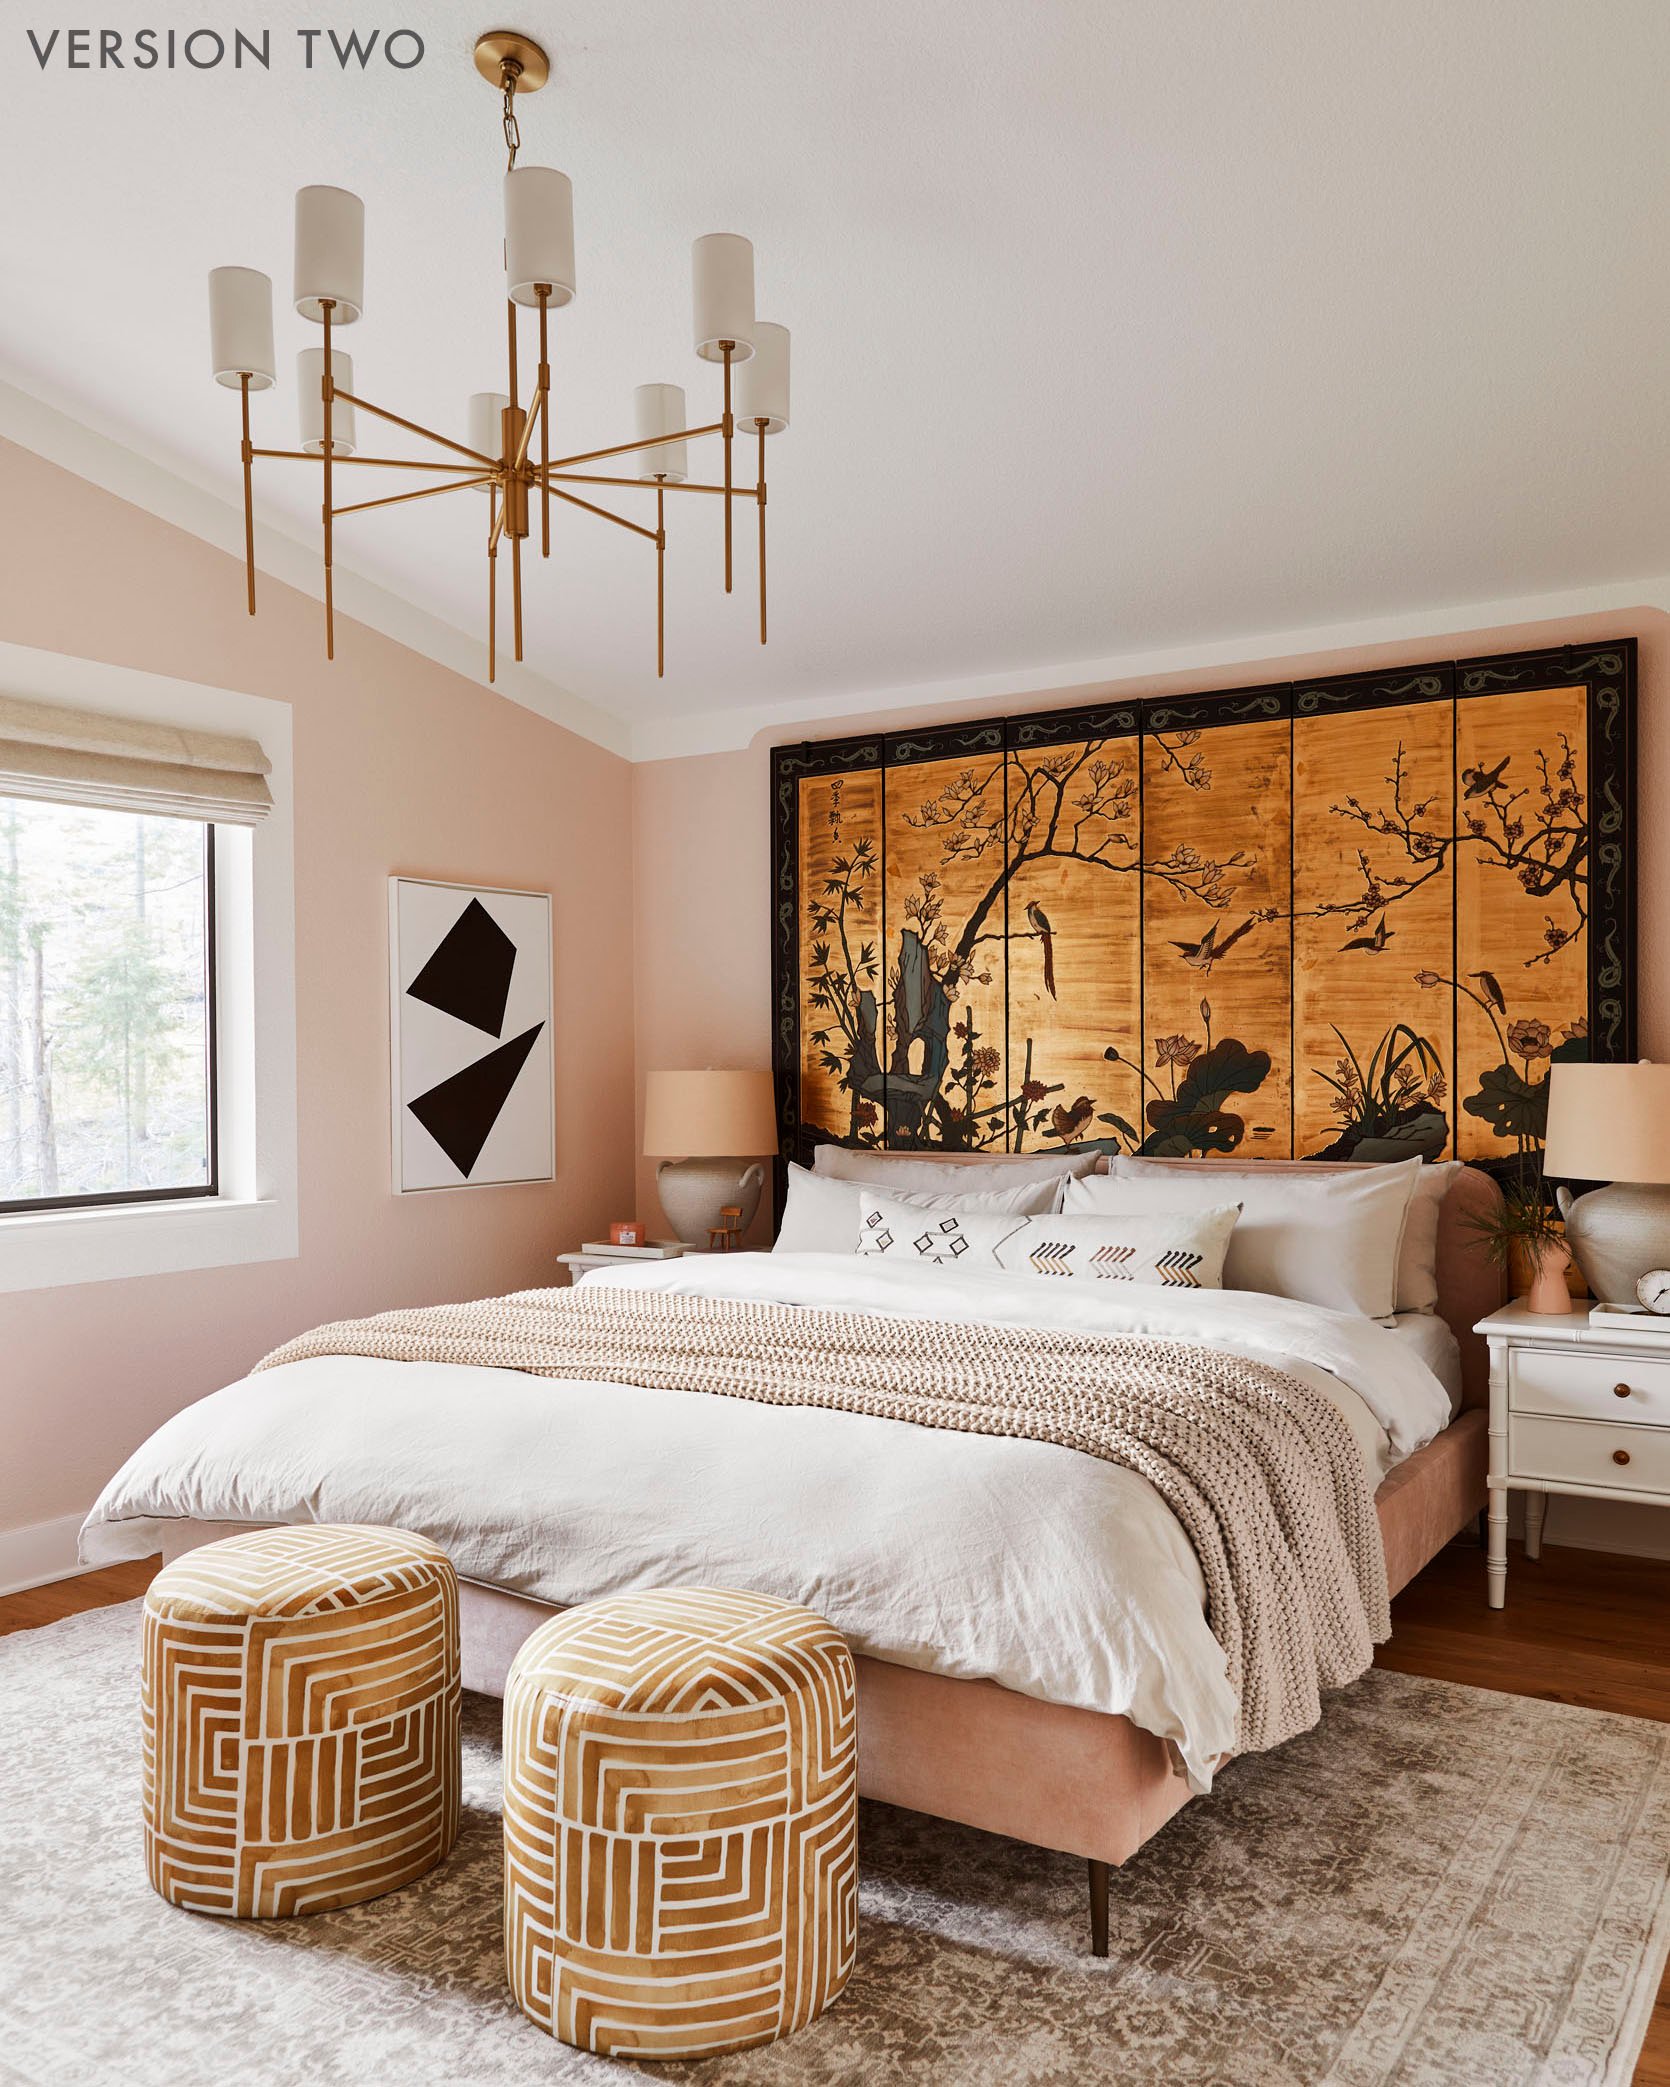
The Primary Bedroom
Patterned Bed | Sheets | Knit Blanket | Lumbar Pillow (No Longer Available) | Nightstands | Table Lamps | Painting by ME! | Rug
Wall Color | Ceiling Color | Cream Table Lamps | Art (Left) | Art (Right) | Dresser
Version One: Patterned Bed | Throw Pillow Fabric | Duvet Cover | Blanket (no longer available) | Sheets (from Target no longer available) | Nightstand | Marble Tray (on nightstand) | White Vase (no longer available) | Bench | Rug | Paper Lantern | Light Kit | Black Table Lamps | Cobalt Blue Art | Chair (similar)
Version Two: White Bed | Sheets and Duvet | Nightstand (painted beige) | Chandelier | Rug | Boucle Chair | Quilt on Sofa
My bedroom has undergone more makeovers than I even remember at this point. When I moved in, I brought my bed from The Inside from my LA apartment. I loved that bed, but I found it hard to style because of the pattern. Basically, when you have a patterned bed all your bedding has to be solid or it turns into pattern chaos. I’m not a maximalist when it comes to pattern so I missed being able to put pretty textiles on my bed. This is why I replaced it with this gorgeous bed from Jonathan Louis Design Lab. I added a sofa to the end of the bed because I think it’s really luxurious to have the space for that. No one ever sits in it, but it’s nice to know it’s there.
The bedroom has actually evolved since these photos were taken and I now have a really pretty four-poster bed in here. If you’re wondering what happens to all the furniture when I’m done with it, I give it away to people in my town. I know it can seem wasteful to people when they see influencers getting new stuff all the time, but I love it because it allows me to give beautiful things away while they’re still in perfect condition. Which in turn is helping me help people make their homes beautiful. So don’t worry, I’m not wasting this stuff! It’s all going to good homes for free!
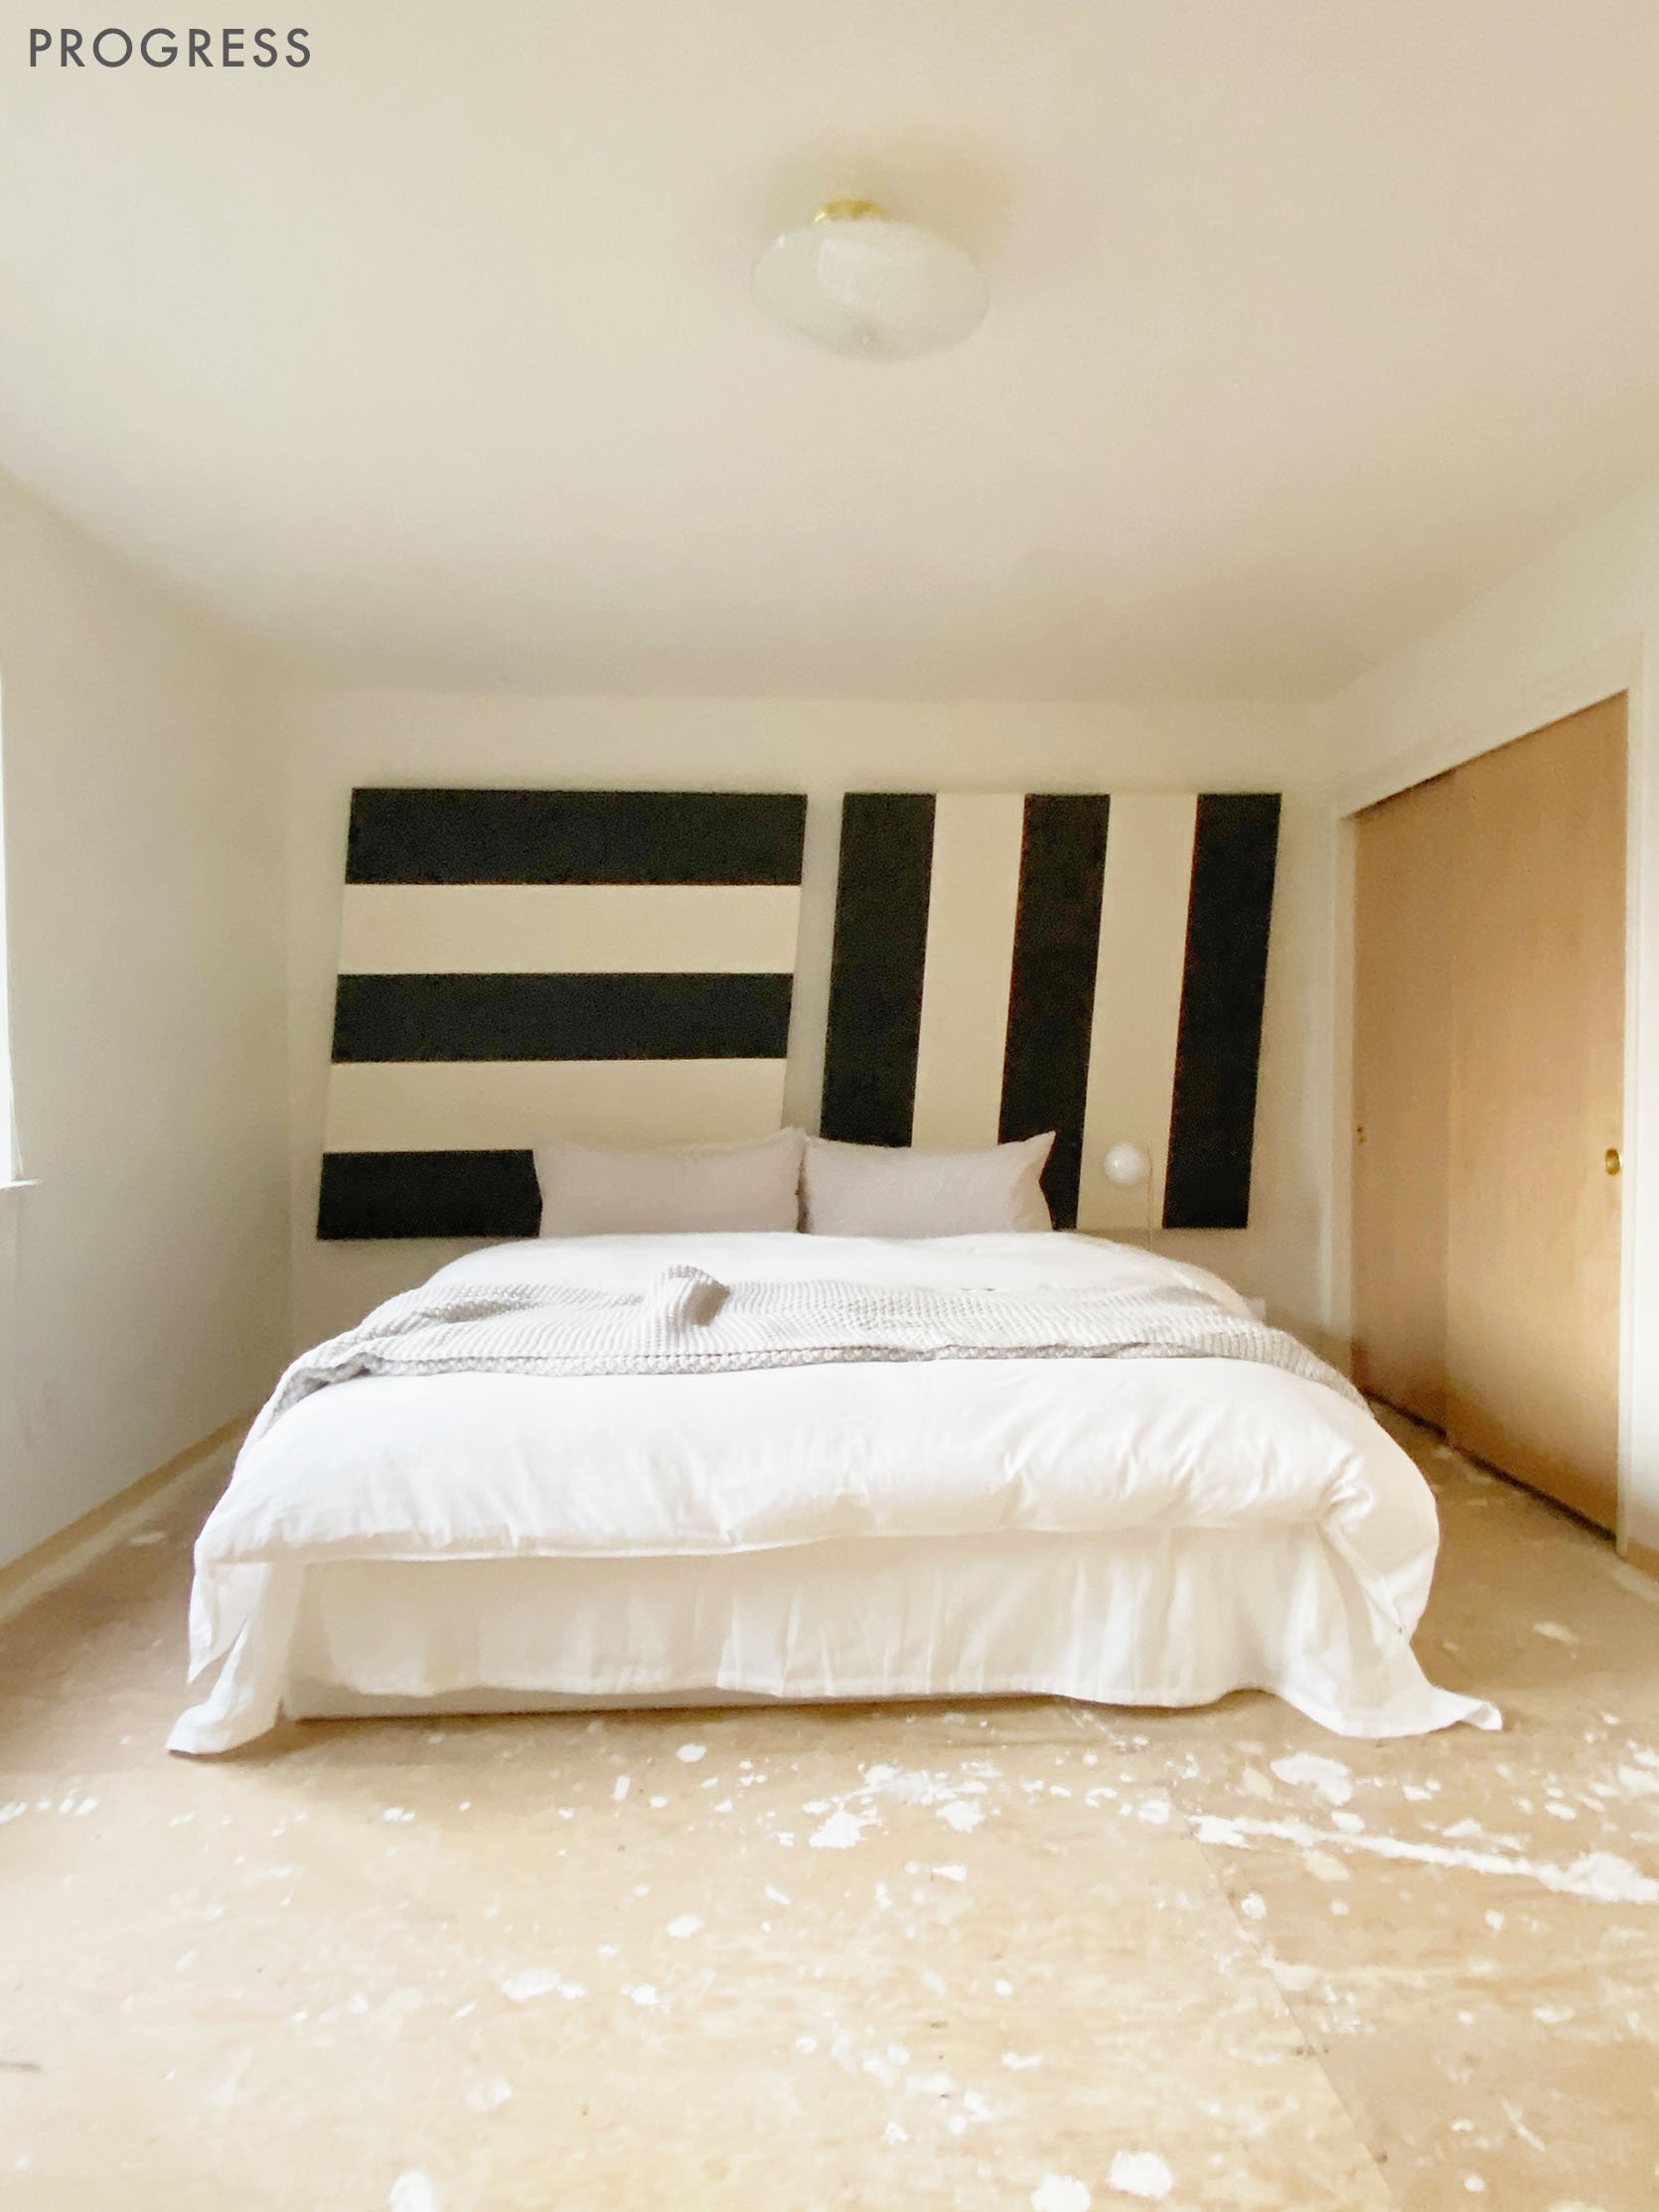
Guestroom #1/ My Parents’ Bedroom
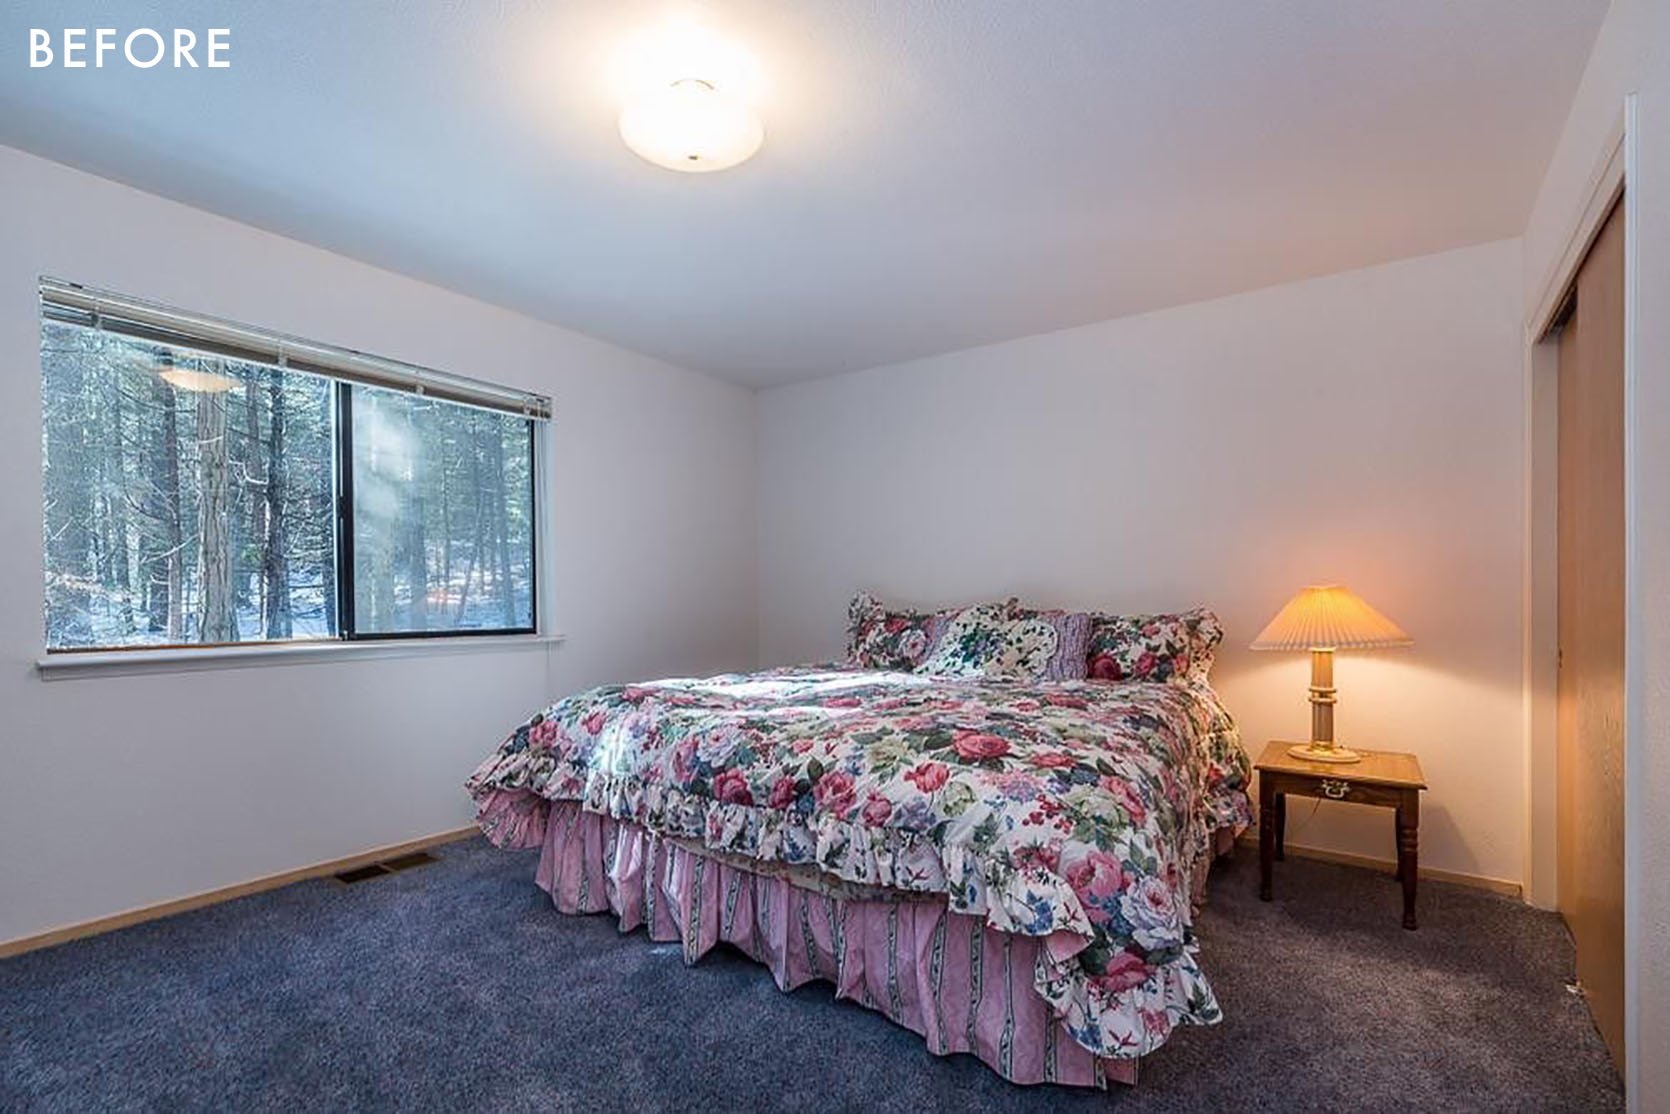
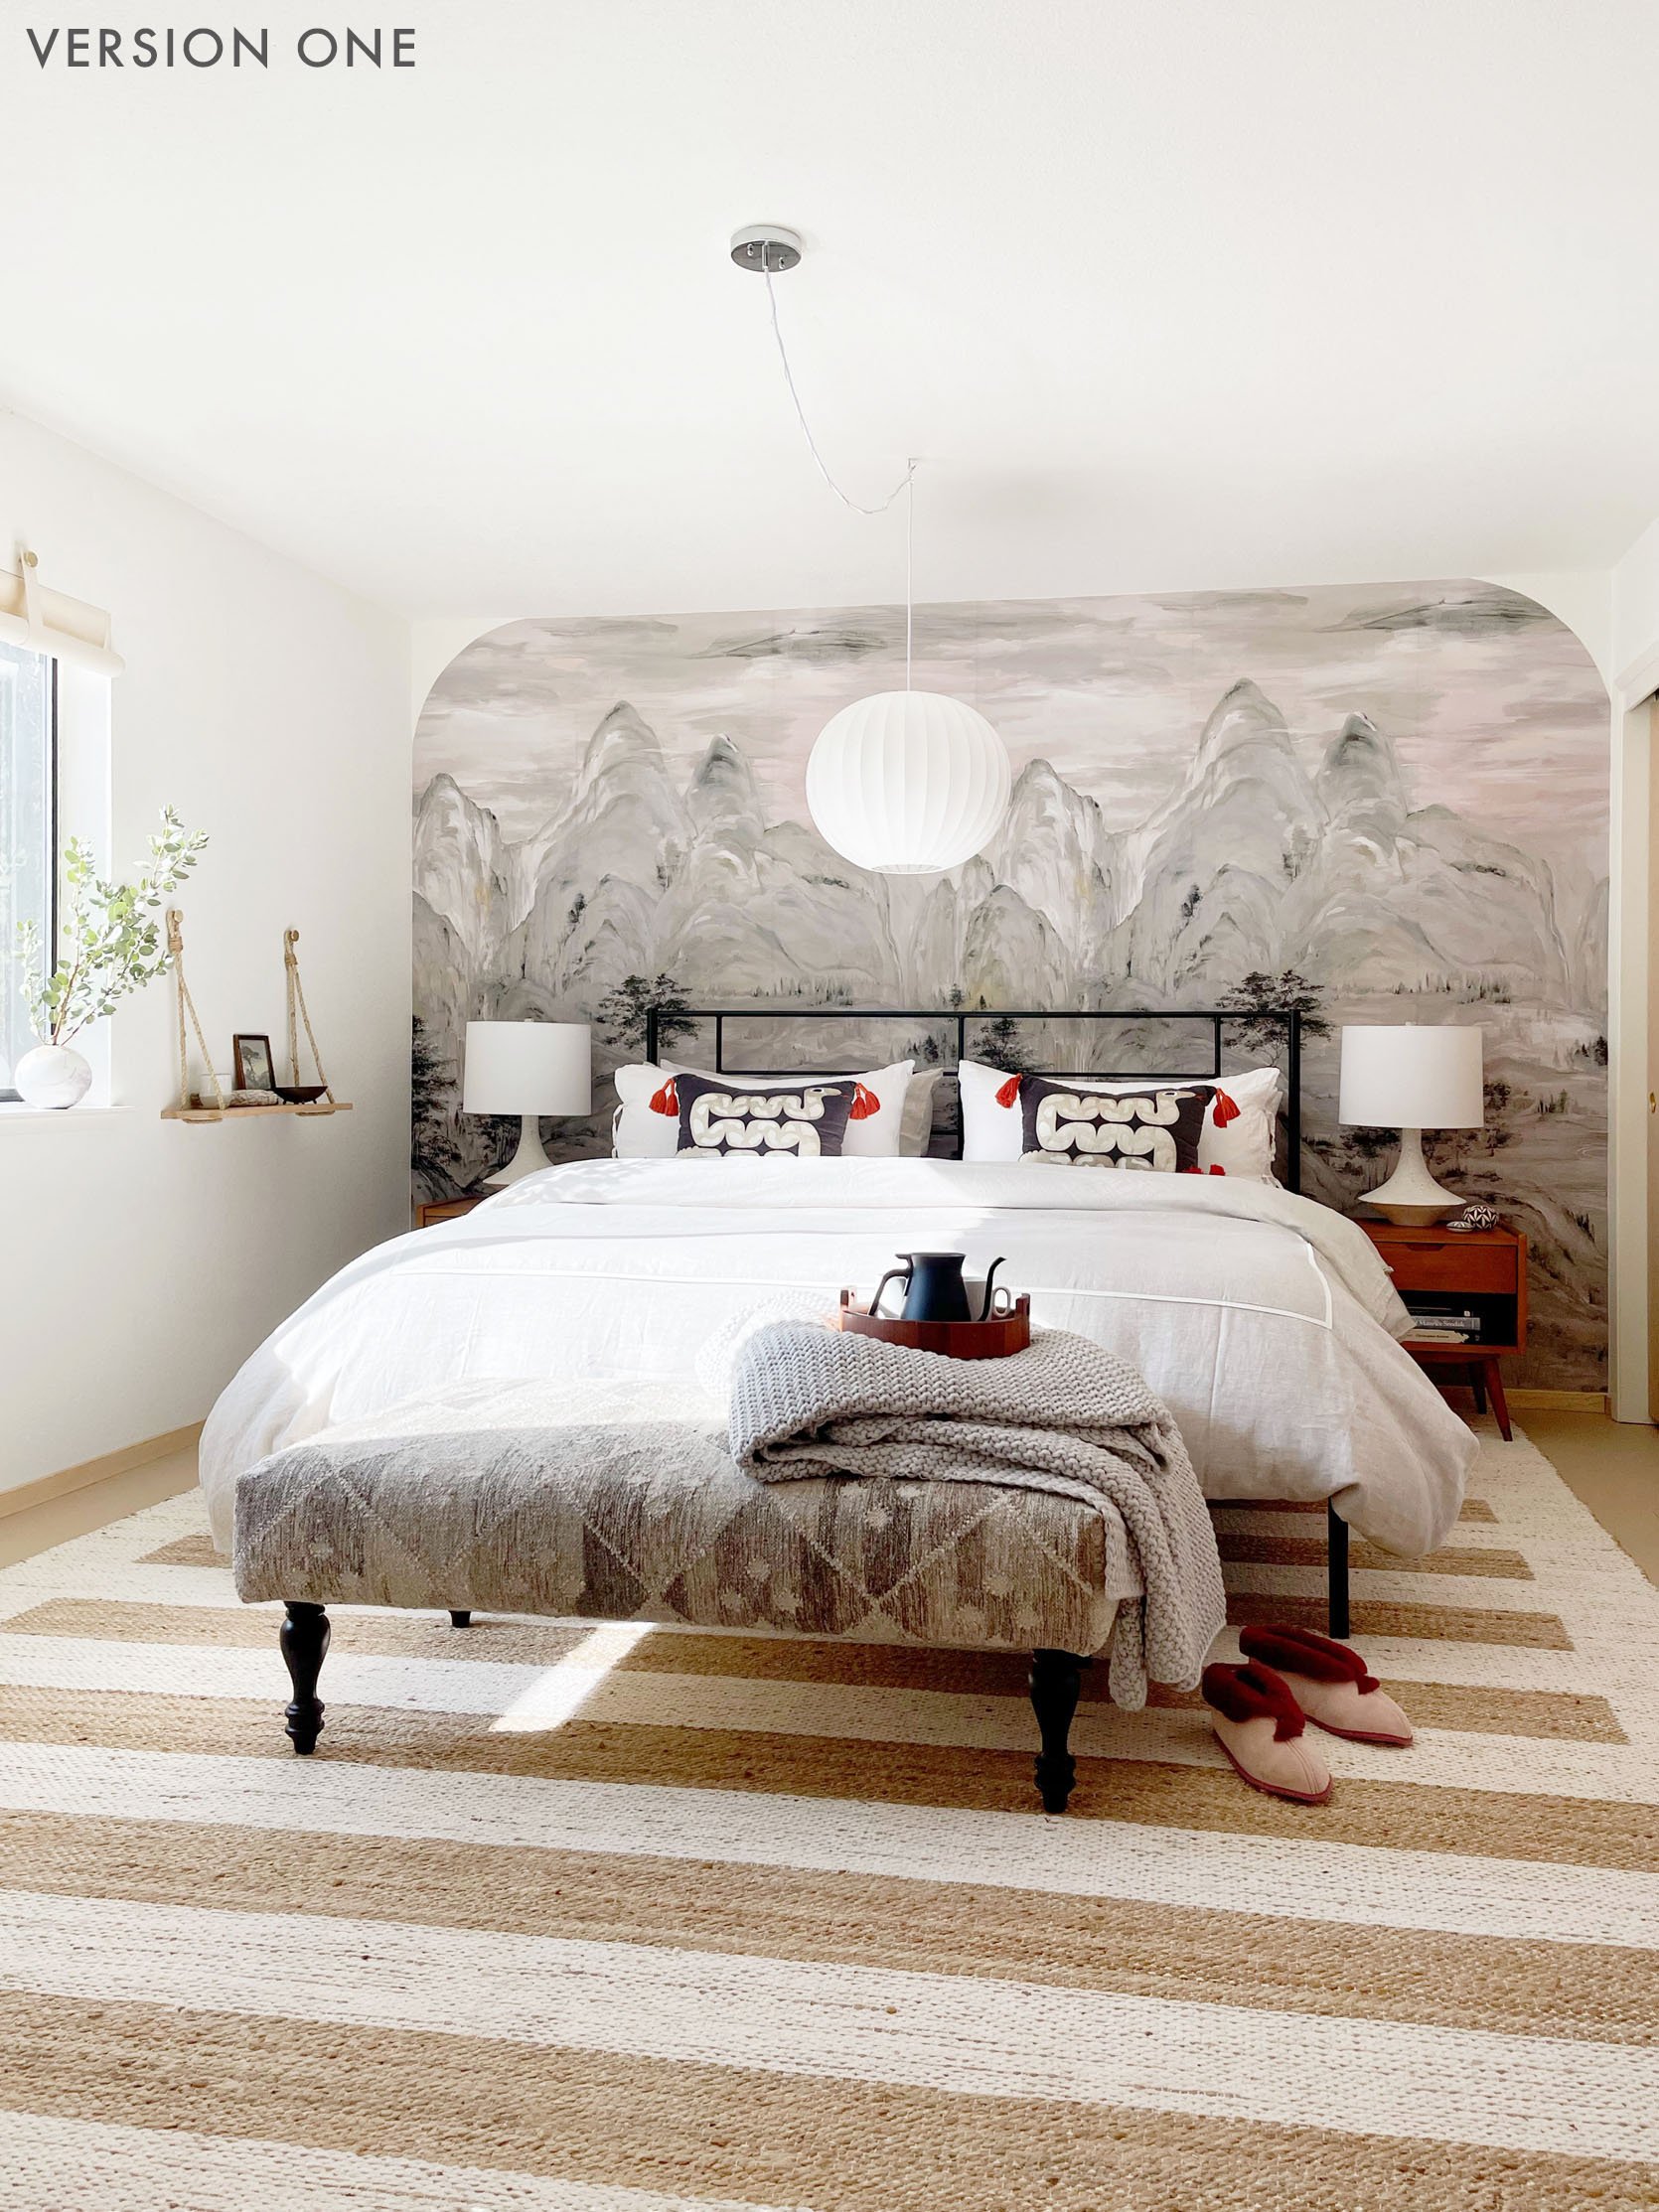
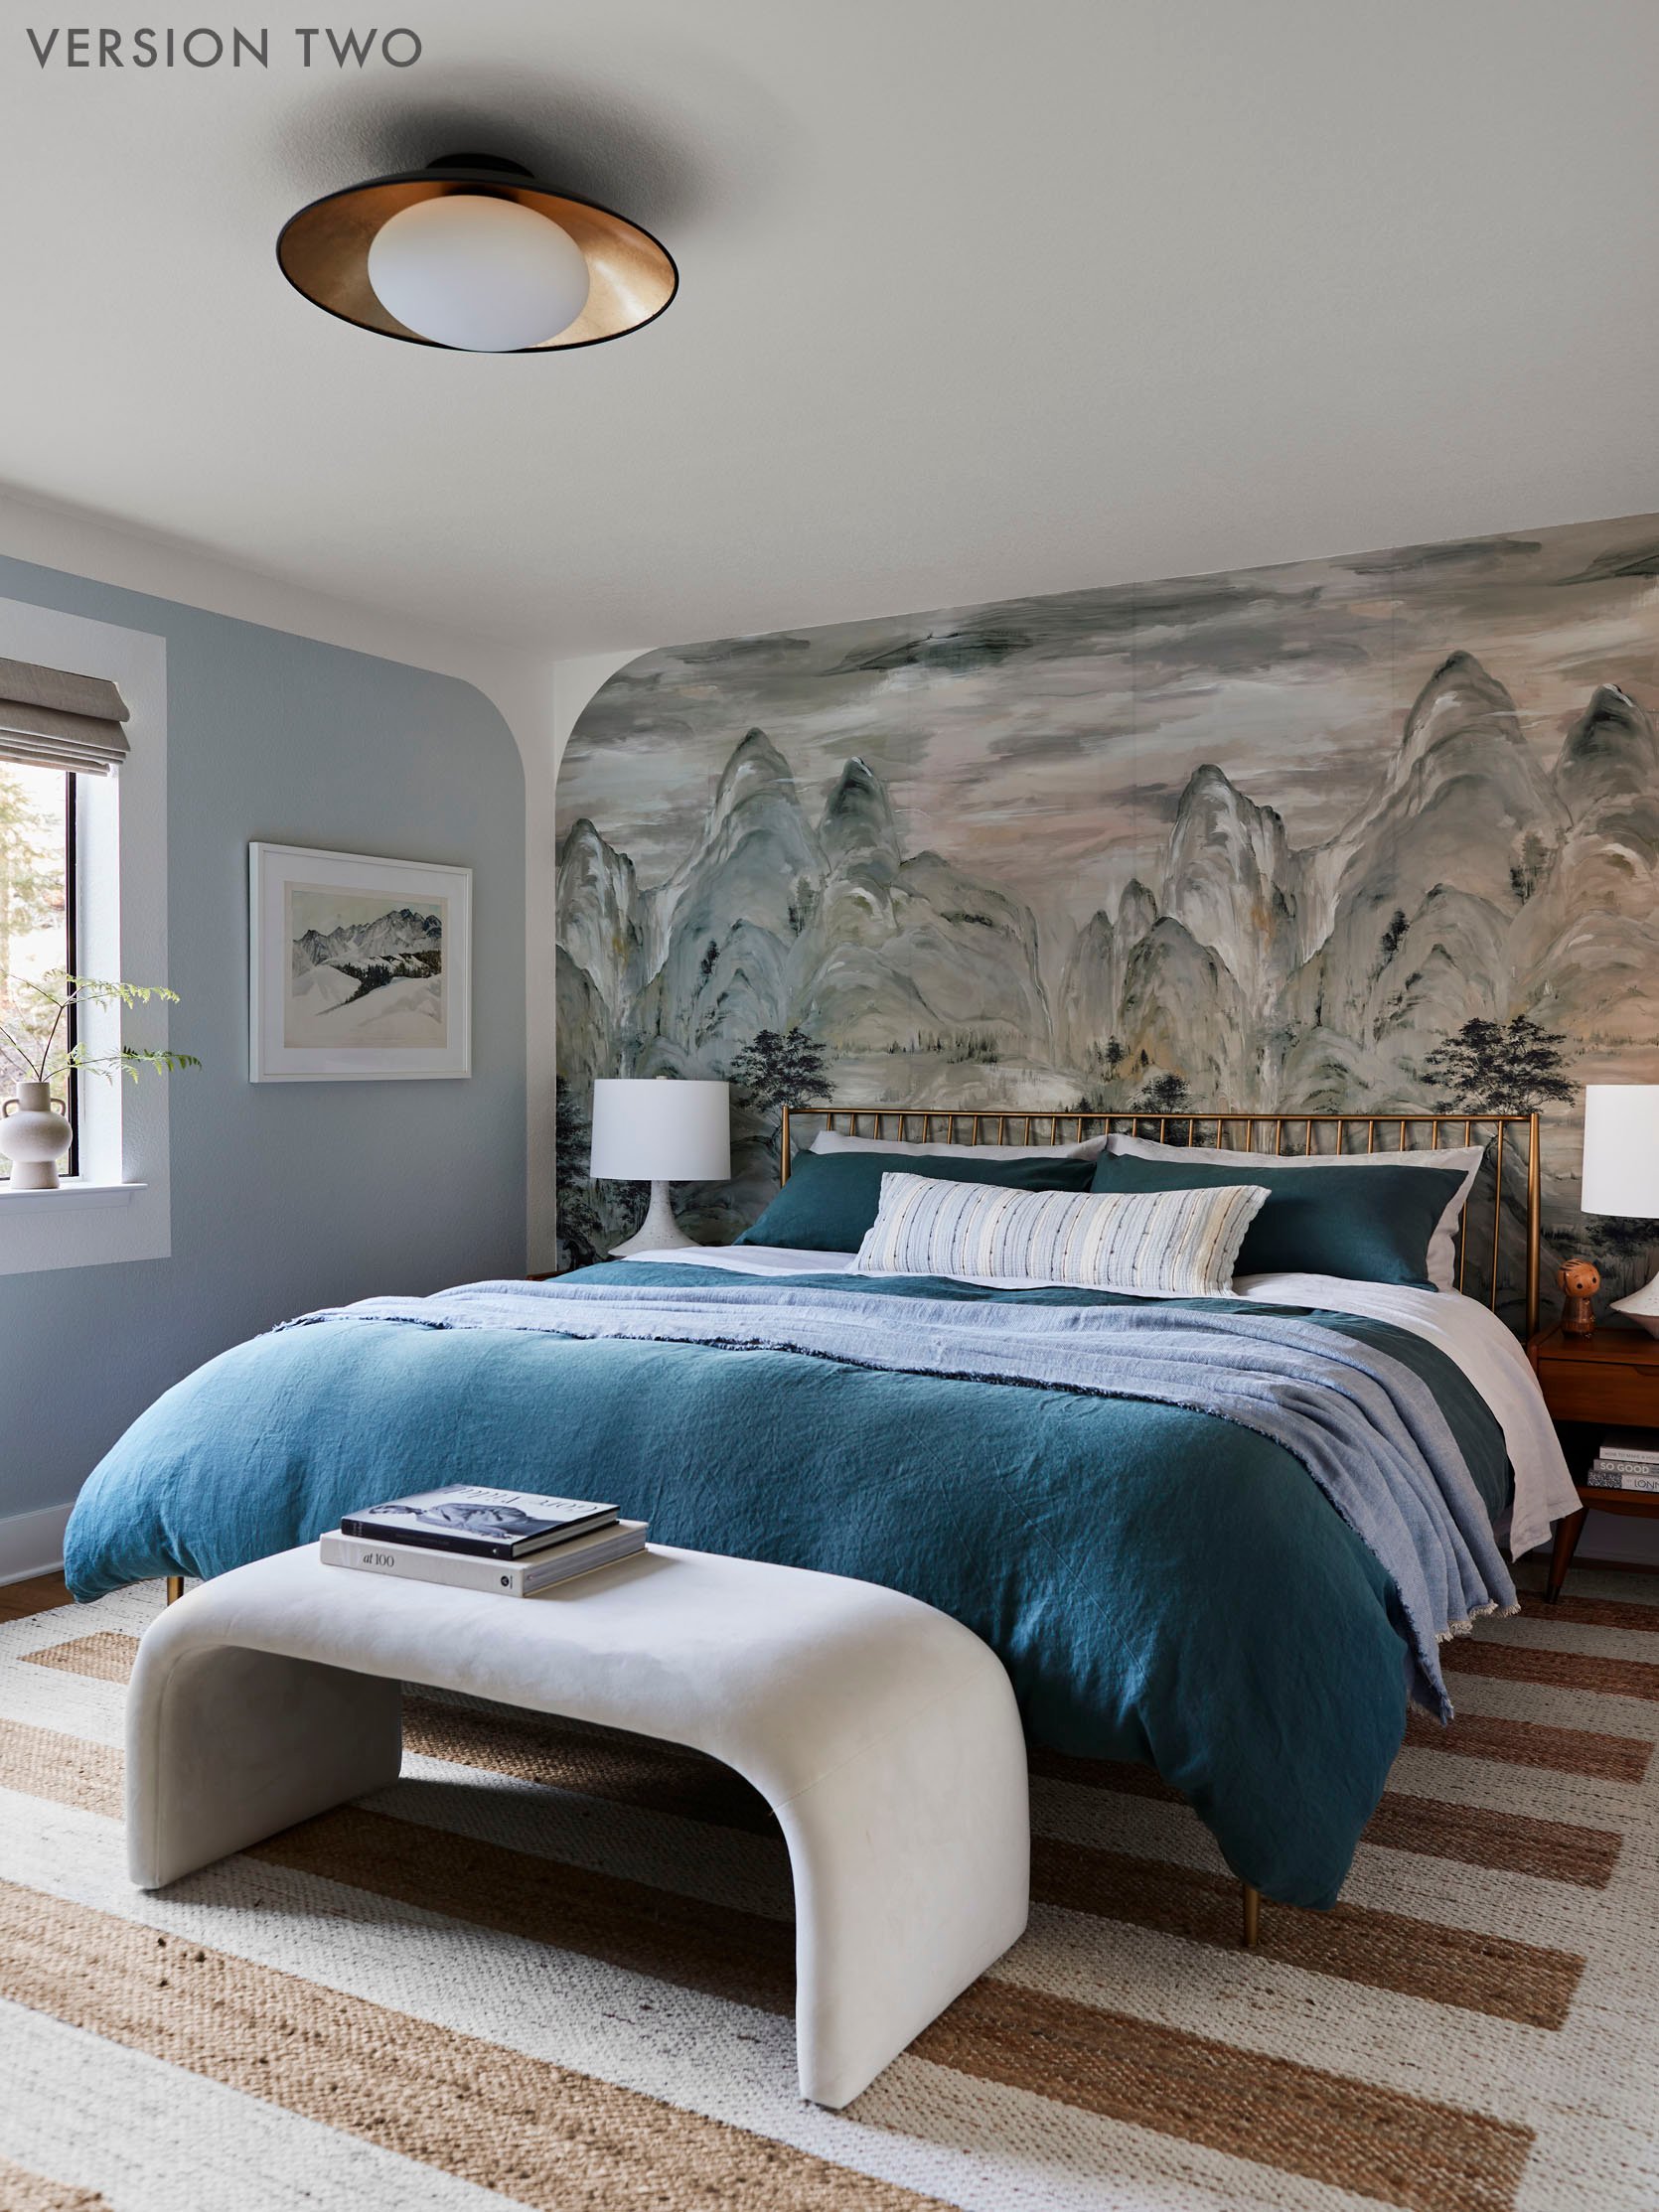
Wall Color | Ceiling Color | Wall Mural | Nightstands | Lamps
Progress: Stripe Art by ME!
Version One: Metal Bed | Snake Pillows (No Longer Available) | Pendant | Rug | Patterned Bench
Version Two: Flush Mount | Teal Duvet | Throw Blanket | Waterfall Bench | Roman Shade
The downstairs guest room is reserved for my parents. So I wanted to make it as inviting as possible. The focal point of the room is obviously the wall mural behind the bed. But the wall color, rug, and light fixture also help make the room feel more polished. I’m not a fan of accent walls, which is why curved the edges of the wall mural to make it look more like a shape, less like a random wall that’s a different treatment for no reason. Usually, my rule of thumb here is that there should be an architectural reason for a wall being a different color or material, like a recess in the wall or at least trim. When I painted the room (Chill by Clare) I created a border around the mural to drive home its curved shape even more.
Guestroom #2
Wall Color | Ceiling Color | Japanese Screen (Vintage) | Bed | Nightstands | Bedding
Version One: Rainbow Art | Basket Light | Light Kit | Table Lamps (No Longer Available) | Black Bench (No Longer Available) | Rug
Version Two: Abstract Art | Chandelier | Urn Lamps | Rug (No Longer Available) | Ottomans (No Longer Available) | Rug (No Longer Available)
You can also see the painted floor in the upstairs guest room. It looked really good! Of course, I love the Riva flooring more (mine is in Amber), but the painted floor looked really chic and let me feel good about my house when I couldn’t afford to do anything more.
The main thing you’ll notice in the room is the stunning Japanese screen above the bed. There are probably 2-3 things in this house I’d be devastated to lose in a fire because they are irreplaceable. And this is one of those things.
In January 2020, I spent a few days with my friend at his family’s cabin in Tahoe. I’d spent time with his parents before, but I really got to know them then. I watched my friend go back and forth with his mom as they collaborated on putting together a complicated French dish (I can’t remember what it was). My friend’s mother, Hana, was too gregarious and bubbly to keep quiet long enough for her son to read the ingredients and instructions to her. It was so funny and beautiful and dinner took forever to make because she was being so extra. It’s a really nice memory.
A few days after that she was gone. She passed away really unexpectedly and it was a shock to everyone. By some miracle, I was gifted this beautiful screen. And it just means so much to me because of how wonderful that woman was.
Getting that screen onto the wall safely was a TASK. I basically had to build it onto the wall to make sure it wouldn’t fall in an earthquake (sidenote: there aren’t really earthquakes up here, at least historically). I built a base for it out of pine. You can’t really see in the photos but it’s basically a huge picture rail/sleeve at the bottom reinforced with posts. At the top, it’s bolted in with brackets attached to studs. I didn’t damage it, but there’s no way it’s coming off that wall.
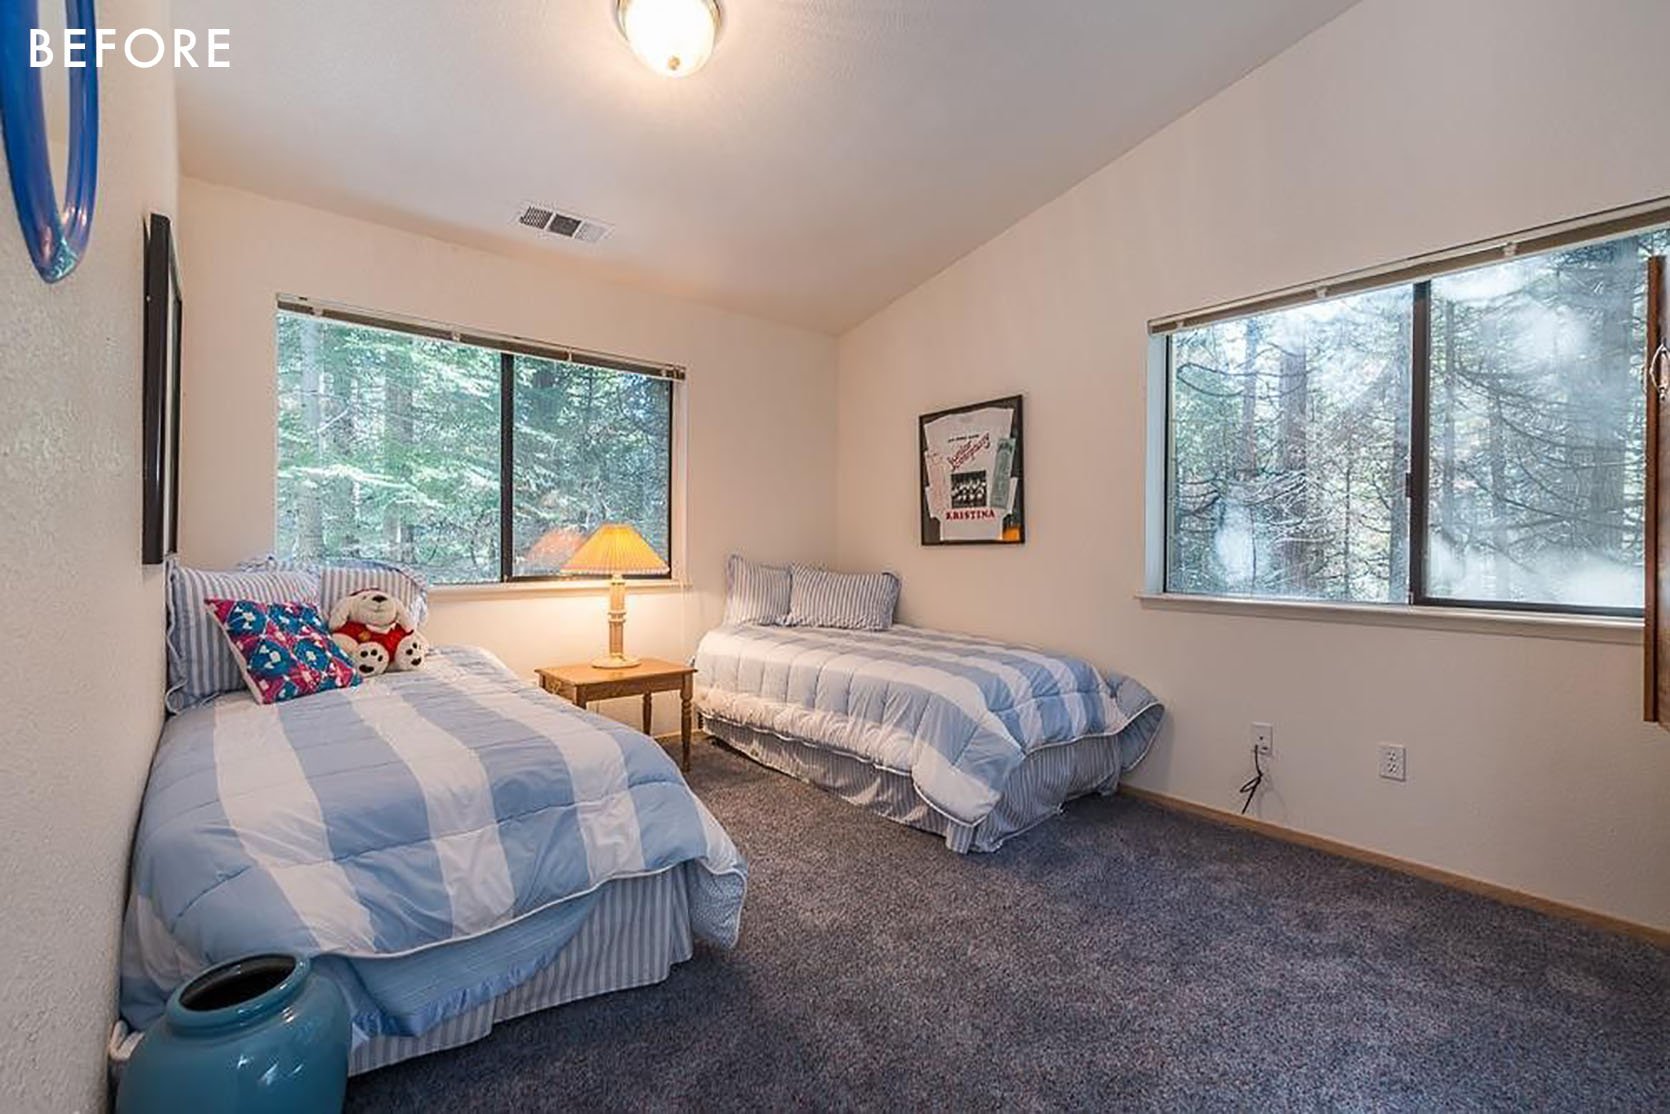
The Giant Weird Room (Guestroom #3)
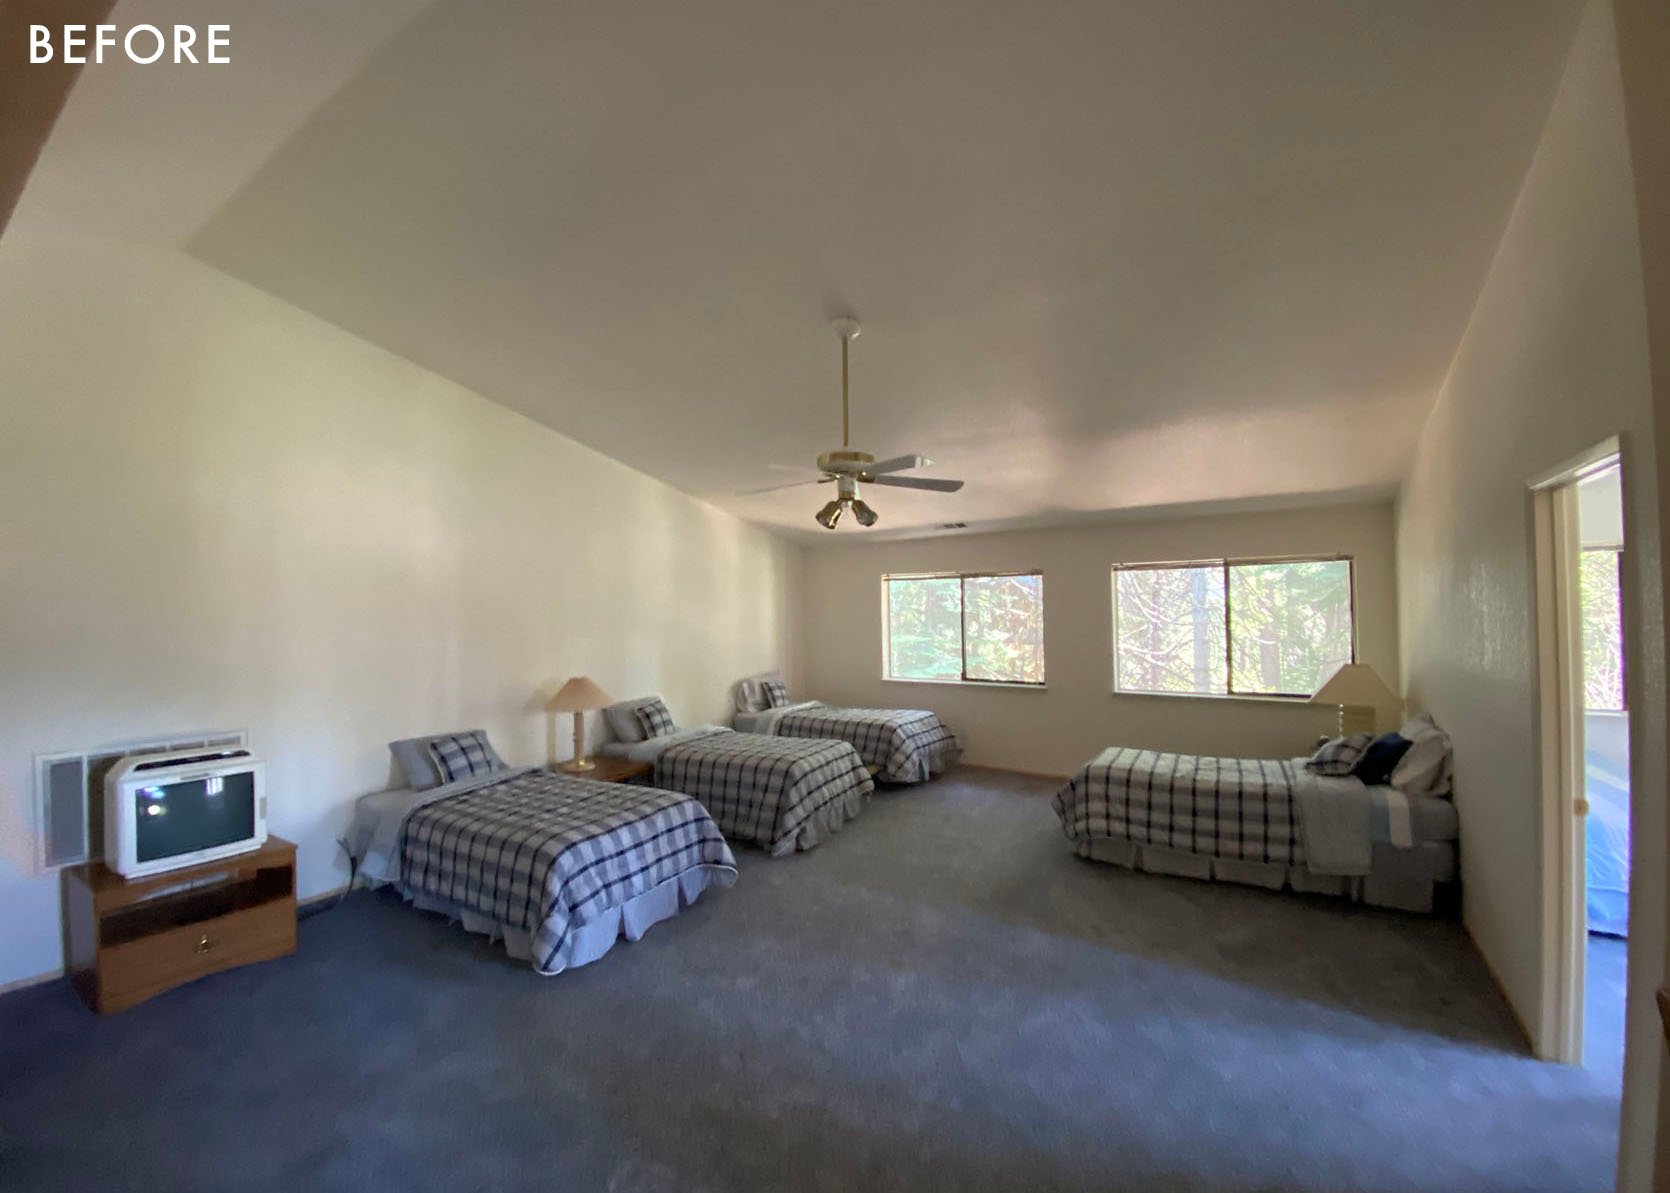
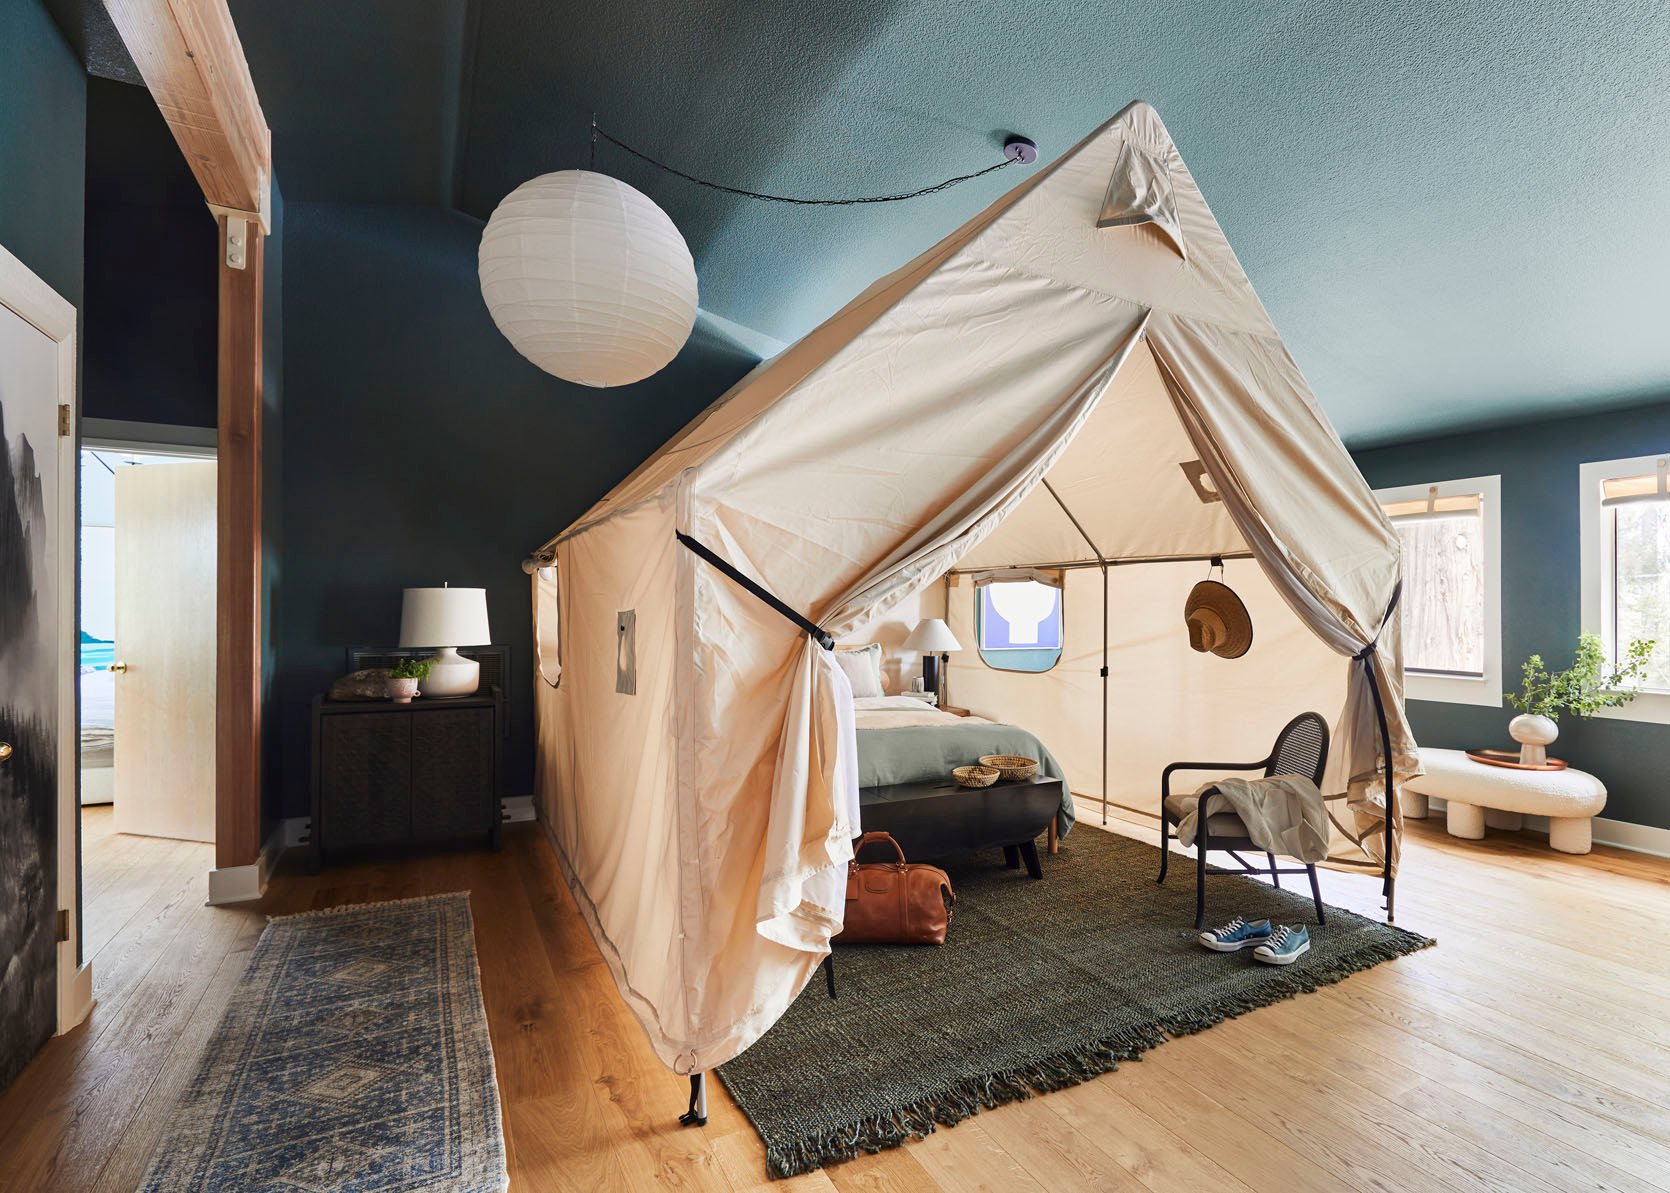
Wall Color | Ceiling Color | Tent | Green Area Rug | Runner | Cane Chair (Vintage)
As I described before, some of the architectural decisions made in the construction of this home were perplexing. Like what is this room? Is it a landing? Is it a bedroom? A game room? THE LIVING ROOM? Upon seeing this space, I was so baffled by it that I named it the Giant Weird Room because there’s really no better way to describe it.
Originally, I thought this would be a good living room. But I quickly nixed that idea because A) It’s right off two bedrooms and who wants to sleep right off the living room? And B) It would be on a different floor than the kitchen which means everyone would always be in the kitchen and that drives me crazy (I hate people in the kitchen when I am trying to cook). My solution was to basically make it into another sleeping space. I have two siblings with kids and my parents. So I wanted each family within my family (my sister, my brother, my parents, me) to have their own sleeping space. I didn’t want this room to feel like a compromise so to make up for the fact that it’s not an actual bedroom, I wanted to give it some novelty. The tent (which I bought from Vevor) was the perfect solution.
I love how fun it is. It’s kind of like a giant canopy bed. My eventual plan for this room is to build a fourth bedroom and bathroom in here to get me to my four en suites plan. Again, the idea here is that my siblings’ families would all have their own room/bathroom (I plan on making a fun bunk bed kids’ room where the gym currently is).
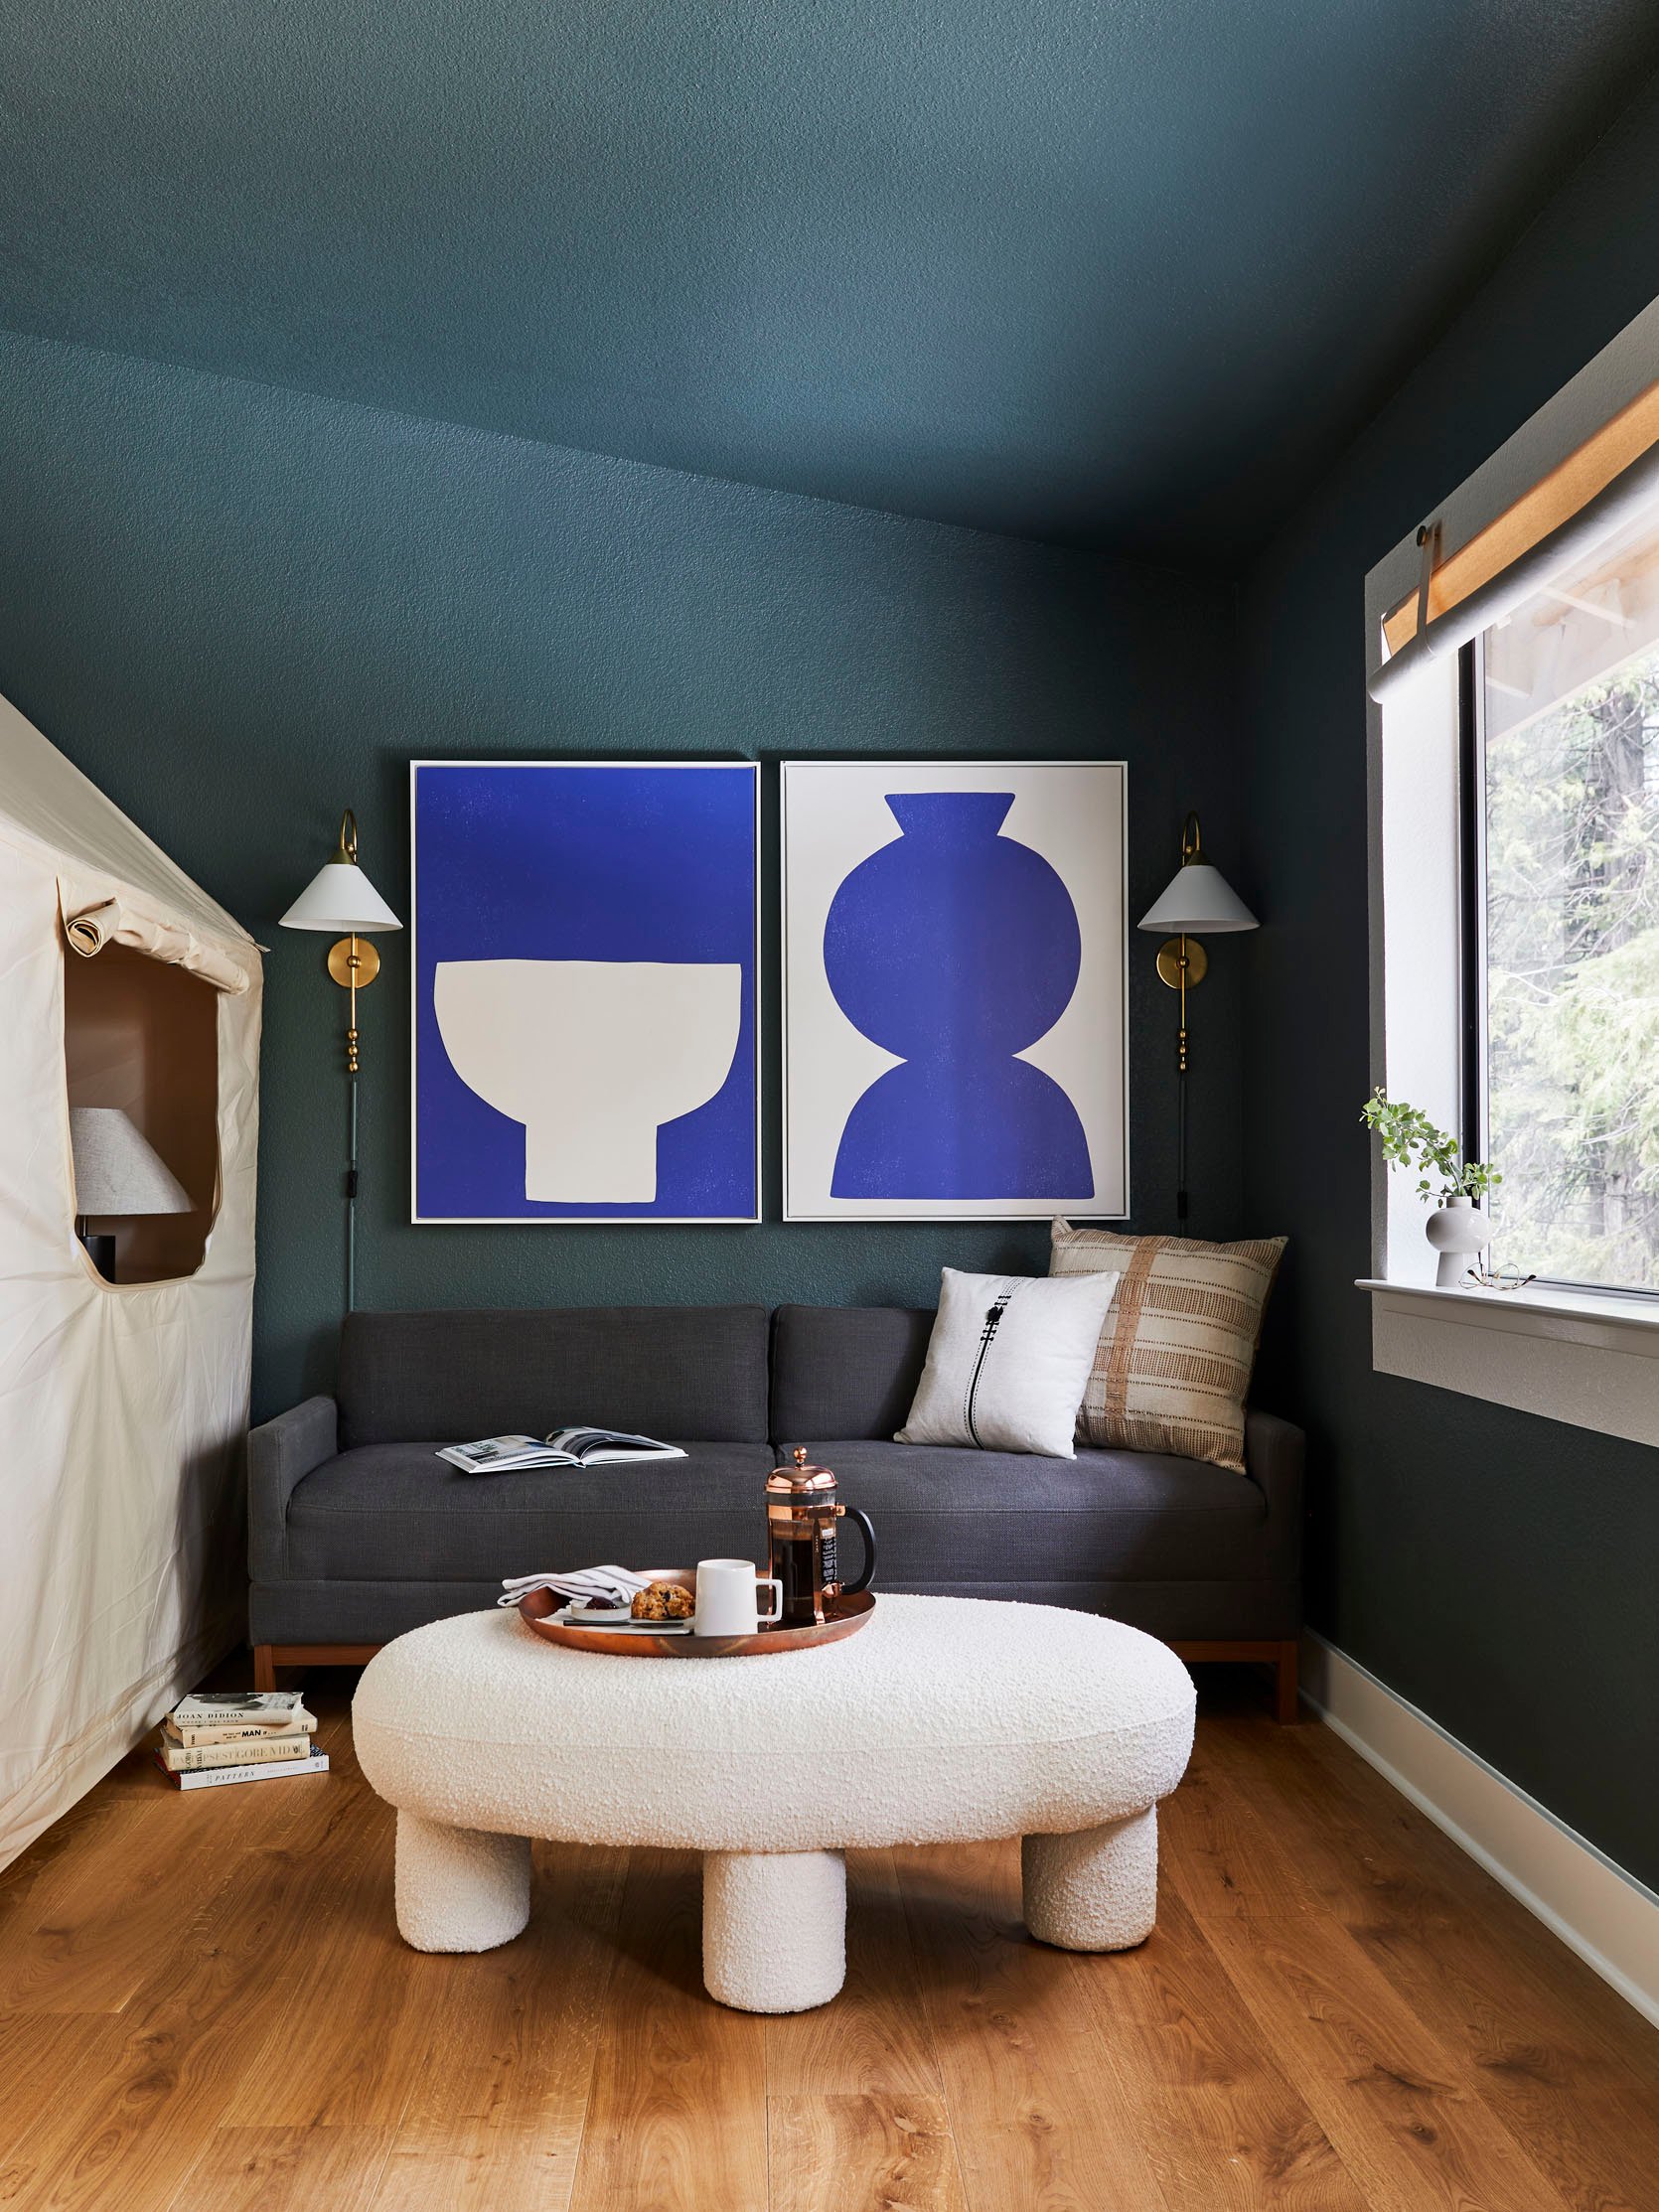
The sofa to the right of the tent is a sofa bed so there’s even more room to sleep there. One thing I love about this house is that there are SO many places to just be. Like if you were here with 20 people, there’d be a little nook everyone could go to to have some privacy. While my family was here over the holidays, I spent a great deal of time on that gray sofa working. It felt really private and serene, even with my nephews downstairs screaming all over the place.
I’m gonna need to do a DIY eventually about these window treatments because they are SUCH a good temporary solution for someone on a budget. Basically, they’re made from painter’s canvas (I had some extra lying around). My mom hemmed them on the side and sewed a sleeve for a dowel. They’re held open by two canvas straps and some cabinet knobs I bought on Amazon. The whole thing cost less than $20 per window and looks so much better than those paper temporary blinds you can get.
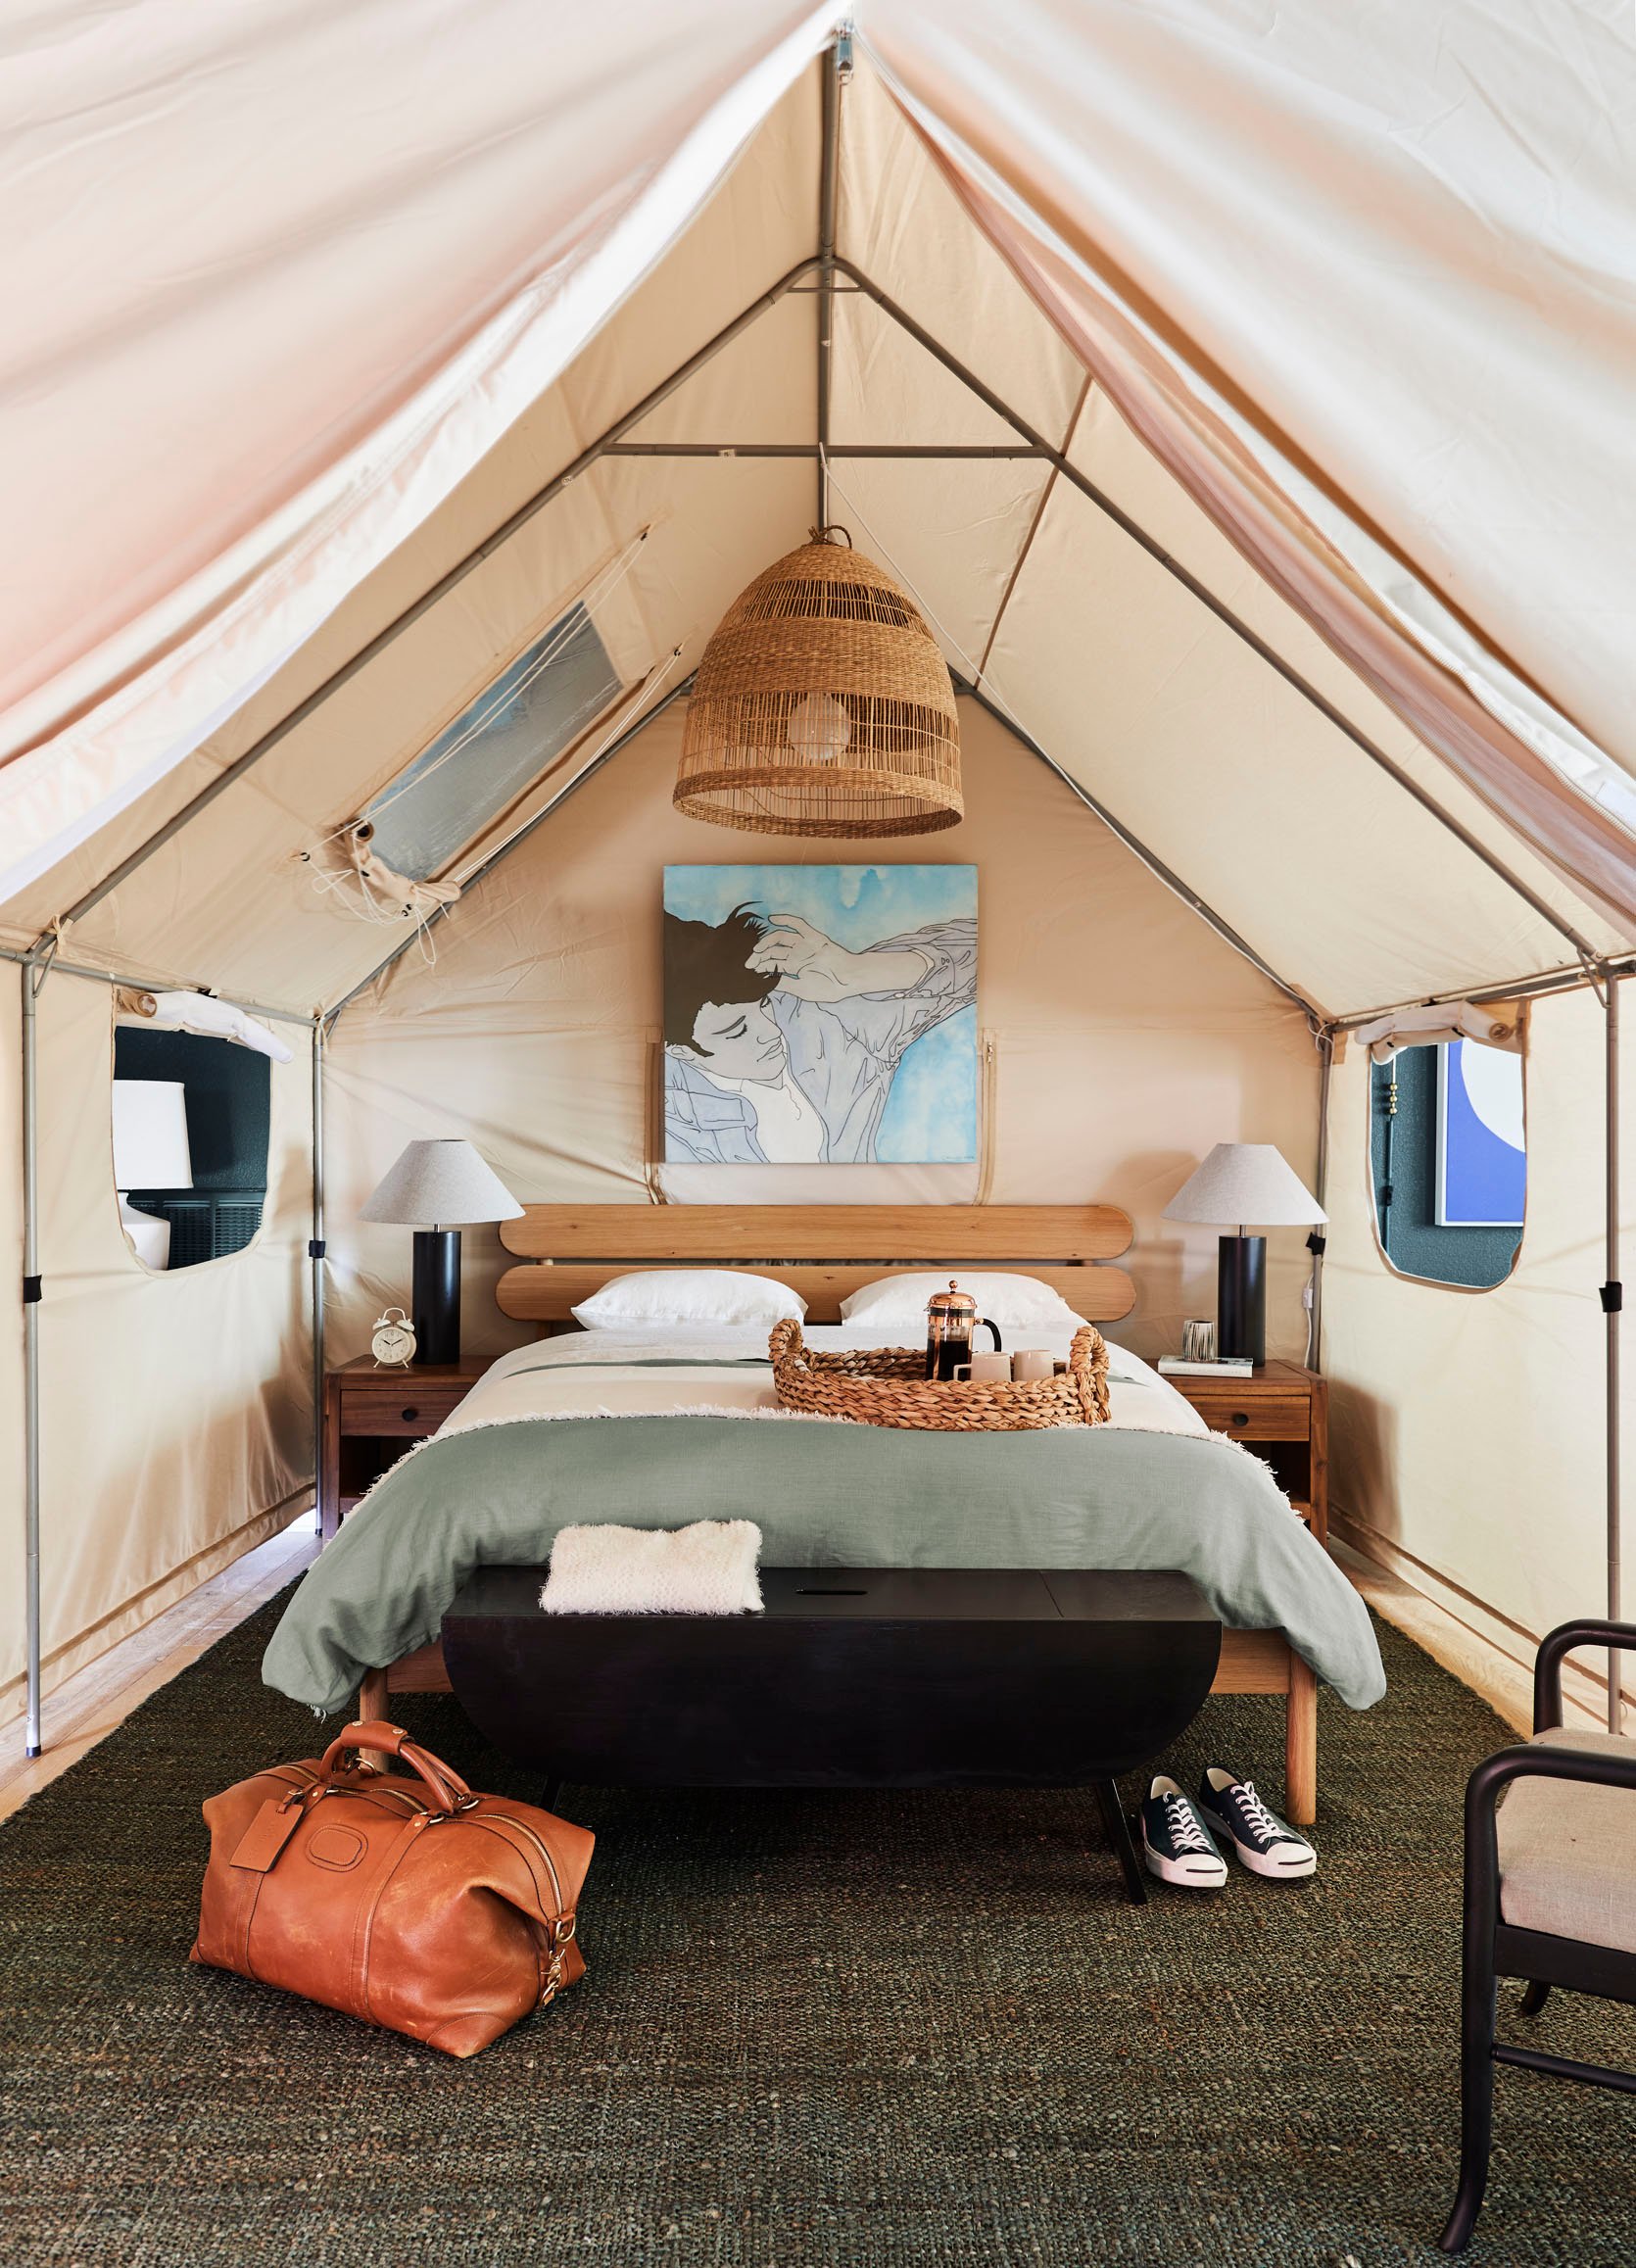
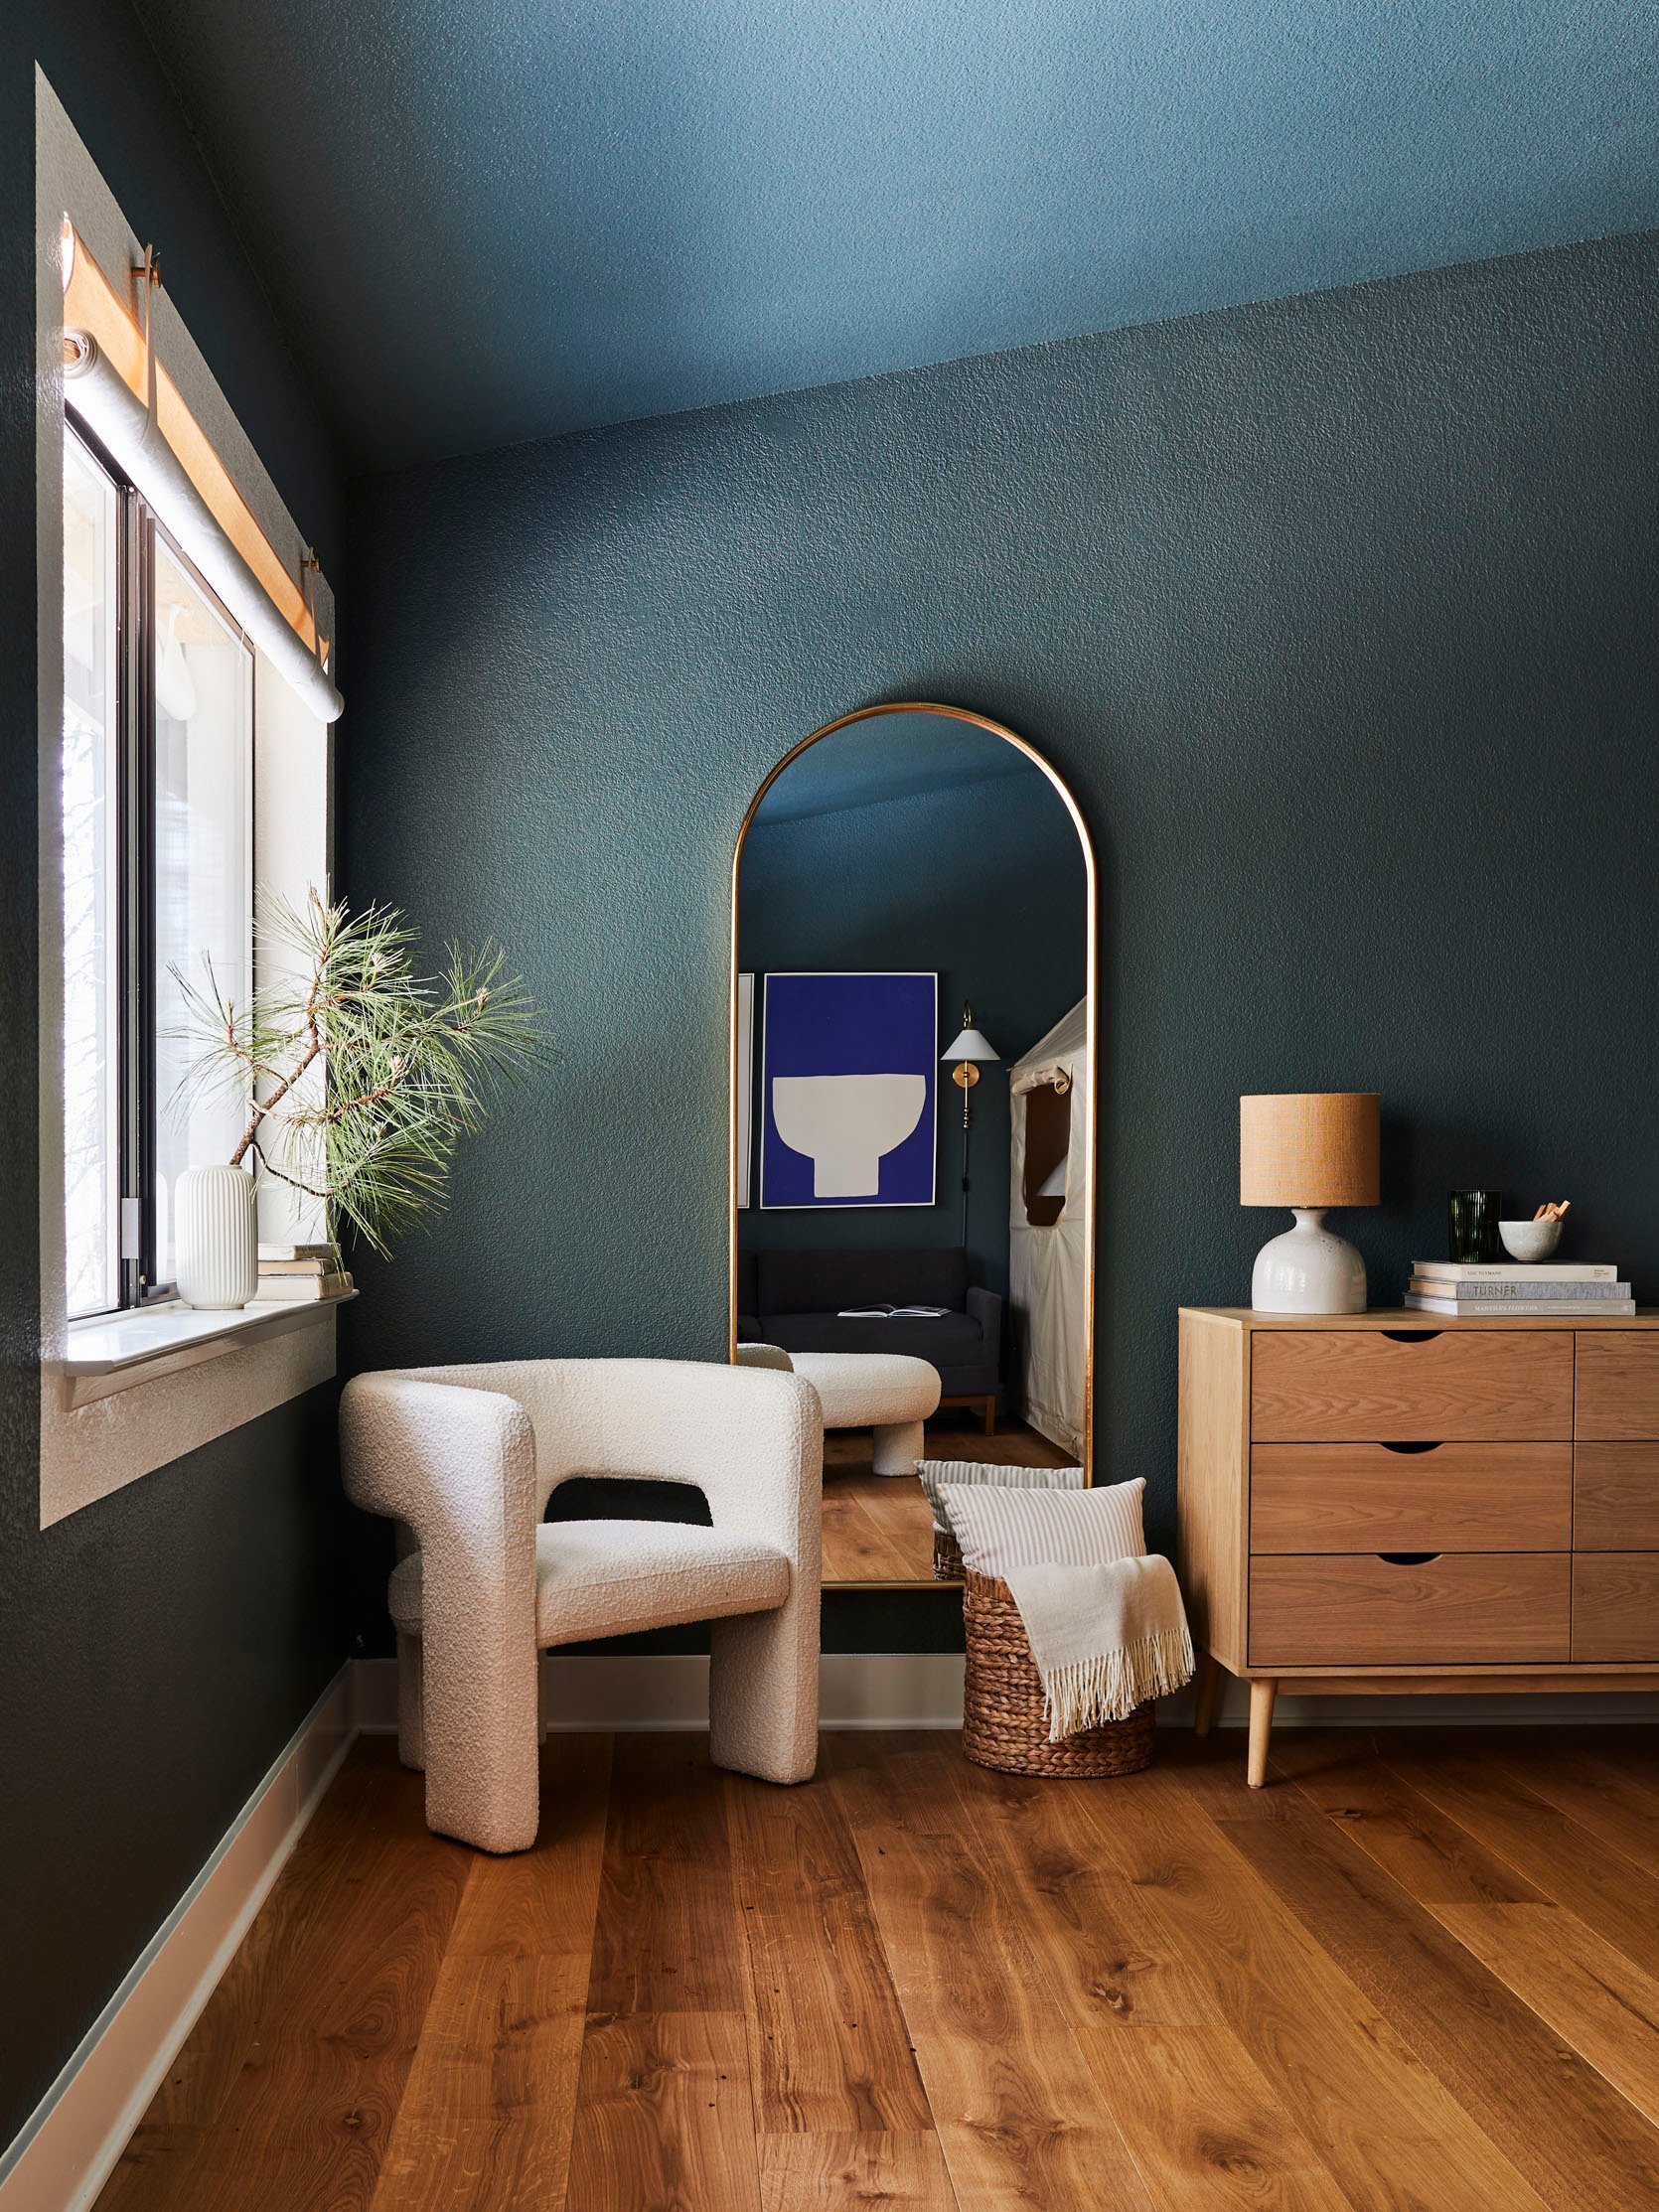
Bed | Basket Light | Light Kit | Black Table Lamps | Black Bench (No Longer Available) | Sofa Bed | Boucle Ottoman | Plug-In Sconces | Blue Art | Boucle Chair | Mirror | Dresser
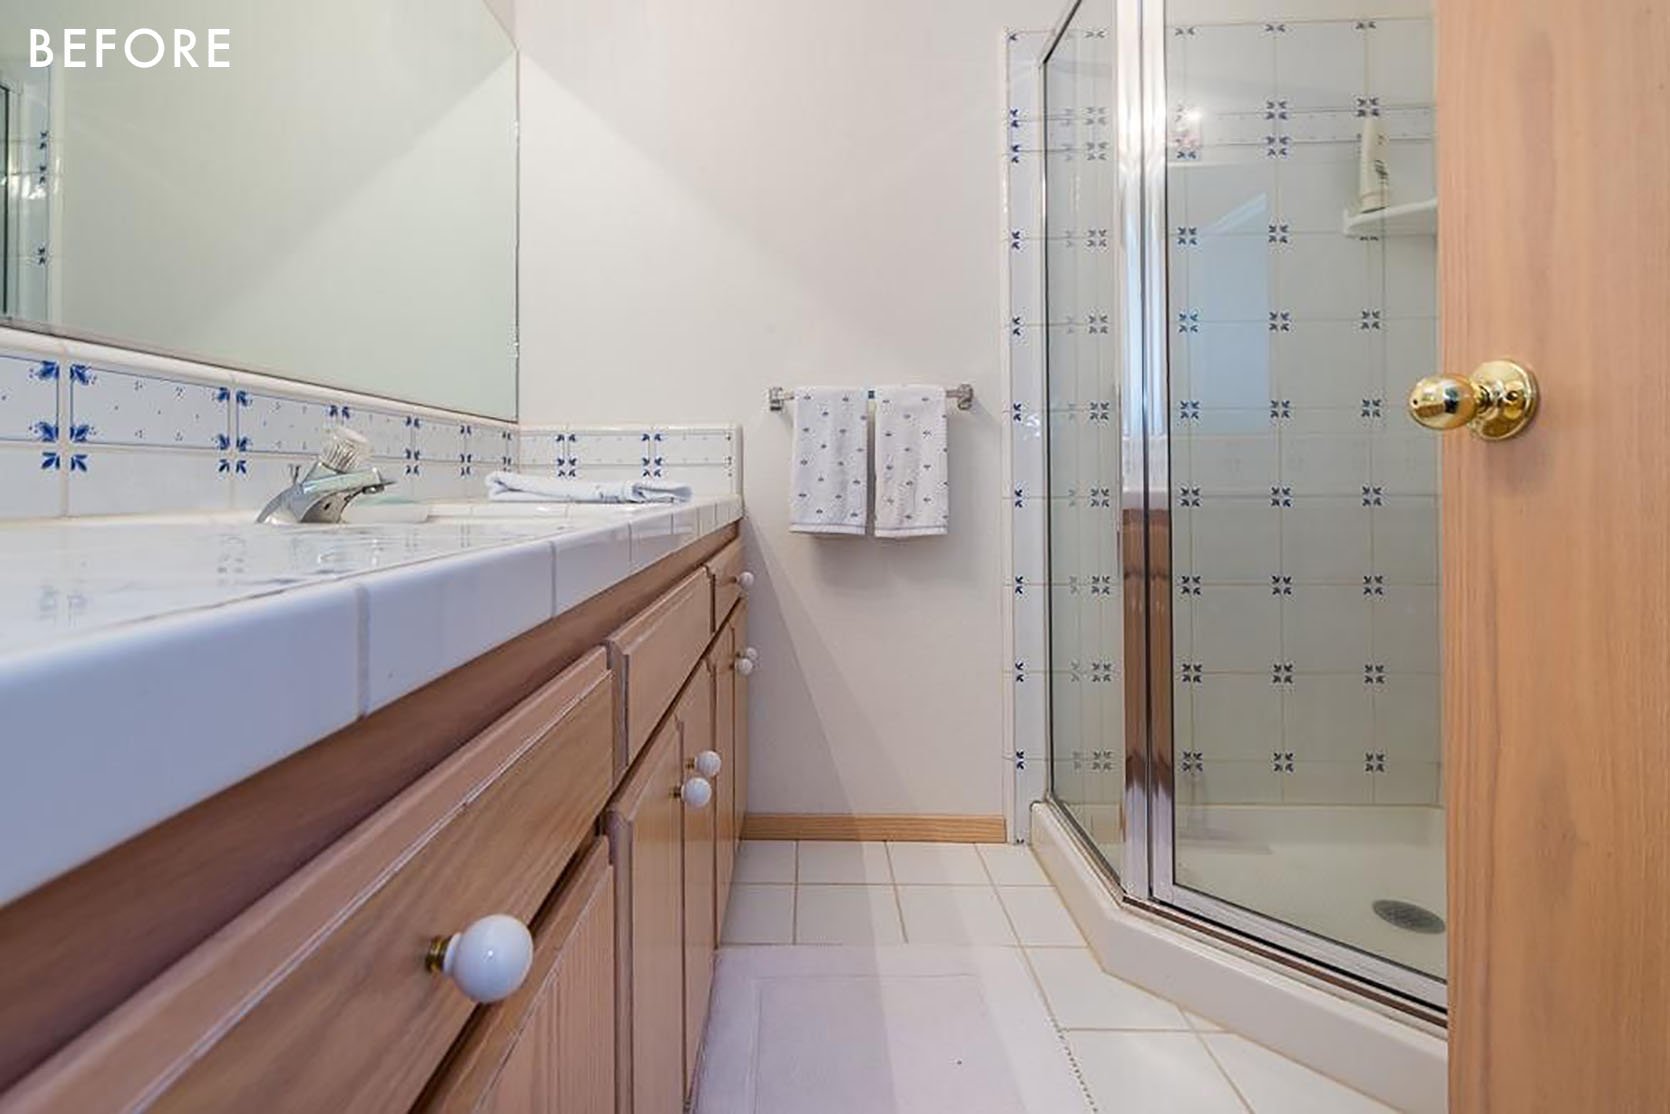
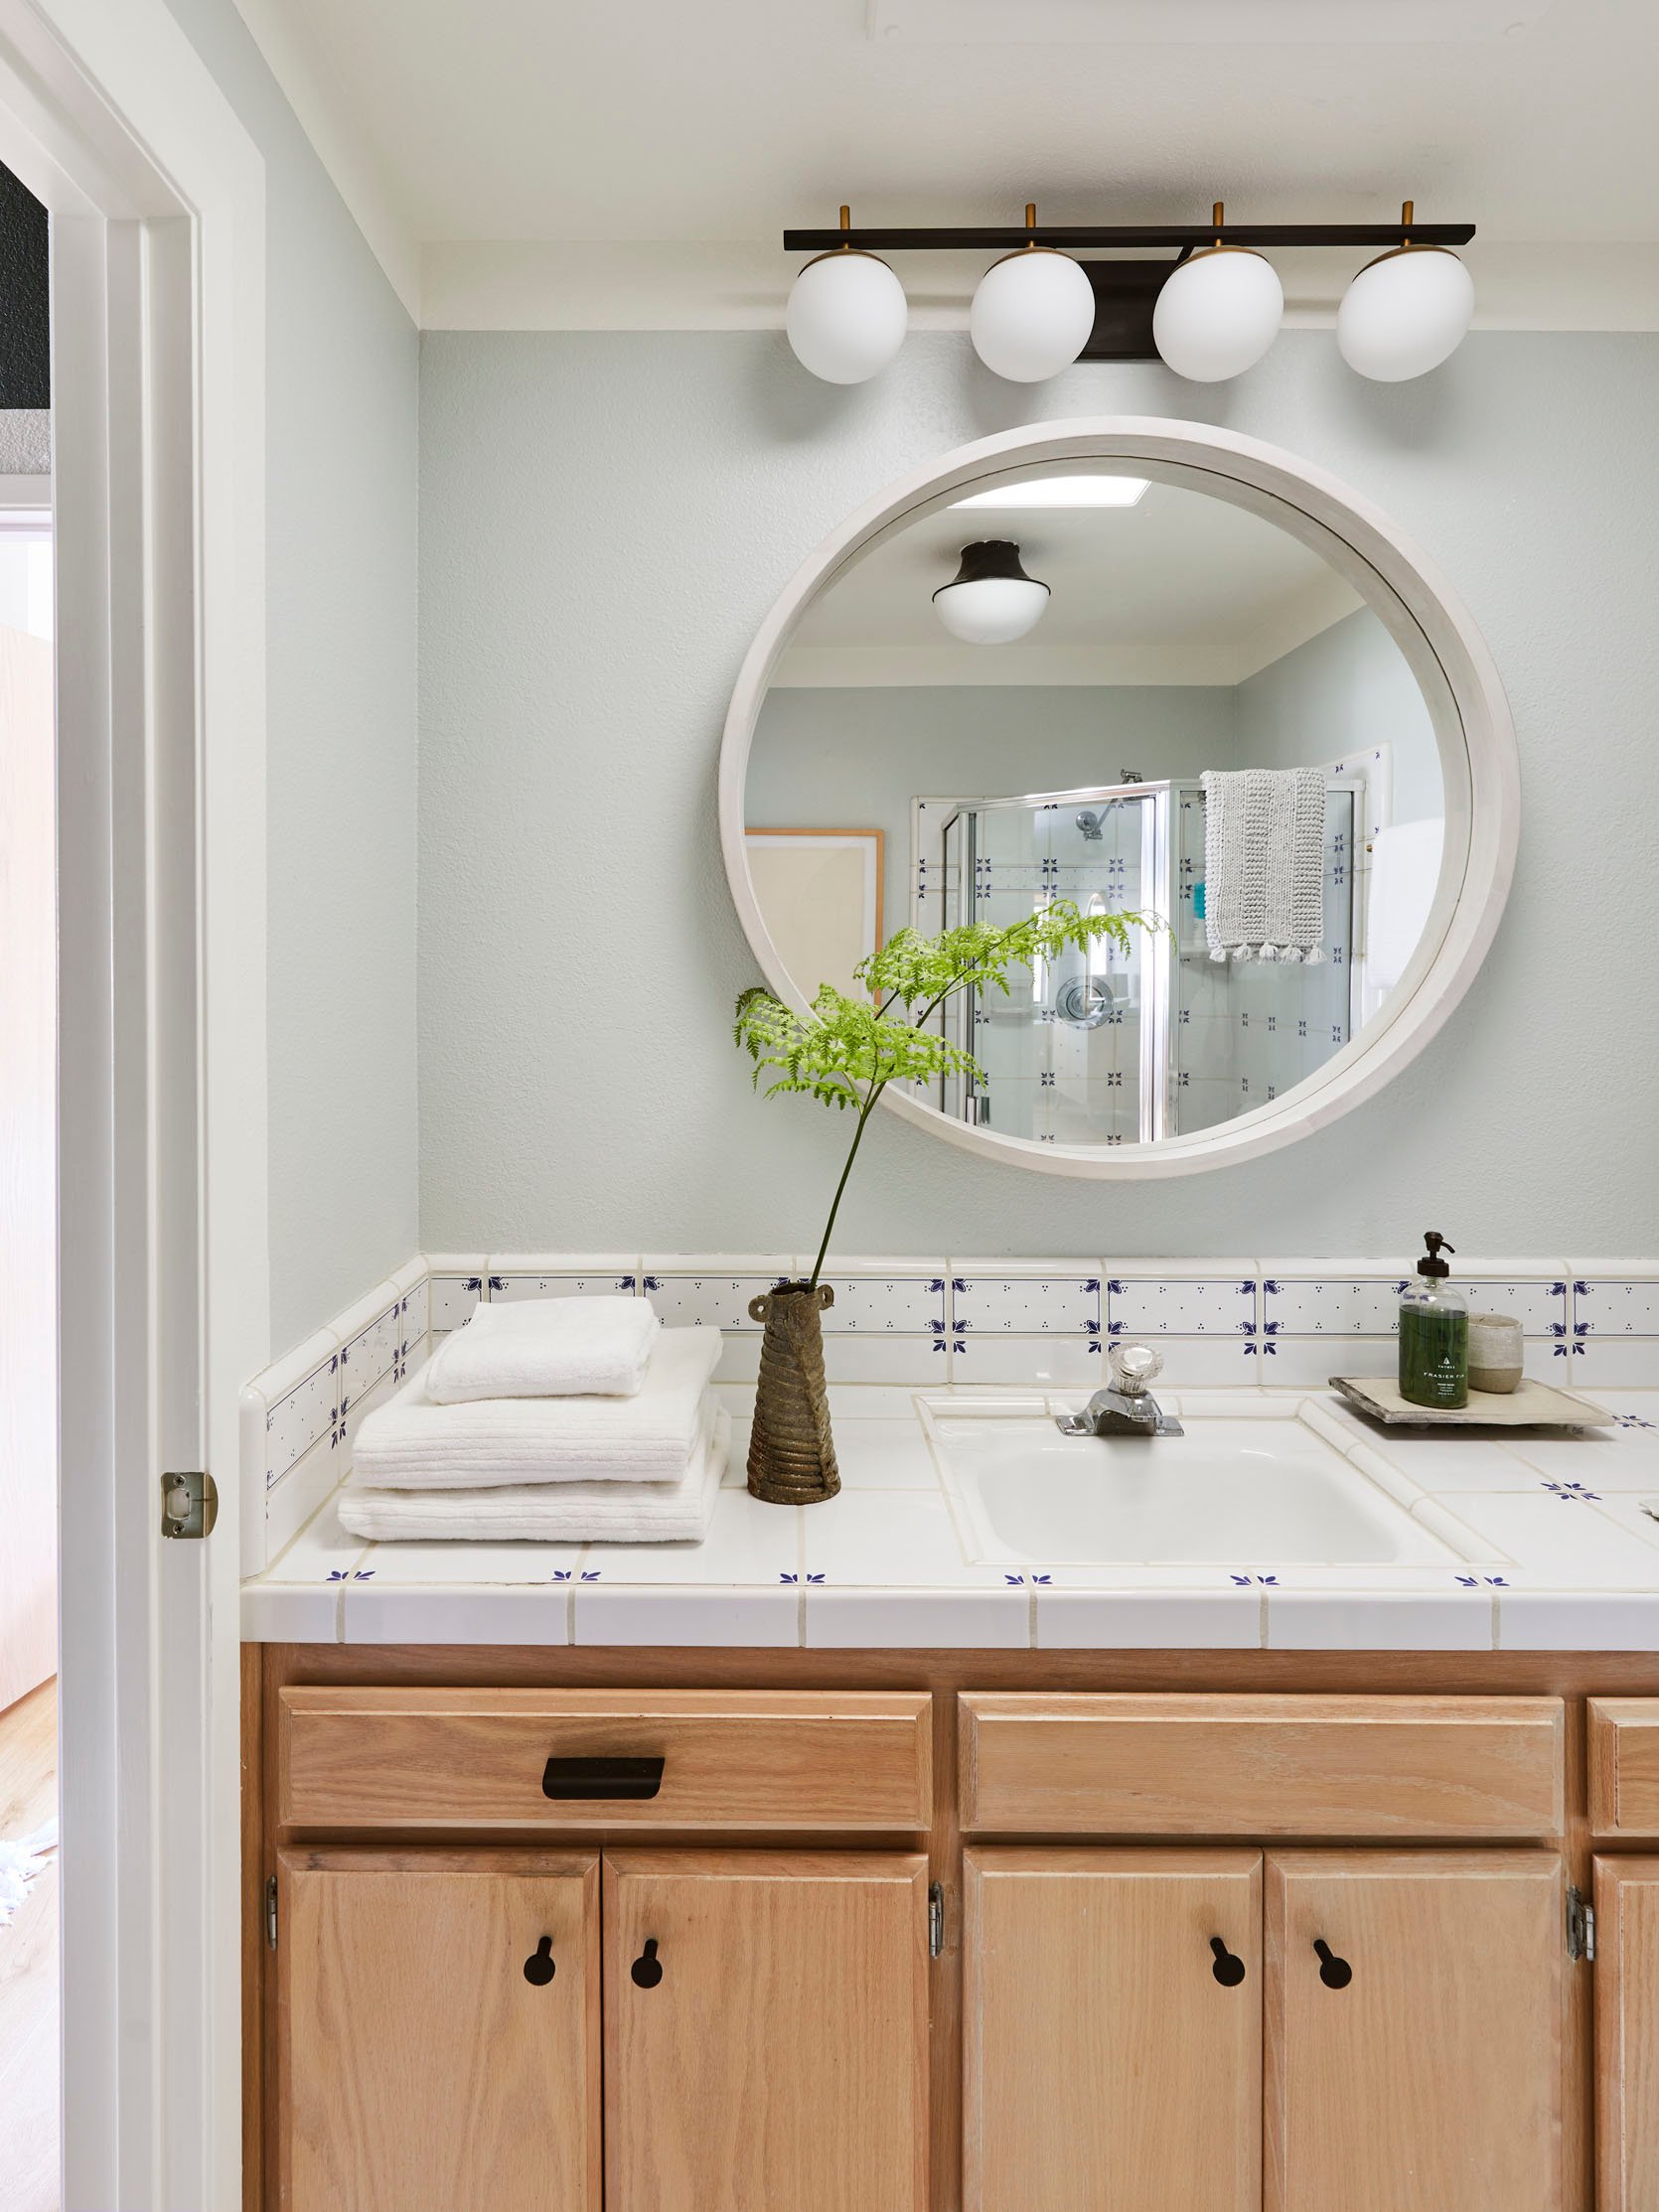
The Downstairs Bathroom
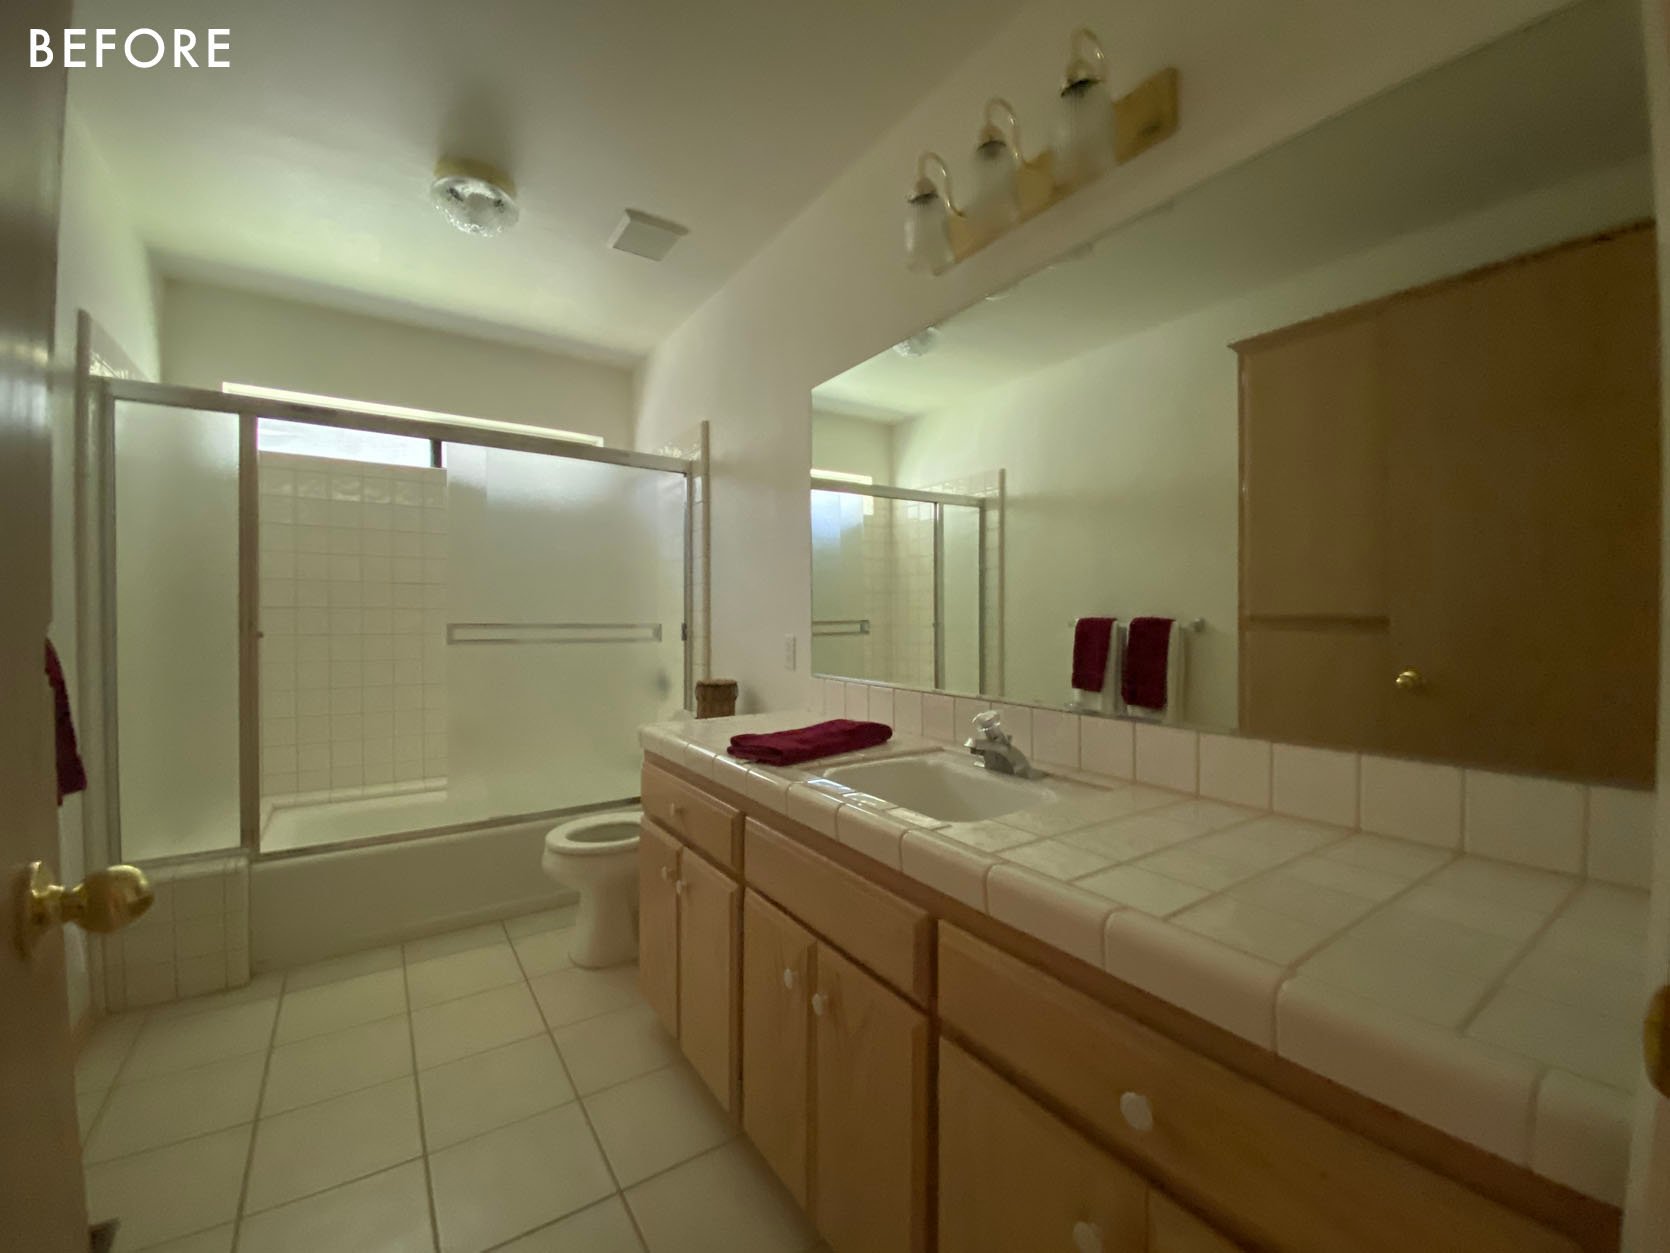
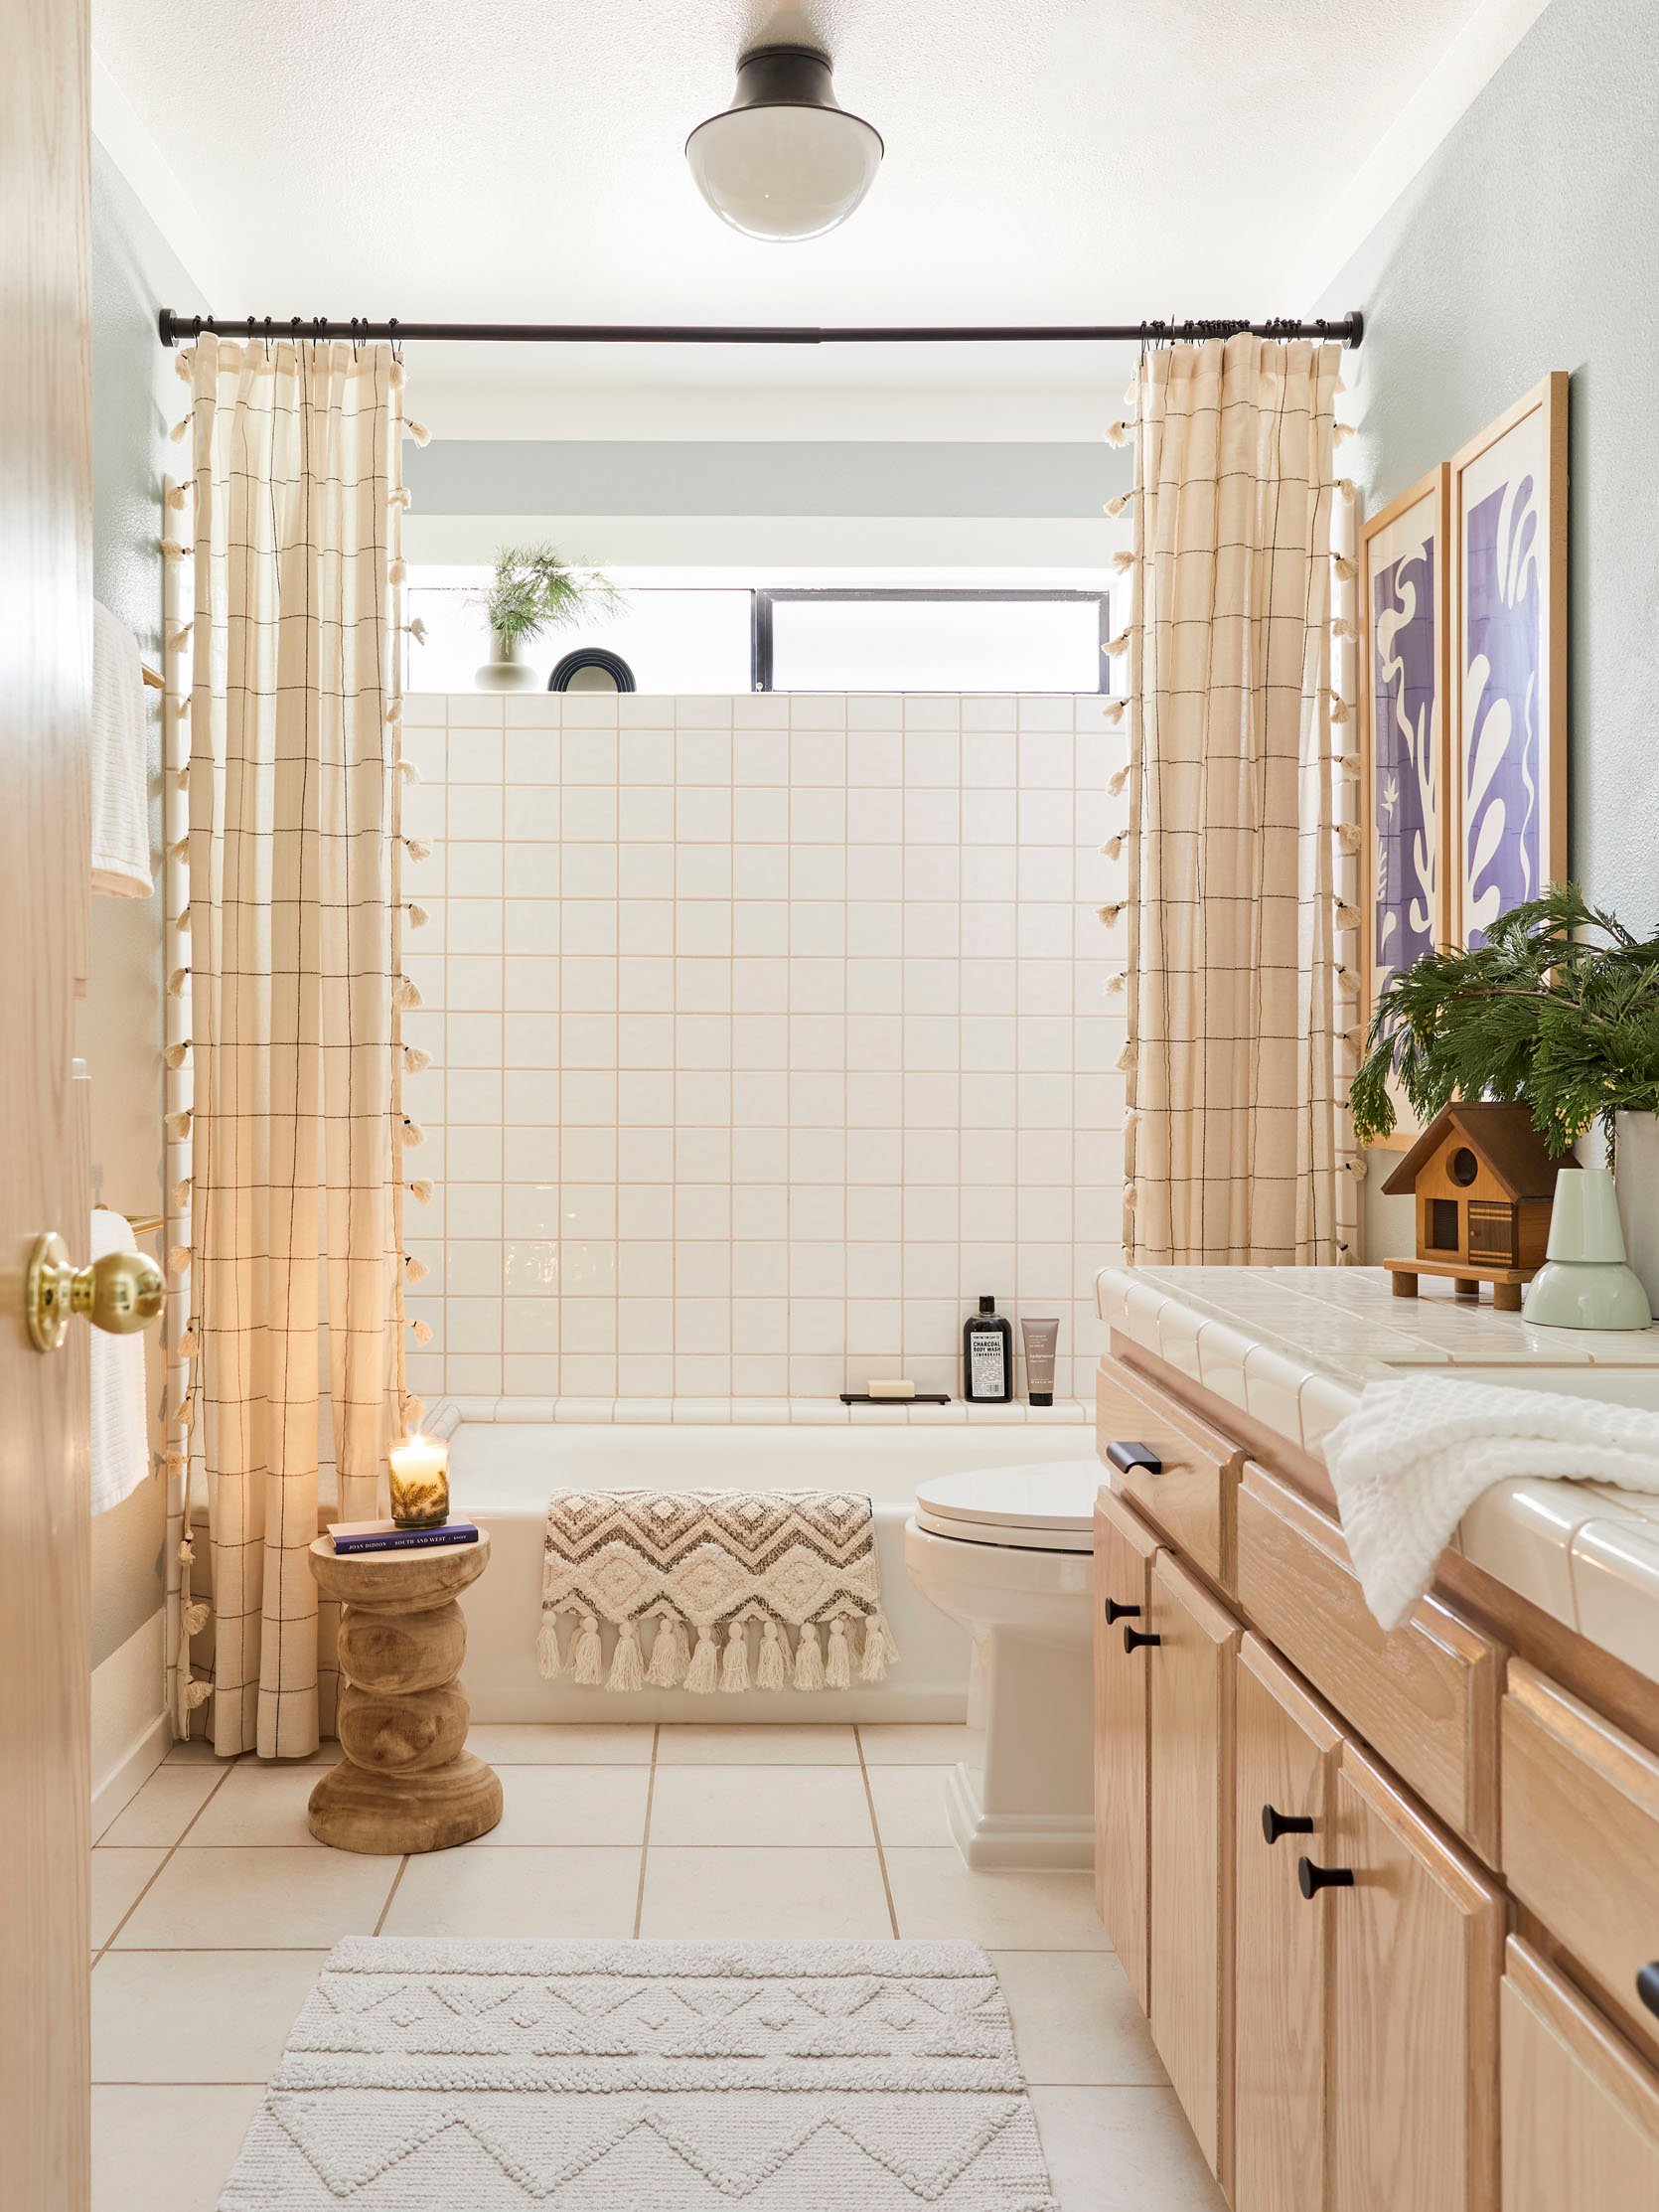
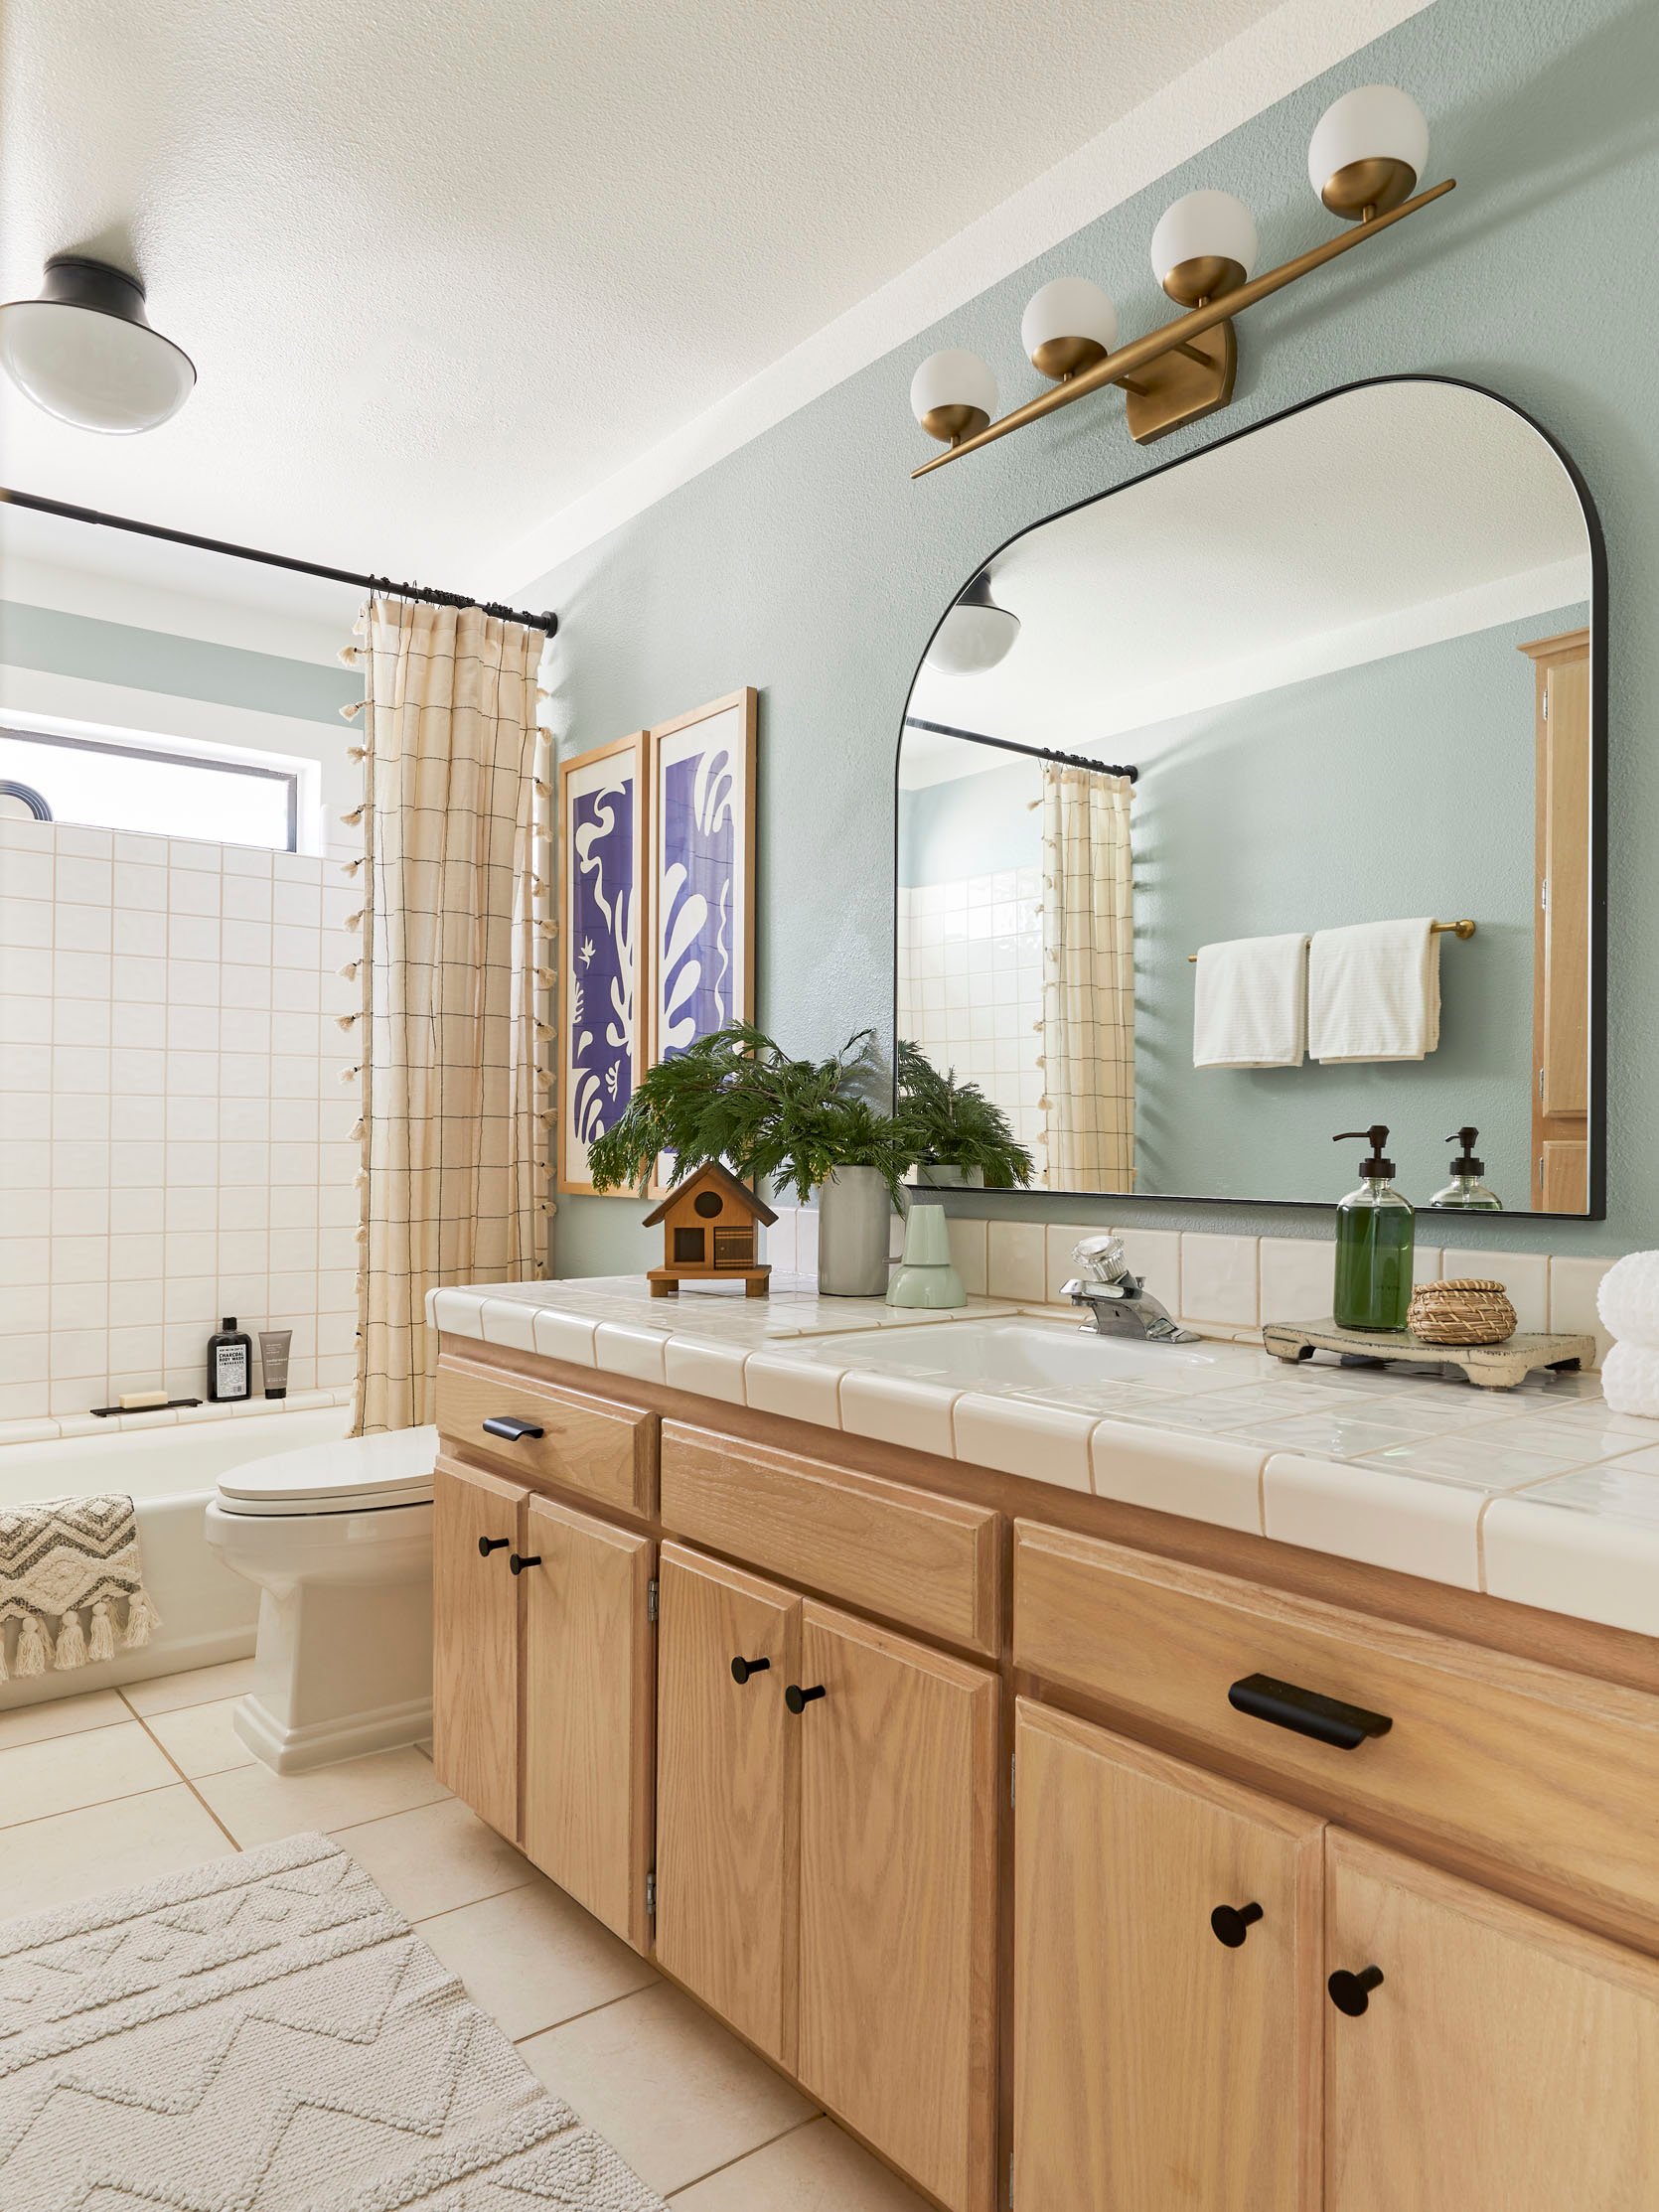
Wall Color | Ceiling Color | Ceiling Light | Sconce | Mirror | Drapes | Toliet | Art (Vintage) | Stool (Vintage) | Knobs | Pulls | Bath Mat | Ceramic Sculpture (On Window Sill)
It’s gonna be a while before I can afford to redo these bathrooms, so the main idea in here was to figure out a way to make the 80s vibes feel more intentional. Kohler played a huge role in here. I got new toilets and cabinet hardware from them and it made all the difference. I also swapped out the mirror and light fixture and added double-panel drapes to the shower. It’s kind of a weird detail, but I thought the drama of having two curtains was really fun. Originally, I put liners behind both of them with the idea they’d close in the middle. But I quickly found that was a recipe for flooding so now there’s only a liner behind the one on the right (where the showerhead is). This gives me the symmetry I want while not encouraging a center opening where water gets out.
The Primary Bath

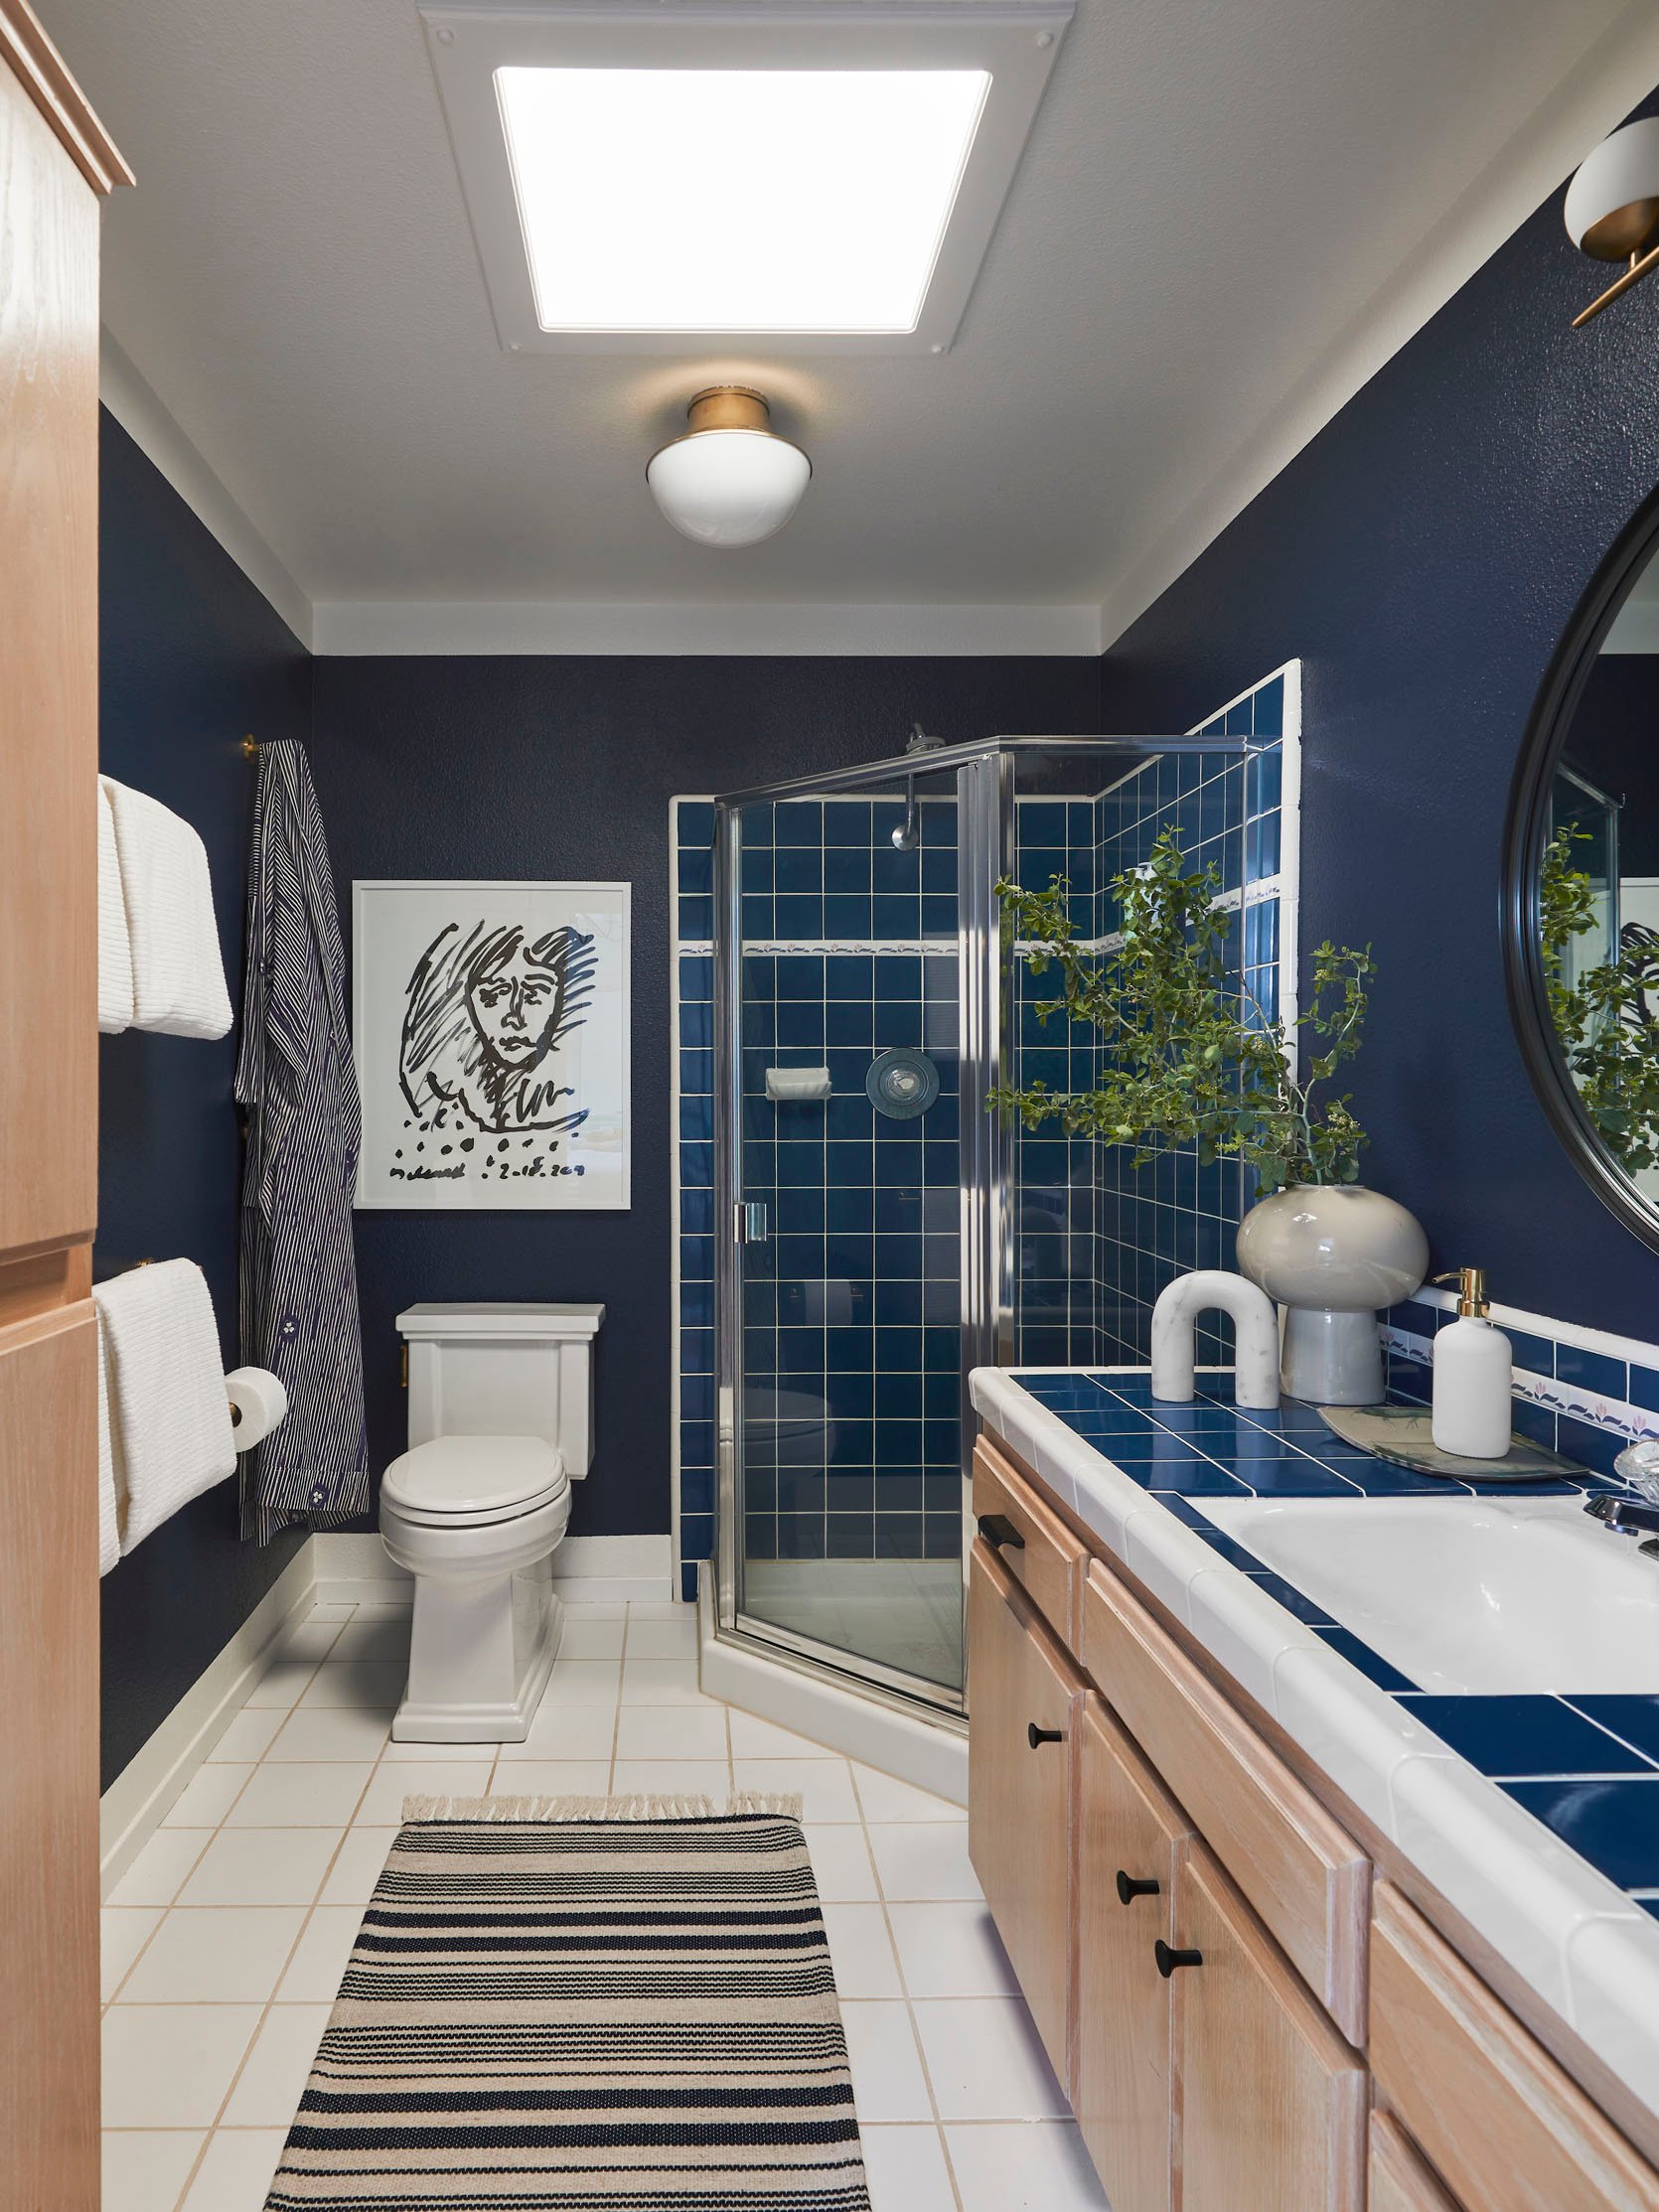
Wall Color | Ceiling Color | Knobs | Pulls | Toliet | Ceiling Light | Sconce
The bathroom in the primary bedroom was also hopelessly dated so I decided to just go with it. It’s also VERY dark so I decided to go with a bold paint color. I’m pretty sure Emily and I have yelled about this to you many times, but often the instinct with dark rooms can be to paint them light to make them brighter. That normally doesn’t work. That can just make the room look dingy. Painting a dark room a color with more pigment helps make it feel more intentionally romantic and moody. This color is Goodnight Moon from Clare, which I eventually decided to paint the exterior of the home. The eventual plan in here is to bust out the wall between this bathroom and the adjoining walk-in closet to create a bathroom twice this size THAT HAS AN EXTERIOR WINDOW. It makes me so mad that the architect put both the upstairs bathrooms inside and the two adjacent walk-in closets on the outside, making it impossible for there to be windows in the bathrooms. They put in skylights, which helps with light, but I’m a firm believer that bathrooms need to have windows for light and ventilation purposes.
The Upstairs Guest Bathroom
Wall Color | Ceiling Color | Sconce | Knobs | Pulls | Mirror
The upstairs guest bath actually gets much better light than mine does for some reason, I think because there are less trees above its skylight. This bathroom got the same fancy Kohler toilet (the Tresham) and hardware. I also swapped out the towel bars for pretty brass ones from Kohler and added a new light fixture and a round mirror. Taking those giant glued-on mirrors was terrifying and I spent the entire time I did it thinking the mirror was going to fall on me and chop my body in half. There were four of these, one in each bathroom. The first one I removed by just smashing it and putting it into contractor garbage bags (wearing gloves, obviously). The remaining three I figured out how to get off the wall by prying them slowly with a crowbar and shims.
The Gym
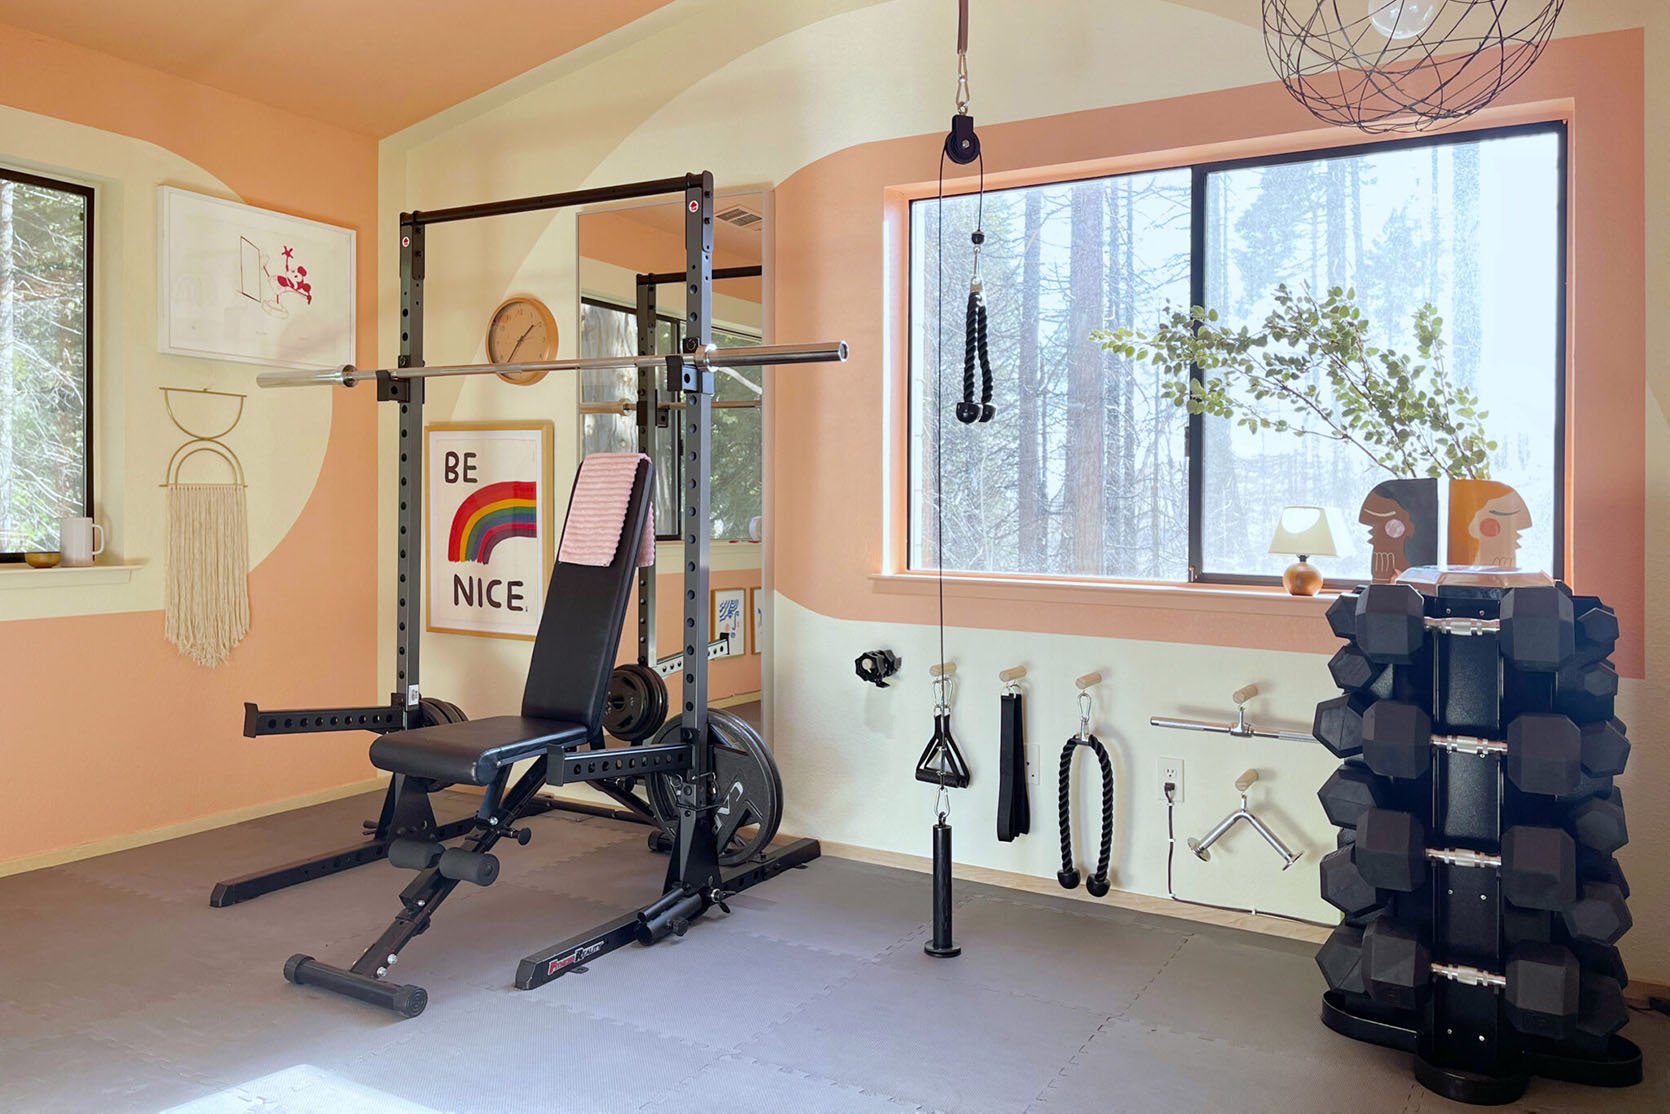
Pink Paint | Beige Paint | Ivory Paint | Exercise Mat | Grip Plate Weight | Adjustable Rack | Pulldown Attachments | Adjustable Bench | Barbell Rubber Hex Dumbbell Set
Now, if you stay at Londo Lodge, you won’t have access to the gym. There are too many liability issues with letting people workout in your house. But I did want to show it just so you have a full house tour and so you can see how it changed. This room can’t technically be called a bedroom because it has no closet but it’s basically a bedroom. When I moved up here, I was really overwhelmed with life and I wanted to prioritize working out to stay healthy. I’ve always dealt with weight issues, but as an adult, I have made fitness and working out a hobby that I really like that helps me stay mentally stable. Unfortunately, the depression and anxiety I had while living at Londo Lodge full-time prevented me from keeping that hobby alive. But now that I’m back in LA and have been in a routine I like (and a gym with other humans in it to motivate me) I’m a lot more muscular than I was before the pandemic. And to be honest, I think it’s because I gained weight in the woods. The added fat helped me grow bigger muscles. So this story has a silver lining! A silver lining made from FRESH AMERICAN BEEF (me).
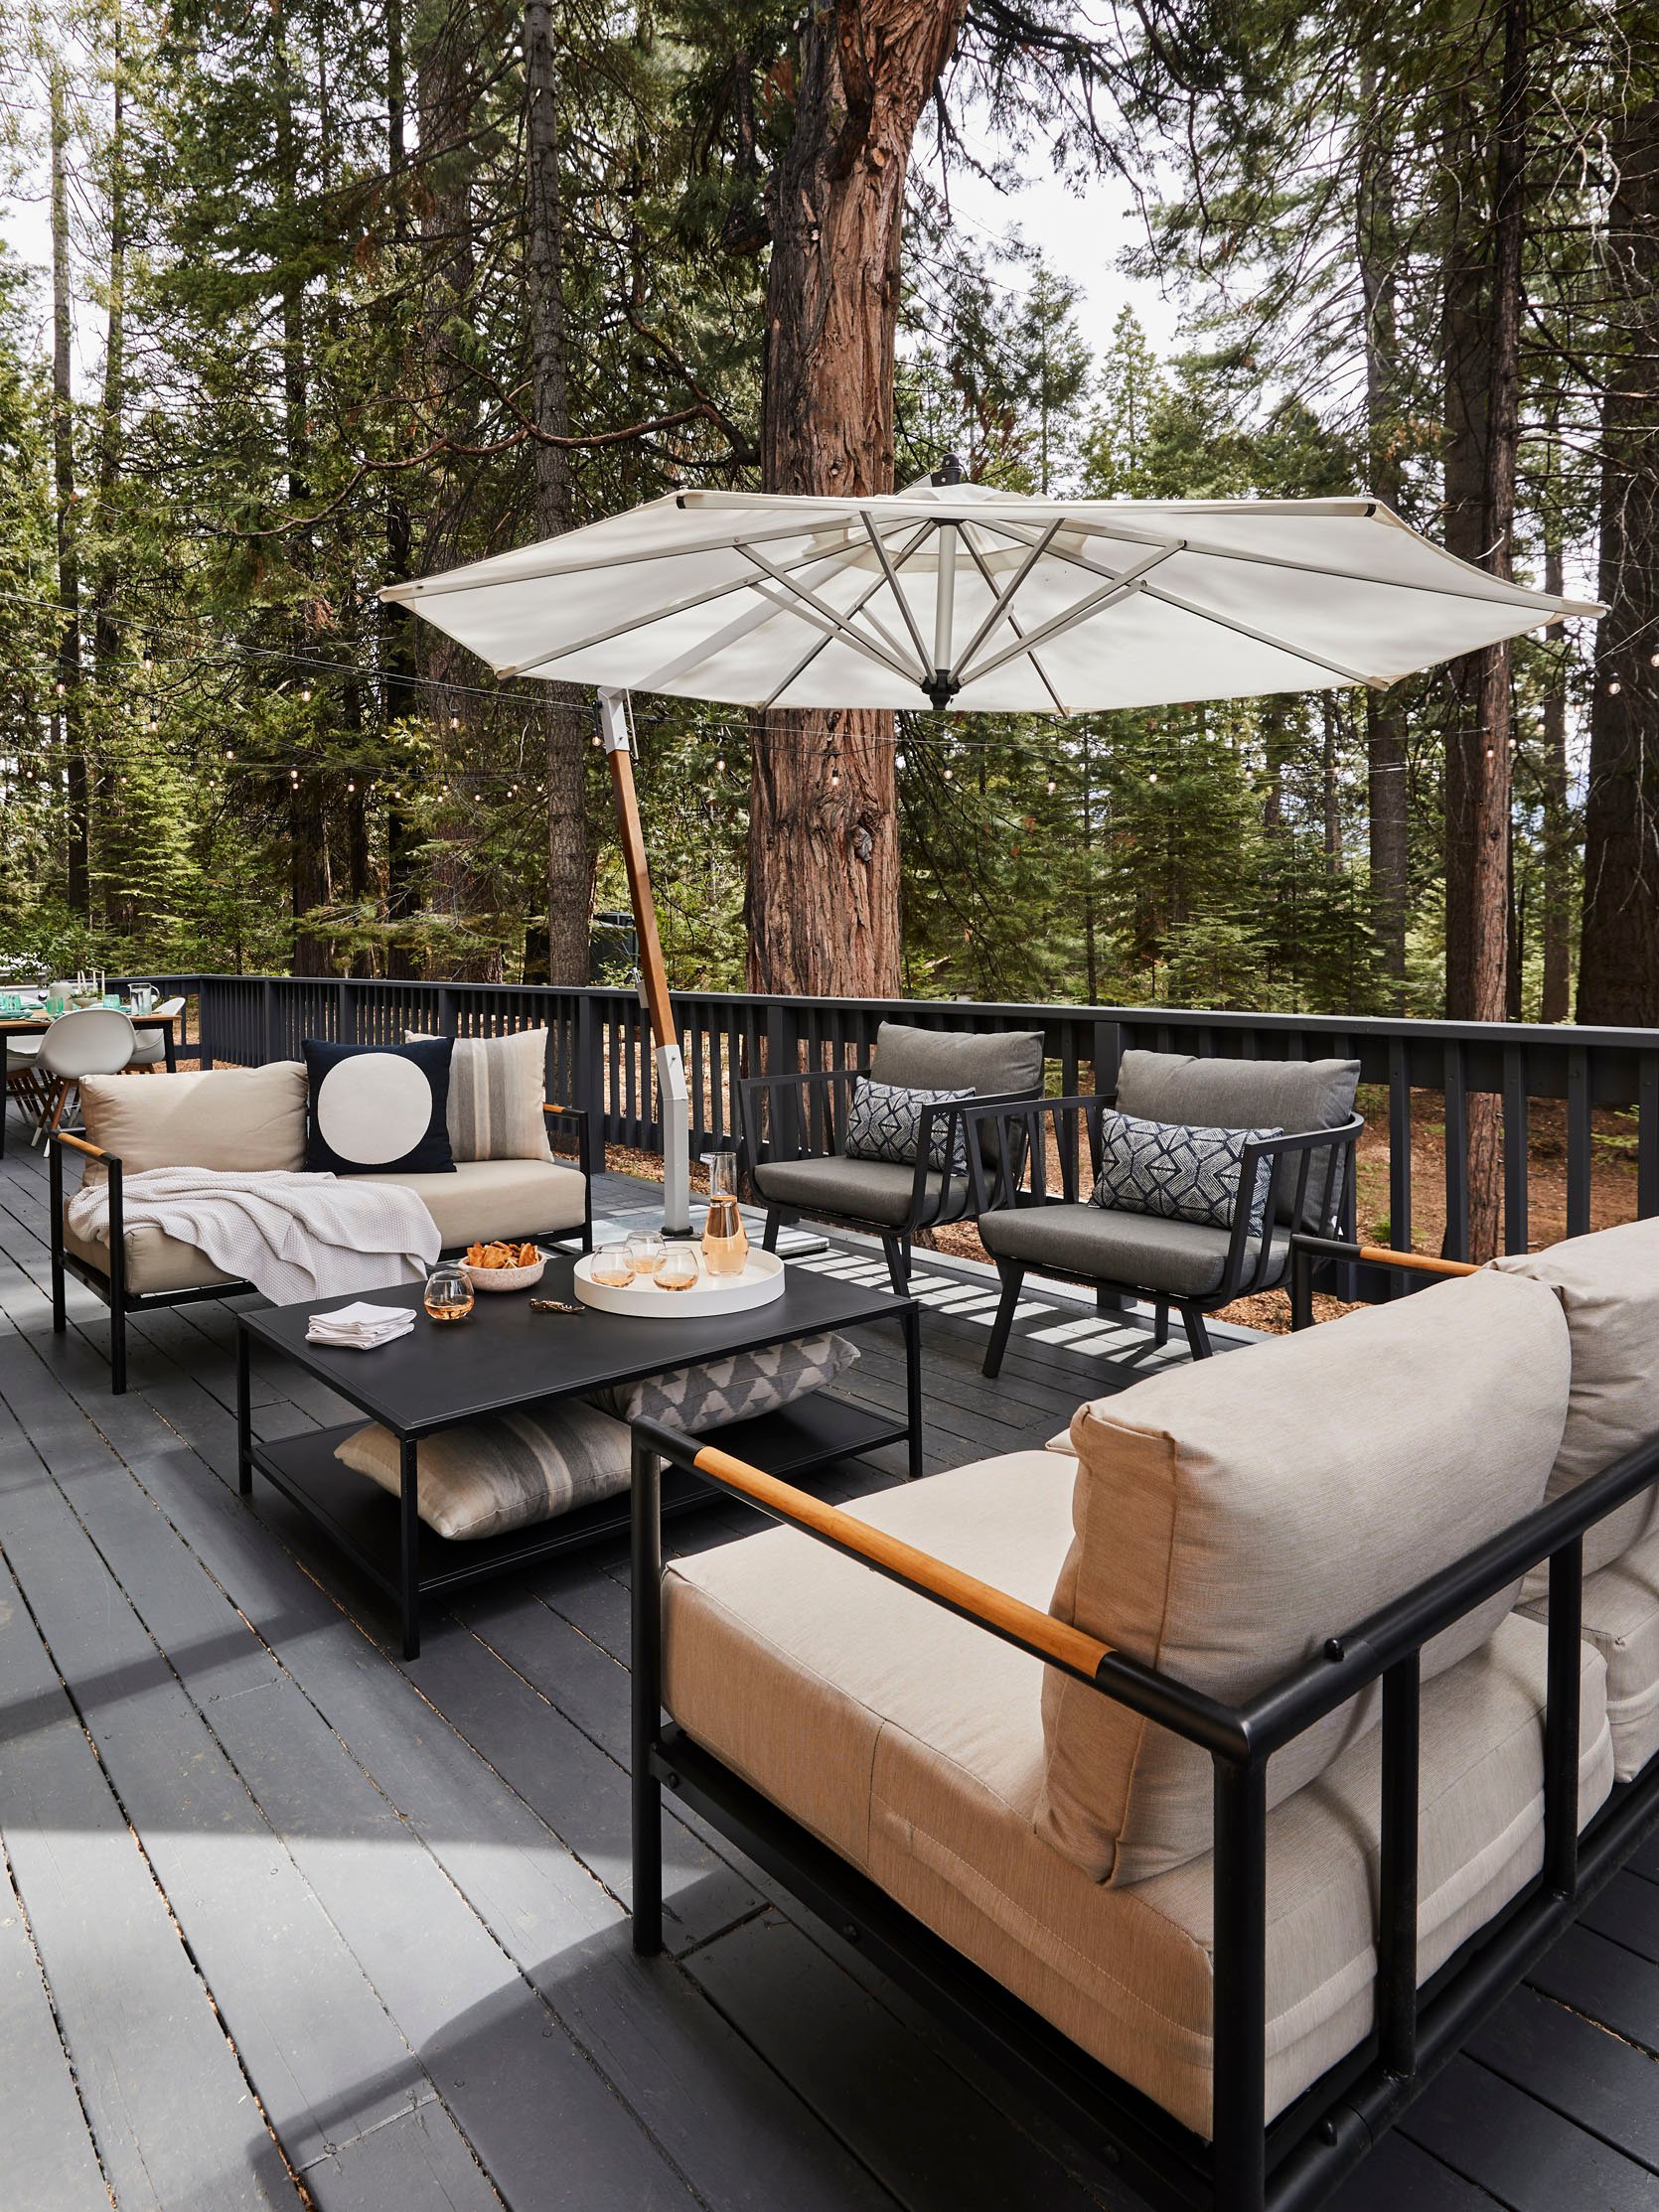
The Deck

Dining Table | Dining Chairs | Deck Paint
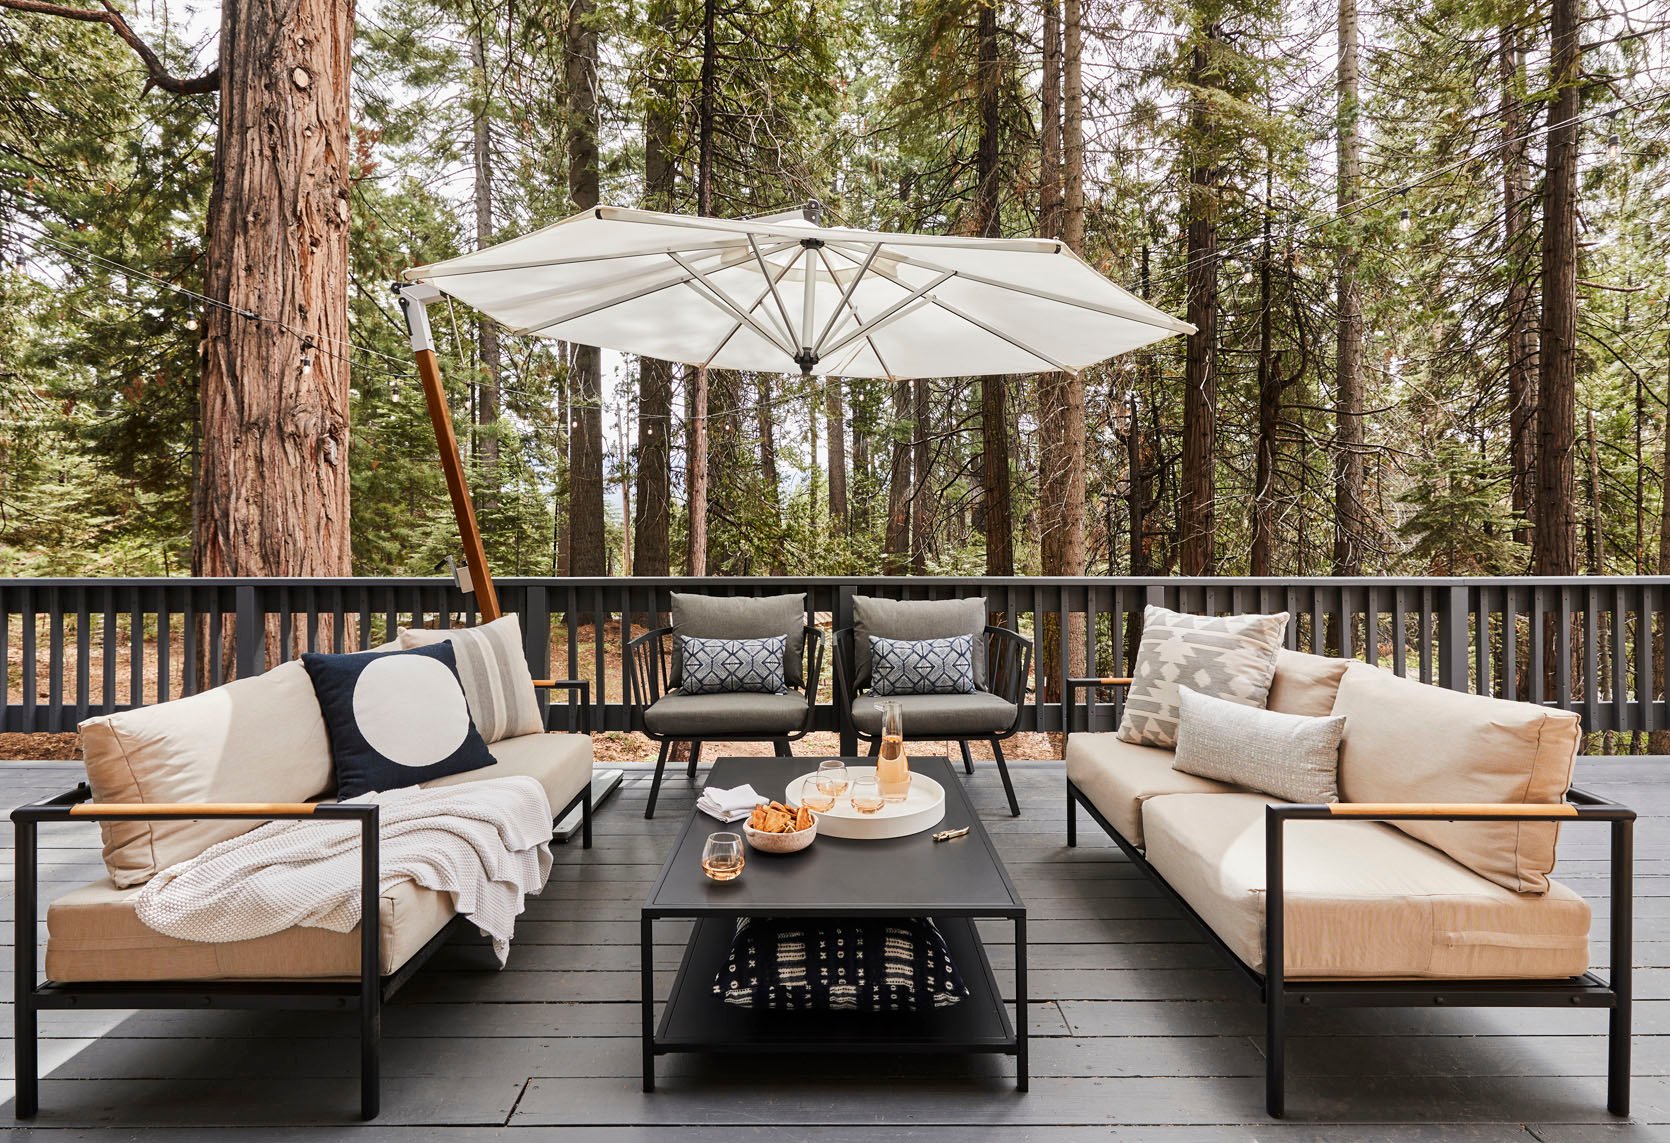
Umbrella | Sofas | Chairs (No Longer Available) | Coffee Table (No Longer Available)
The deck is one of the most peaceful parts of the property. The house is nestled amongst pine trees. And is set up for outdoor hangs and star gazing. I set up the seating area right outside the dining room so that it looks welcoming from inside. The umbrella isn’t fully necessary in the woods but it has lasted through two winters and still looks perfect (not surprising, it’s Sunbrella).
Eventually, I plan on replacing the deck. But to update it and extend its life, I painted it with deck paint. It looks great! But this is likely something I’ll have to do every spring because snow is really hard on decks. I’ve had to fix the railing both springs I’ve spent at Londo Lodge. And to get this place permitted for rental, I had to remove all those balusters, put them closer together (4” instead of 6” because the code changed since the house was built). It was sort of a pain because I plan on replacing the deck soon anyway, but it was definitely something that wasn’t hard for me to do.
The Other Outdoor Seating Area/The Witches Circle
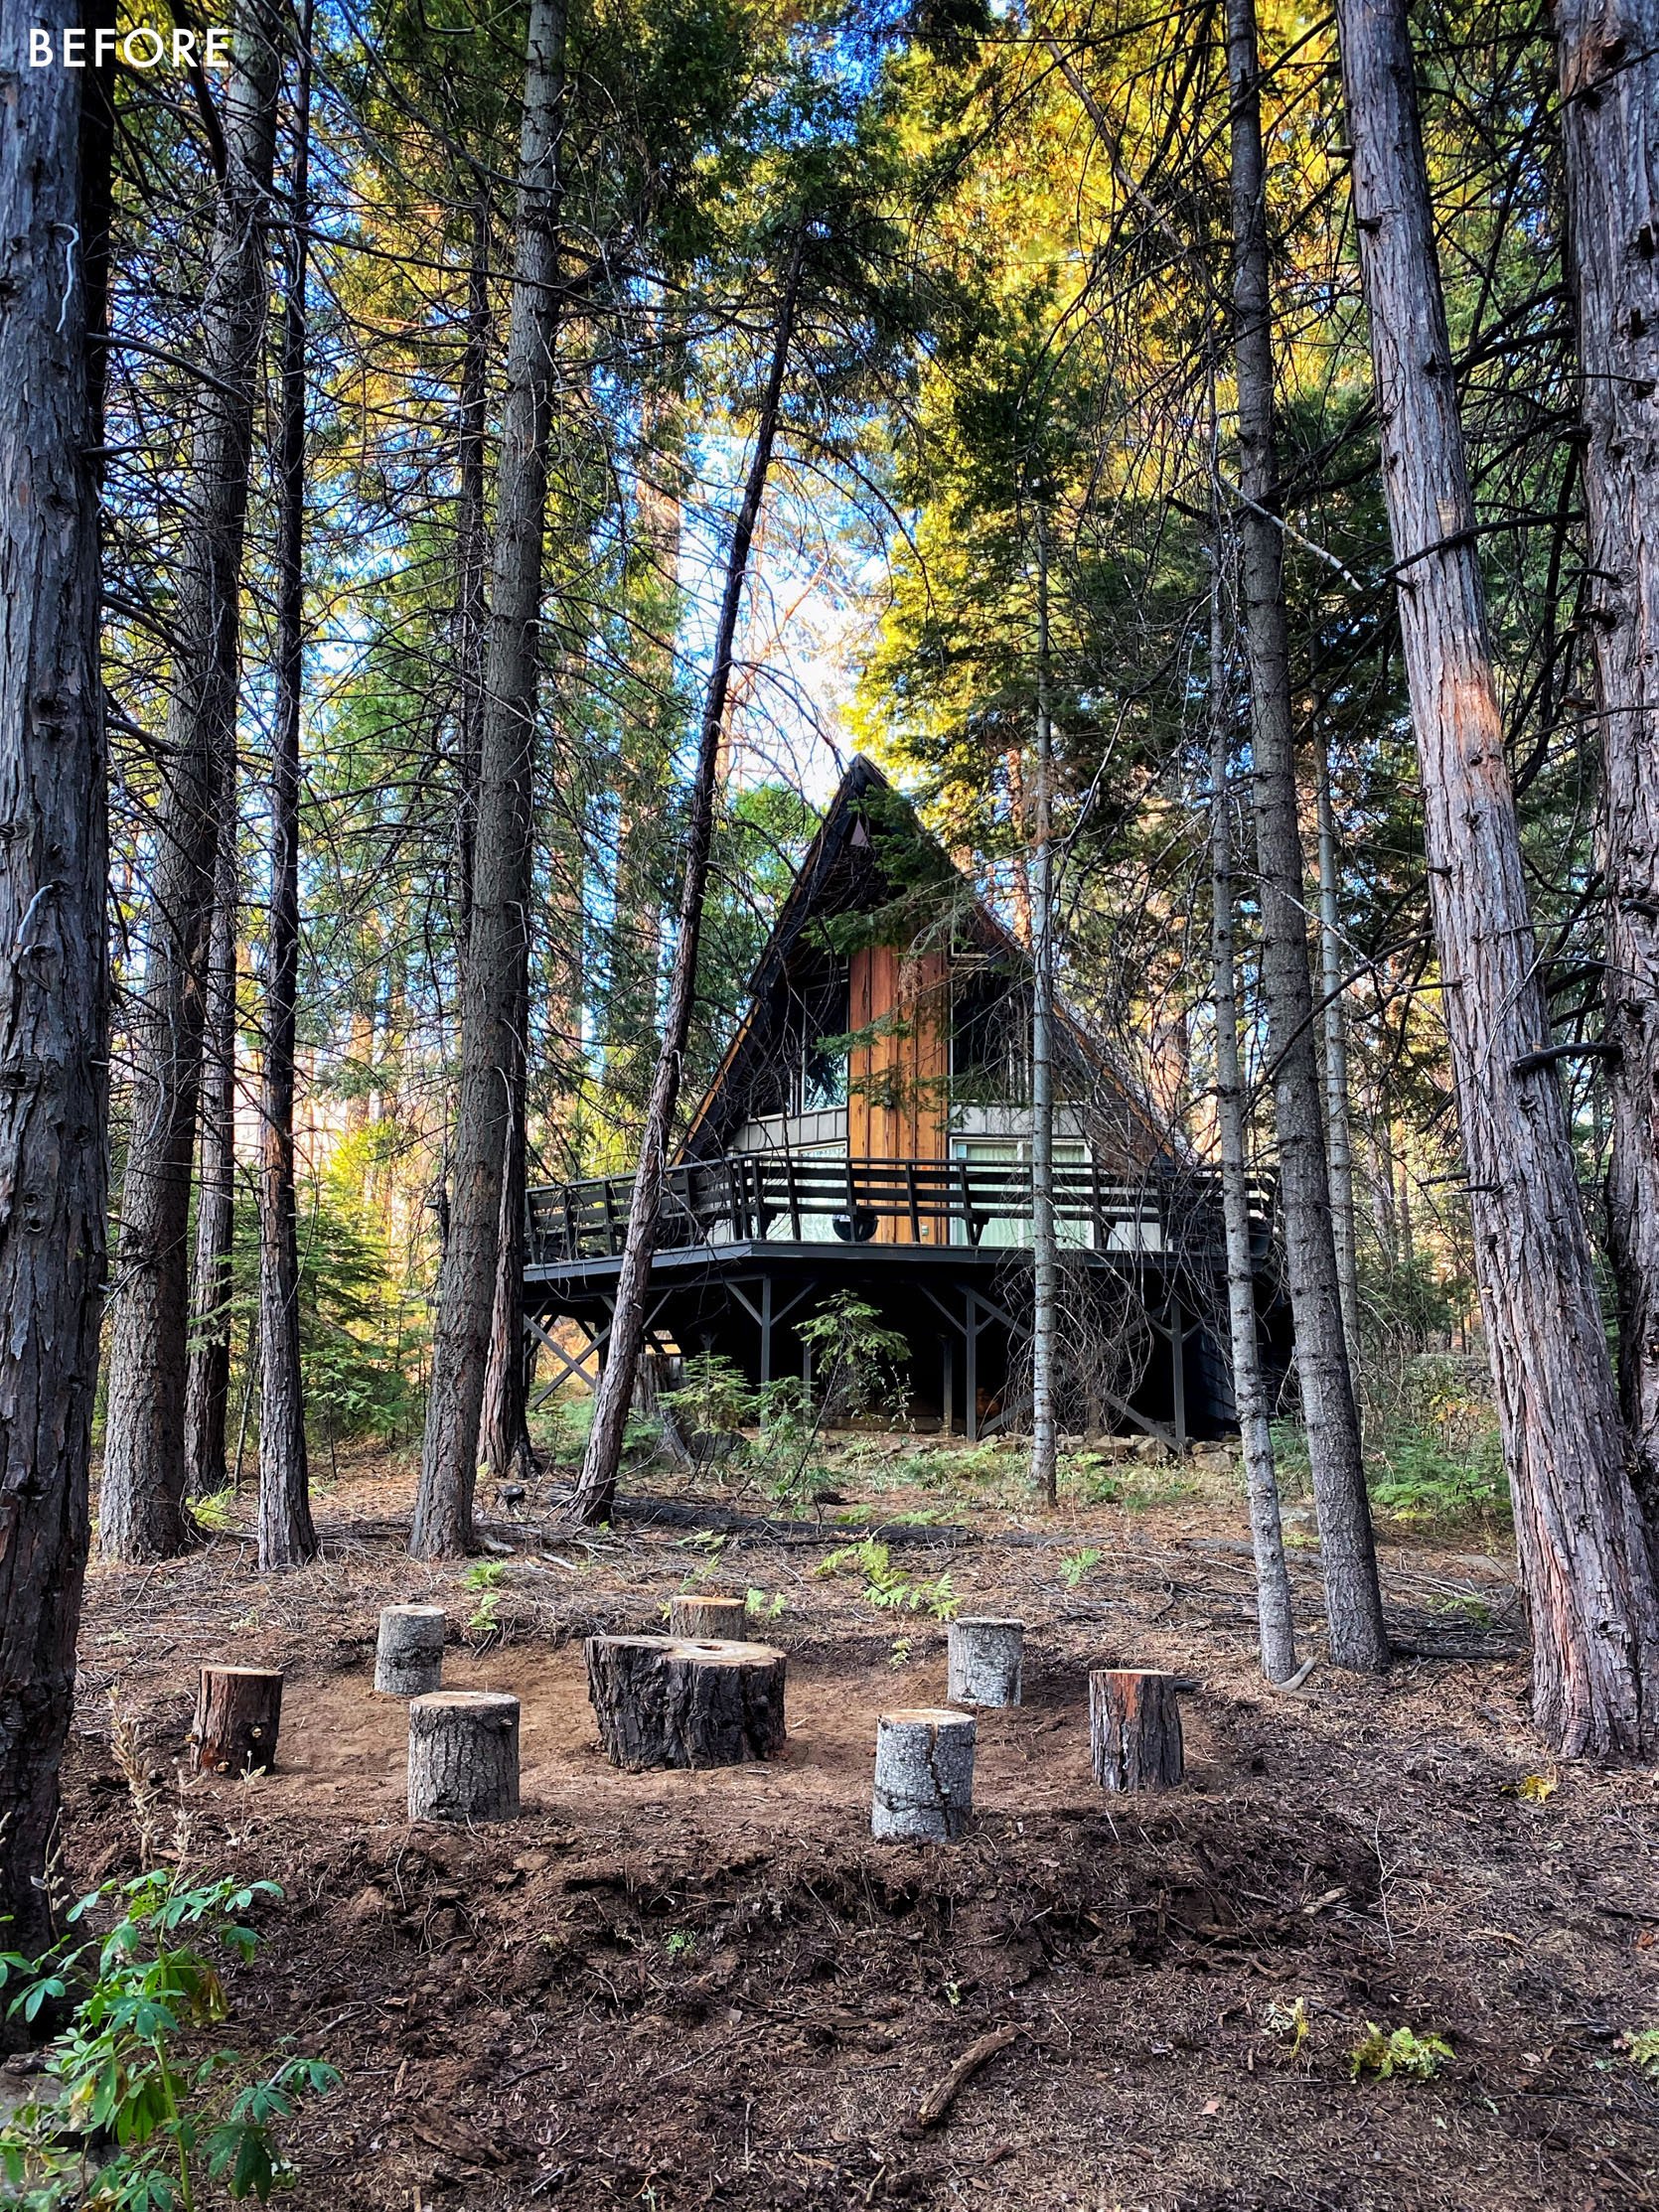
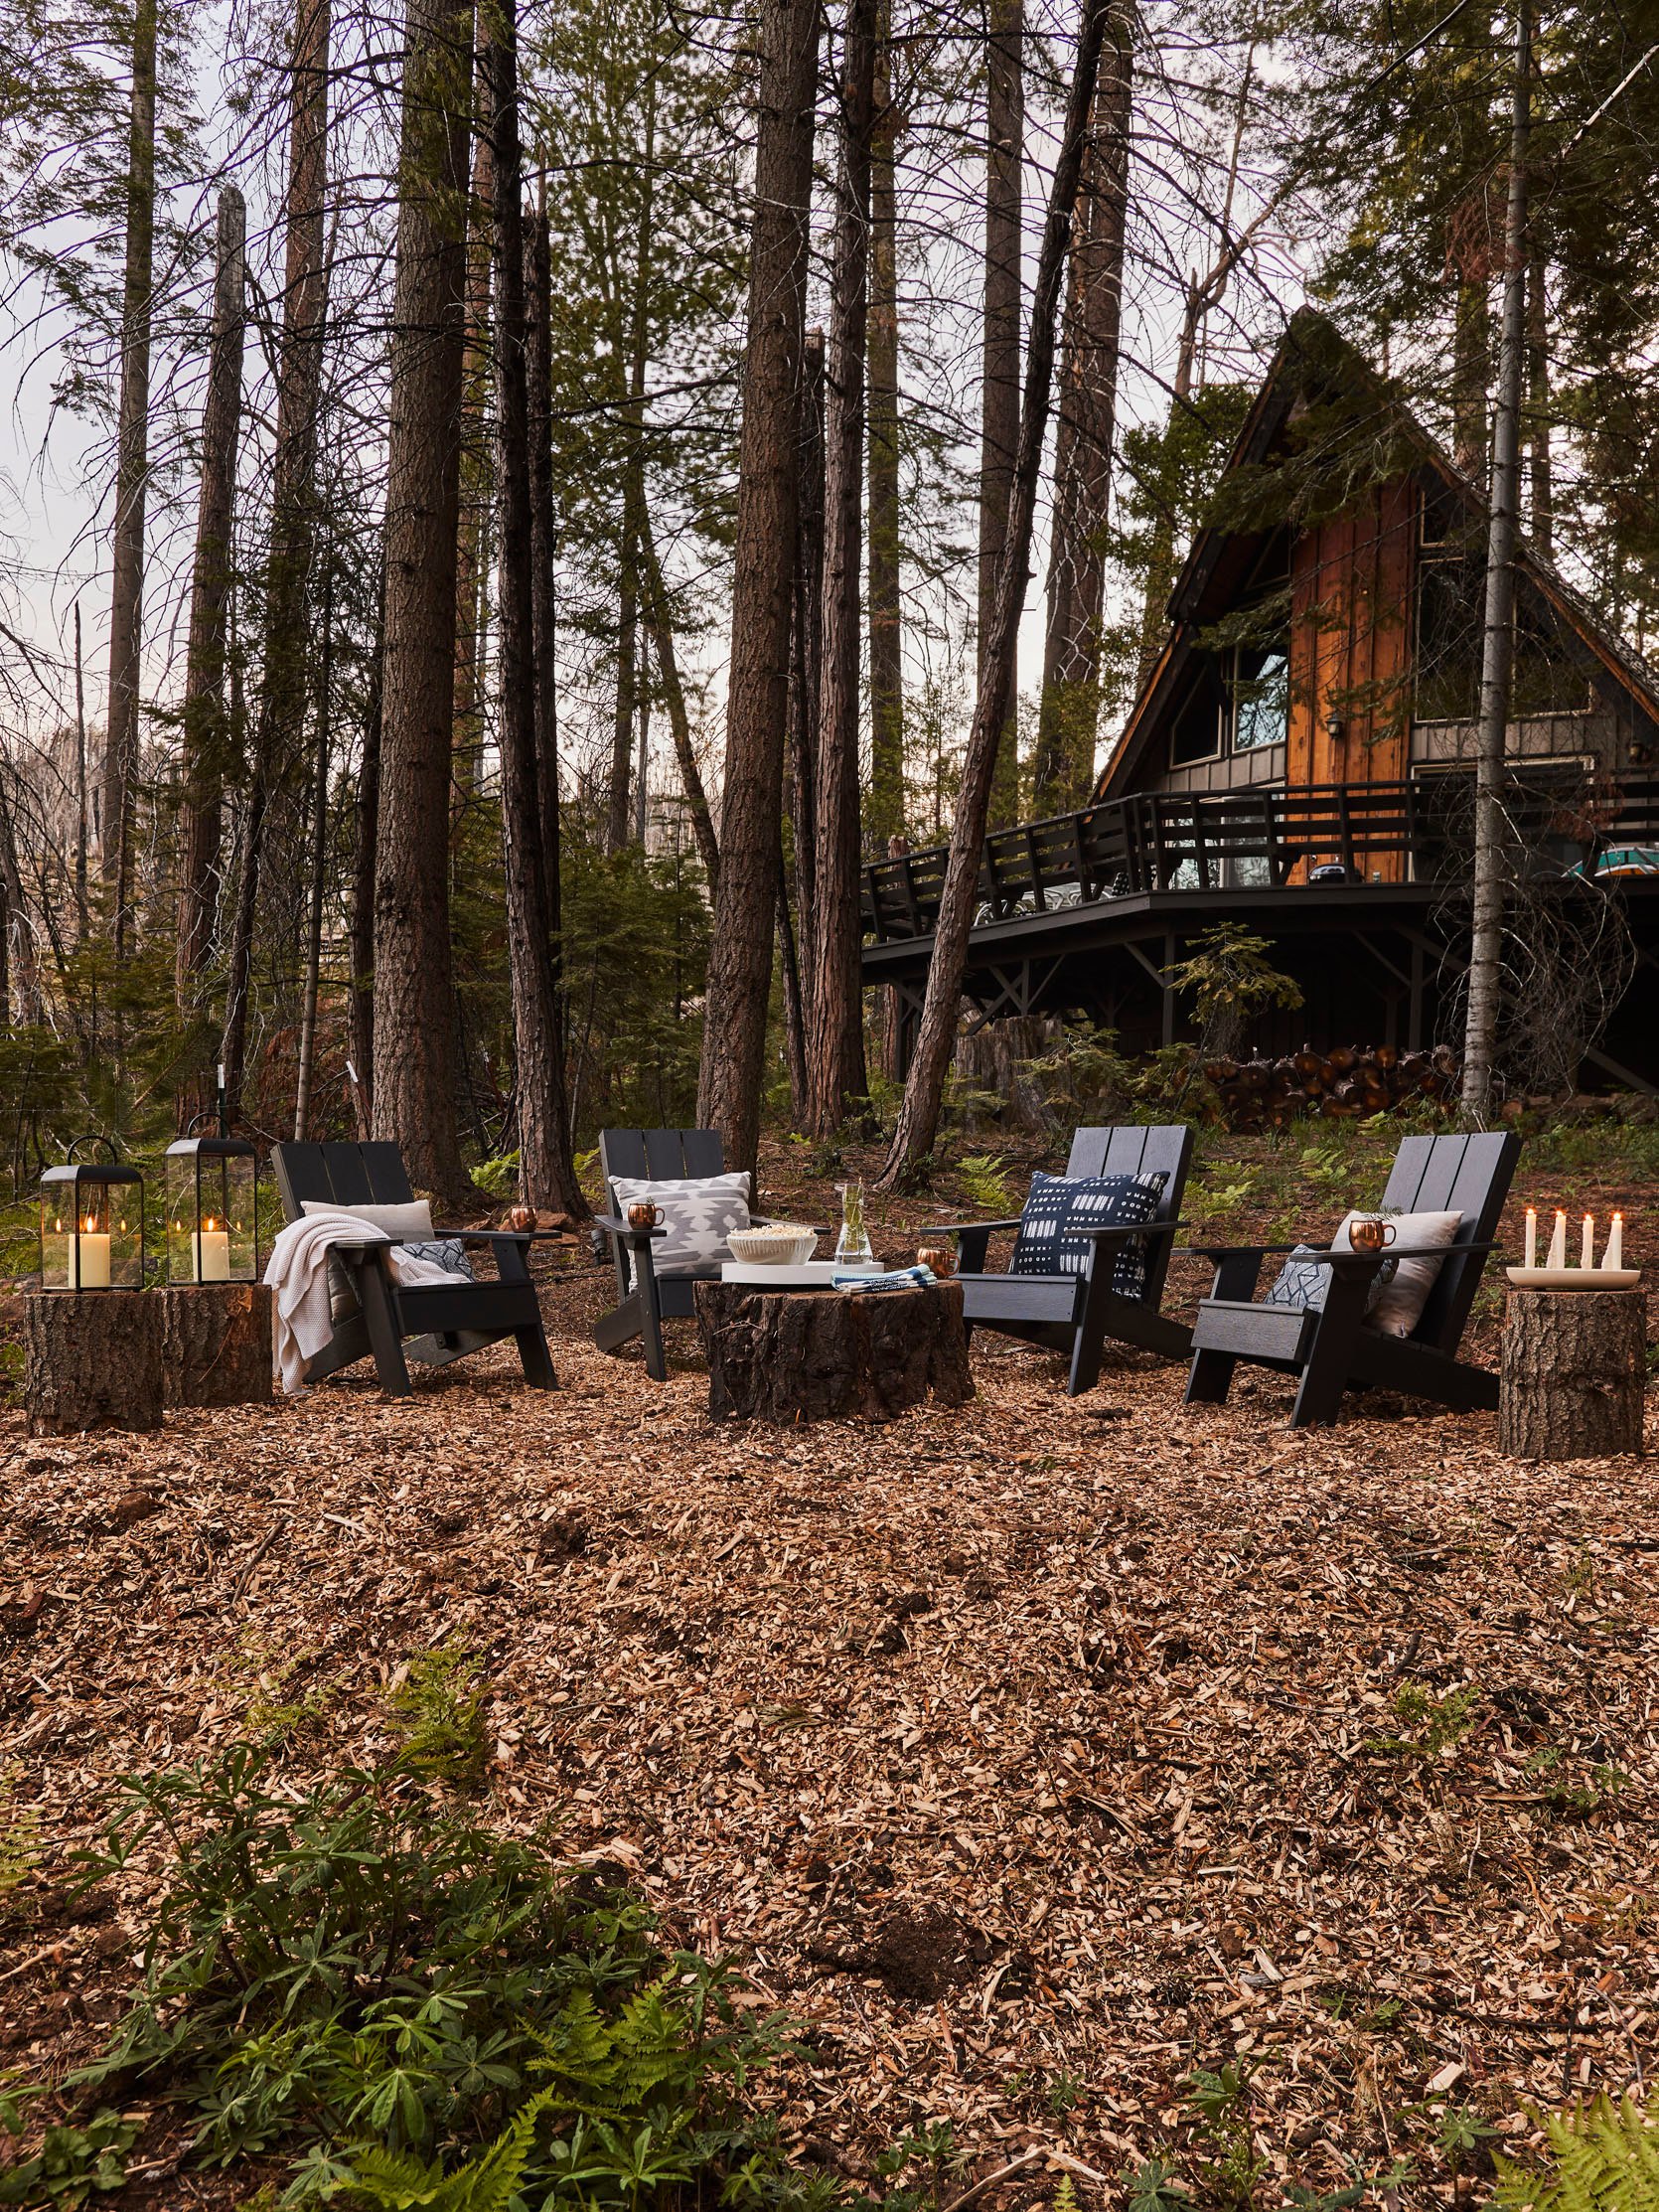
Eventually (I’m noticing I’m using that word a lot) I have a plan to lightly landscape the property. Don’t worry, I’m not gonna put sod in or make it look like suburbia. I plan to expand the deck around the house and then create some paths to get around the property but otherwise keep it natural. When I moved in, there were literally piles of old rotting wood EVERYWHERE. So the native lupines and ferns weren’t growing very well. I have spent countless days removing debris from the property so that the plants could thrive. And the past two springs/summers have been STUNNING. The lupines and ferns are so lush and they last until late summer. So the house is surrounded by natural landscaping (wait, is that what we call “nature”?) that’s self-sustaining and requires no irrigation. I’ve planted about 15 dogwood trees, which are native to the area and will eventually require no irrigation but do for the first few years until they’re established. My goal here is to make an outdoor space that has some flow but pretty much just looks like the woods.
For now, I’ve created what I call “The Witches Circle” by building up a part of my yard using downed branches and yard waste covered in soil and woodchips. Each spring our amazing fire department offers a service to chip any branches or debris that may have fallen during the winter. So I drag all the giant branches that fall to the road, they chip them, and I put them around the property. The goal is to get rid of fire hazards. Wood chips are a lot safer than branches and leaves all over the ground.
Londo Lodge is on a half acre and honestly I didn’t really know how much work it would be to keep up with all those falling branches. You basically have to do a major clearing twice a year. In spring after all the snow makes branches fall. And fall after all the leaves and pinecones fall. Forest homes can’t just exist without upkeep. They are alive and need to be cared for constantly. I guess before having this place I thought you could just leave your cabin for months on end. But you can’t. You need eyes on your property constantly, which is one of the reasons I decided to rent it out (so there would be housekeepers and managers on site all the time).
LOL. Ooops! The point of this post, based on Emily’s incredible generosity, was supposed to be to get you to rent out my house. But I guess I just really wanted to tell the story of how it got to where it is because I haven’t told it all together in one place before. Growing up in Yosemite Valley, I always thought the options for lodging up there were terrible. The reason is that the National Park Service contracts out the hotels and services there and since I was a kid they’ve always contracted with terrible, publicly traded megacorporations who care more about shareholder dividends than creating a good experience for park guests. So a room at the Ahwahnee (the historic lodge in the valley) usually costs around $700 and the rooms aren’t that nice.
My goal with Londo Lodge was to do something different than the other vacation rentals in the area. Most places you’ll see on Airbnb up here have beds with no frames, no nightstands, no decor to speak of aside from bears carved from tree trunks. Growing up here, I was always like I DON’T NEED TO SEE PHOTOS OF HALF DOME ON THE WALL YOSEMITE IS RIGHT OUTSIDE. So my art and decor are more of what I’d have in my regular home.
The eventual plan is to make the house a lot more traditional by swapping out the windows and doors, adding interior wall paneling and wood-clad ceilings, and shingling the outside. The reason I’m renting it out is A) So I can afford the mortgage while having a place in LA, which I’ve found is necessary for my mental and physical health and B) To help pay for the renovations I want to do BECAUSE GIRLFRIEND THEY ARE EXPENSIVE.
When I moved into the house, my whole family was like “You could totally rent this out as is!” Which was true, the house would have rented easily in its “before” state. But as a designer, this is my brand, this is my calling card. So I wouldn’t have been comfortable having people pay to stay in a house I didn’t think was up to my standards. I’m happy that my house is as beautiful and comfy as it is now and I feel proud to share it. Of course, there are a million things I want to change but it will ALWAYS be like that. I don’t think I’ll ever be done improving it. But for now, it’s a really wonderful place to spend time, to relax, to forest bathe. The beds are comfortable, the home itself is very spacious (3000 sq/ft) and it has an amenity almost no other properties in town do: AC. I’m hoping to install solar next year to offset the power this large house uses, but doing so is a little complicated because of my roof style and a few trees that need to be cleared to make enough light for the panels. My goal is to make this a carbon-neutral property as soon as possible (which is another reason I need funds from renting it out).
Okay, so here are some essential details about the house should you choose to book:
The house has three king beds (one in each official bedroom), one queen bed, and one fold-out sofa. So if two people slept in each bed, you could fit up to ten. Unfortunately, I’m only authorized to rent it out to six by the county. If you look at Airbnbs in Mariposa County, there are a suspicious number of 3 bedrooms listed. You can guess what’s going on there. The county only allows three bedrooms per property to be rented out. But my guess is… Those aren’t all three bedrooms (WINK!).
The nearest airport is FAT (Fresno Yosemite International Airport) but I’m gonna be honest, flights directly there tend to be really expensive. If you’re coming from out of state, I’d fly to LA rather than SF. San Francisco is technically closer but the roads between there and Londo Lodge are VERY windy and so it takes about 5.5 hours whereas LA takes about 4.5 hours.
This sounds super conceited, but it’s true: My house is going to be the best decorated house you’ll find in the area. With the best beds, the best bedding, the most outfitted kitchen, and the best furnishings throughout the house.
I’m starting a kitchen renovation in February so it’s kind of a bummer I didn’t get my permit from the county until right before Christmas. Timing hasn’t been on my side. The application process for the county permits (needed to rent out your house or they will shut it down) took a year and cost $15,000 BUT THAT’S A STORY FOR ANOTHER DAY.
So if you have time, head on up this month before I tear up the kitchen! Or, come in summer after the kitchen (hopefully) is complete. I ruined my body and ran myself ragged getting this place ready and I DID IT ALL FOR YOU. Just kidding I did it for me. But you can benefit from its beauty as well! Book today! Goodbye!
What it will look like when it’s ALLLLL DONE…eventually:)
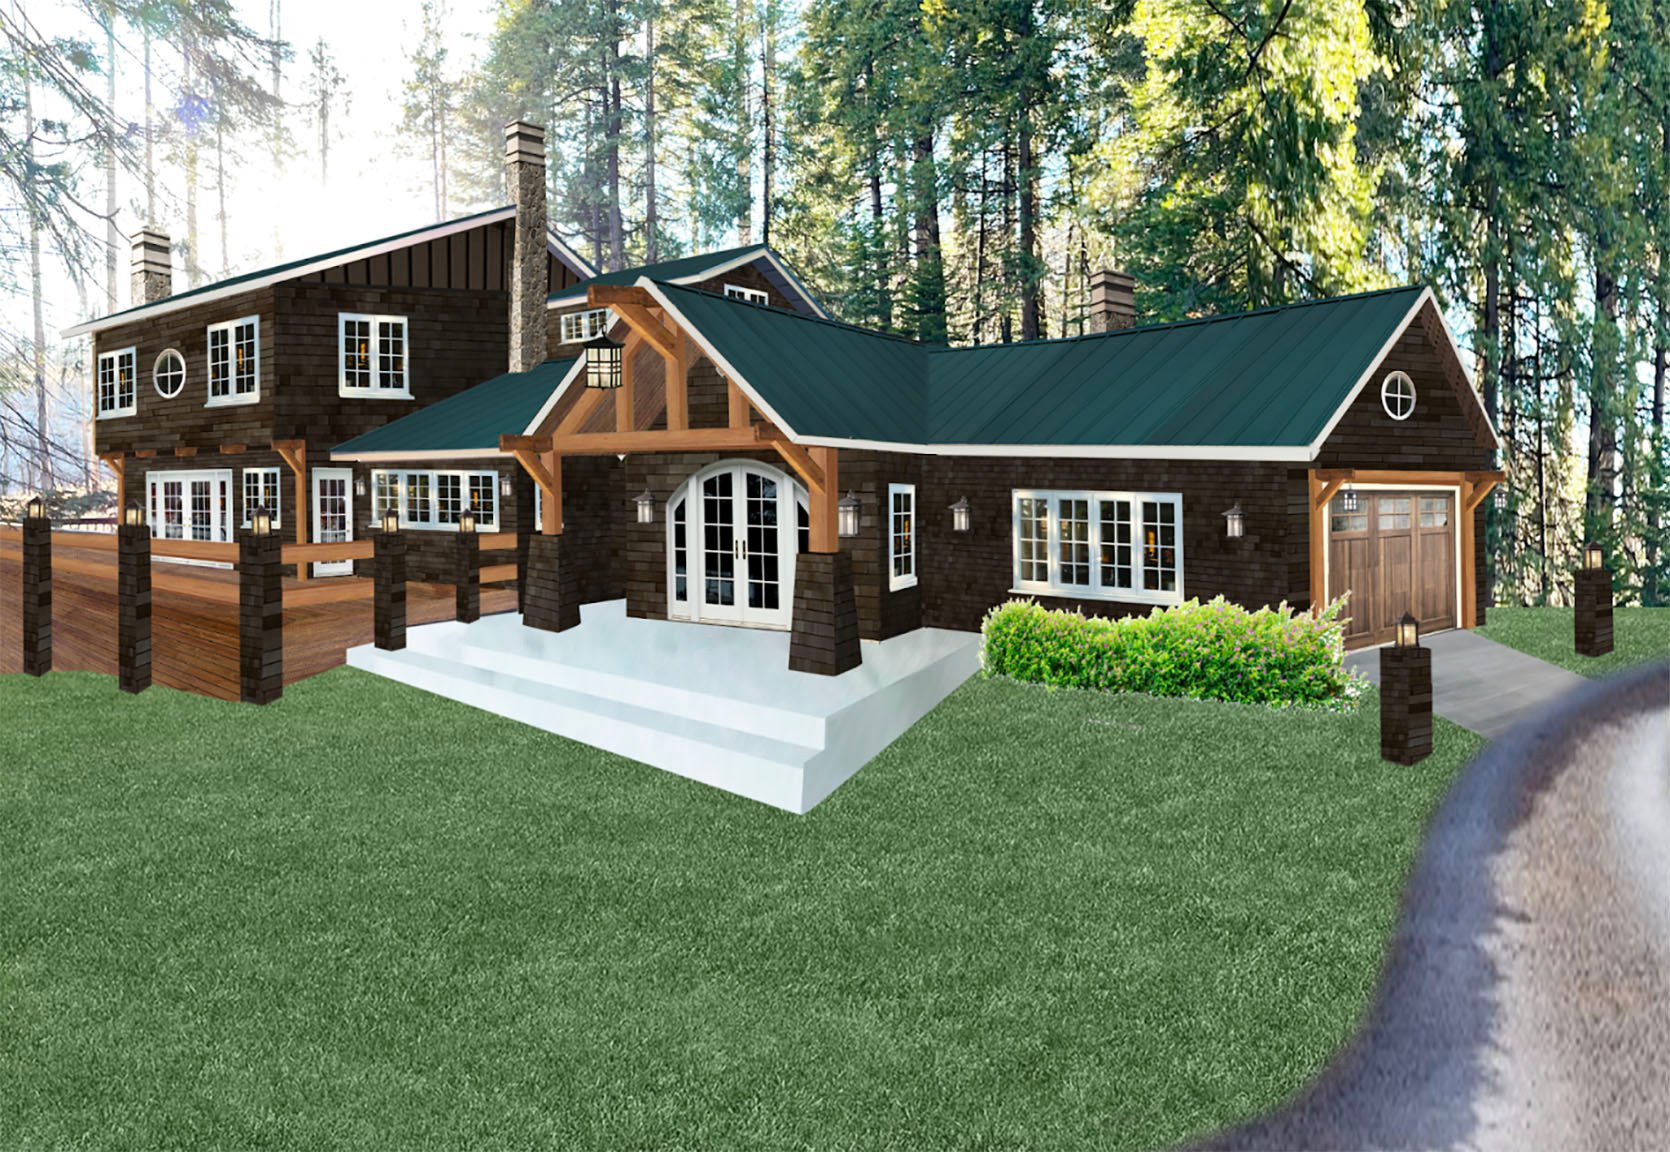
*Design by Orlando Soria
**After Photos by Sara Ligorria-Tramp
THIS POST WAS ORIGINALLY PUBLISHED HERE.
