Hello everyone! I’m writing this during my most favorite time of the year, the week between Christmas and New Year’s when no one should put on hard pants, open an email, or walk outside. Unless, of course, you’re walking into your perfectly styled backyard that we will be looking at today.
I am using the time to catch up on rest. This year has been a doozy. For the Bowser’s it has been a year of grinding and grinding and feeling like you’re getting nowhere. On top of that, our cat Gremmy went missing for 6 long weeks and Daffy, my most precious love (also a cat) had a terrifying and expensive brush with death. You know that feeling like you’re digging a hole but like, someone is behind you kicking the dirt back in? That’s been 2022. In exciting news, my husband got his movie into Sundance. Yes. The movie he was famously getting ready for in this room got into the biggest film festival in North America:

Sundance is a really big deal. Huge. Really happy and proud and excited for him BUT a fun thing for ME is that we are going to be quarantining starting Jan 1 so we don’t get sick before we leave on the 17th which basically means this boxing day/week will extend until the 17th! I’m being forced to NOT WORK! I mean, that’s not totally true, I worked on a project with William Hunter Collective over this year and I will be sourcing from home for another one to make ends meet as well as finishing up my kitchen reveal (waiting on one last thing before I can shoot – lead times AM I RIGHT?) and writing a few blog posts for you all. But does it count as work if you’re not wearing hard pants and your cat is on your lap?? The answer is yes, but in comparison to my 2022 – no.
I’ve been mostly off for the past couple of weeks as production always slows down during the holiday season but I’m still vibrating with the anxieties of these past couple of years. I’m excited to enjoy my home, catch up, and reset for 2023. This is also my birthday week, which as a young person was a bit of a bummer but as an adult, it has been the best. No one bothers you, I never have a job, and it’s a great time to reflect and re-evaluate. I know logically that nothing has to fundamentally change because you turn a year older or because the calendar flips to a new year, but I’ve always loved the idea of a fresh start and I have quite a few half-used planners to prove it.
~Resolution #1: Don’t buy another planner. Do. Not. It will not fix your ADD and will only bring you shame whenever you come across it.~
Let’s get into this sweet little rental reveal, shall we? When I last talked to you about my back house’s backyard (BHBY) I had written half of it when Daffy had a massive seizure, continued to have seizures for days, and I lost all sense of self and time and then I guess I finished it? Honestly, it’s a blur. It’s amazing how these little creatures affect our lives so wholly. My friend Lauren dropped everything and flew to be with me because we had always “joked” how she would need to do that if something happened to Daffy. I do not know how I could have gotten through the next few days without her. She sat with me and stared into the horizon, she helped me build the Veradek planters that came for this shoot, went with me to the flea market to find a bar/console for this space, she drove with me to the fabric district to find last minute upholstery fabric for the WH project. She’s a real one, be a friend like Lauren. Also, big thanks to everyone who gave to Daffy’s GoFundMe, it has been very helpful in alleviating some of the financial stress. The update for those interested is that I am in the appeal process with the pet insurance company that denied me the first time around. BUT I am happy to report that Daffy is soundly snoring in the window next to me, and is only maybe a teensy bit brain-damaged? We are thankful and so happy that she is still a sweet girl who enjoys her life, loves treats, and I think maybe even likes Gremmy a little more than she used to, which is the biggest blessing in all of this. Live shot of a sleeping Daffy:

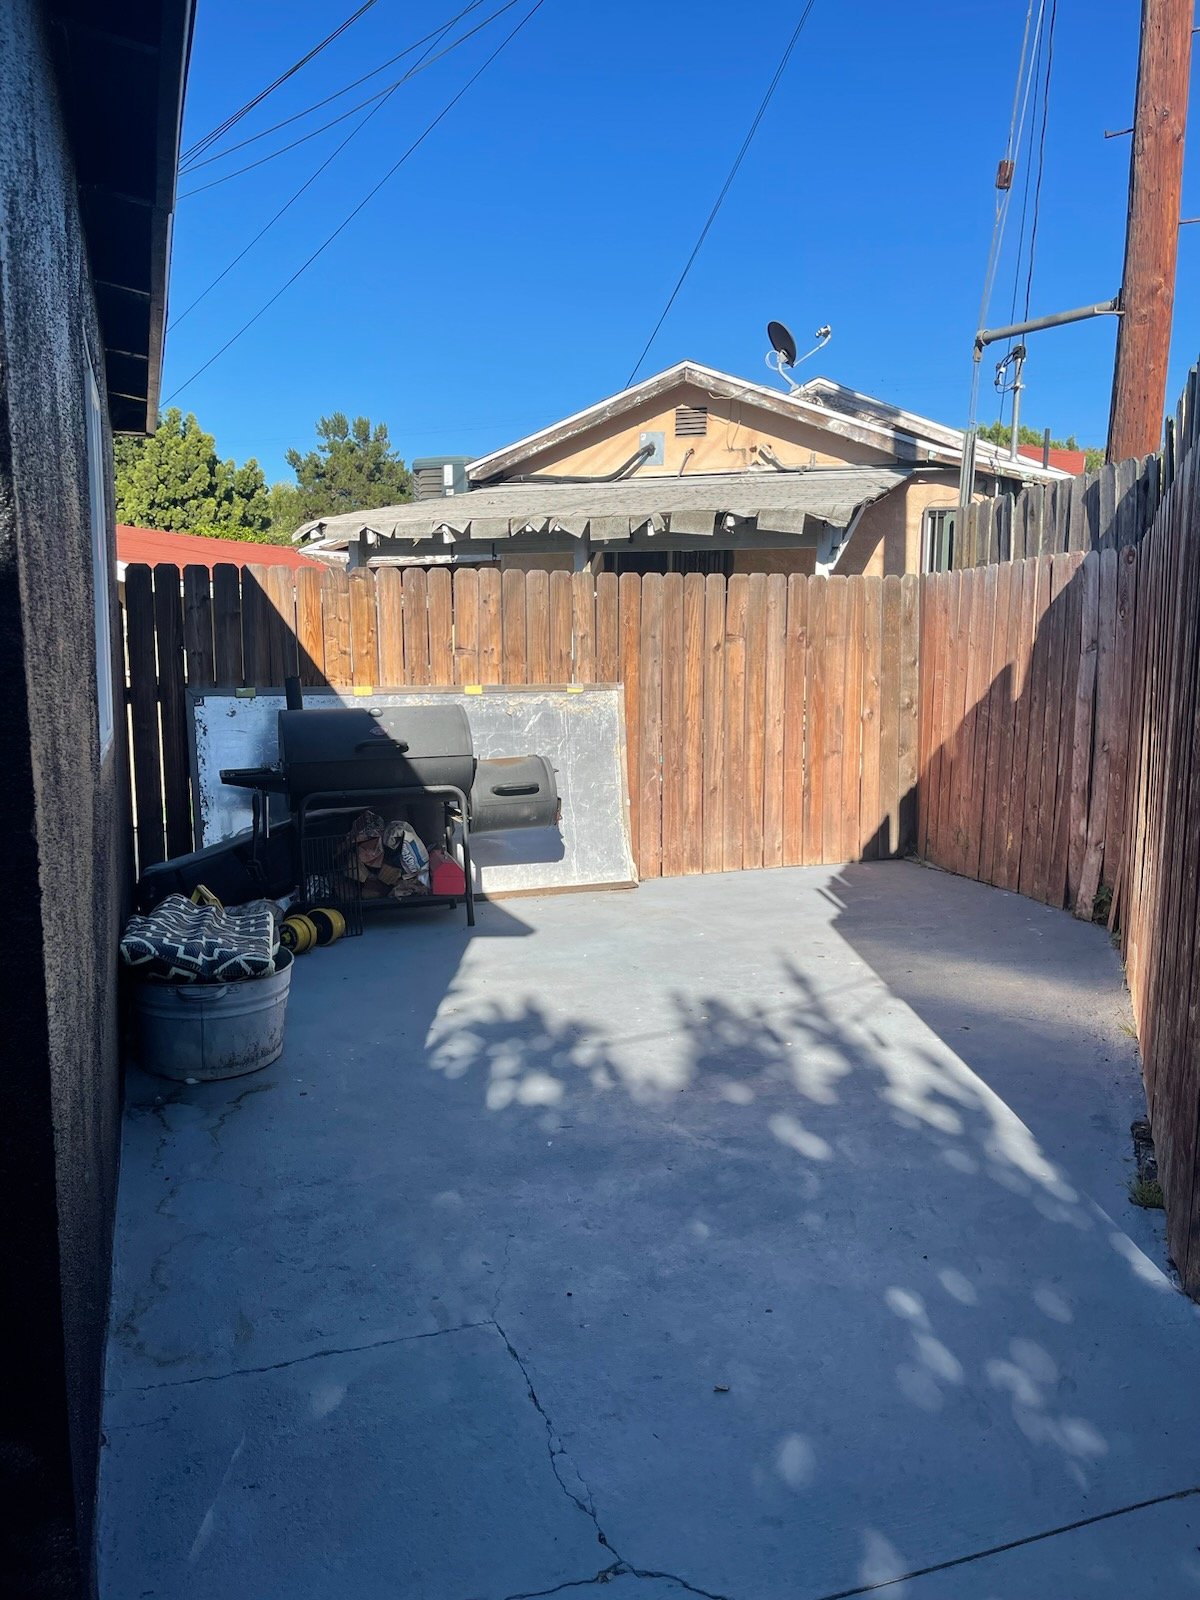
I got off track, the point is: I’m not sure I remember everything I said in that post and I’m scared to re-read it as I’m not sure if it will be triggering. I know I talked about all the different spaces and I tackled most of them. I am the person here to remind you that projects take lots of time and money and you are not going to be able to do it all overnight unless (and maybe not even if) it is your literal job. It may surprise some of you but this is not mine, in fact, these projects cost me quite a bit of money but we’ll get into costs in a bit. Anyway, life got wild so, for example, the sunshade idea got cut because the sun isn’t high enough this time of year for it to be an immediate problem. I had a great idea for an herb garden in the area I called “1” (photo below for reference) but I missed planting season and it would have required more money from me to finish the job well. I ended up tackling spaces 3, 4, 5, and 6. The good news is that when spring comes we will check back in to see how everything is growing and how the rest of the spaces turned out.
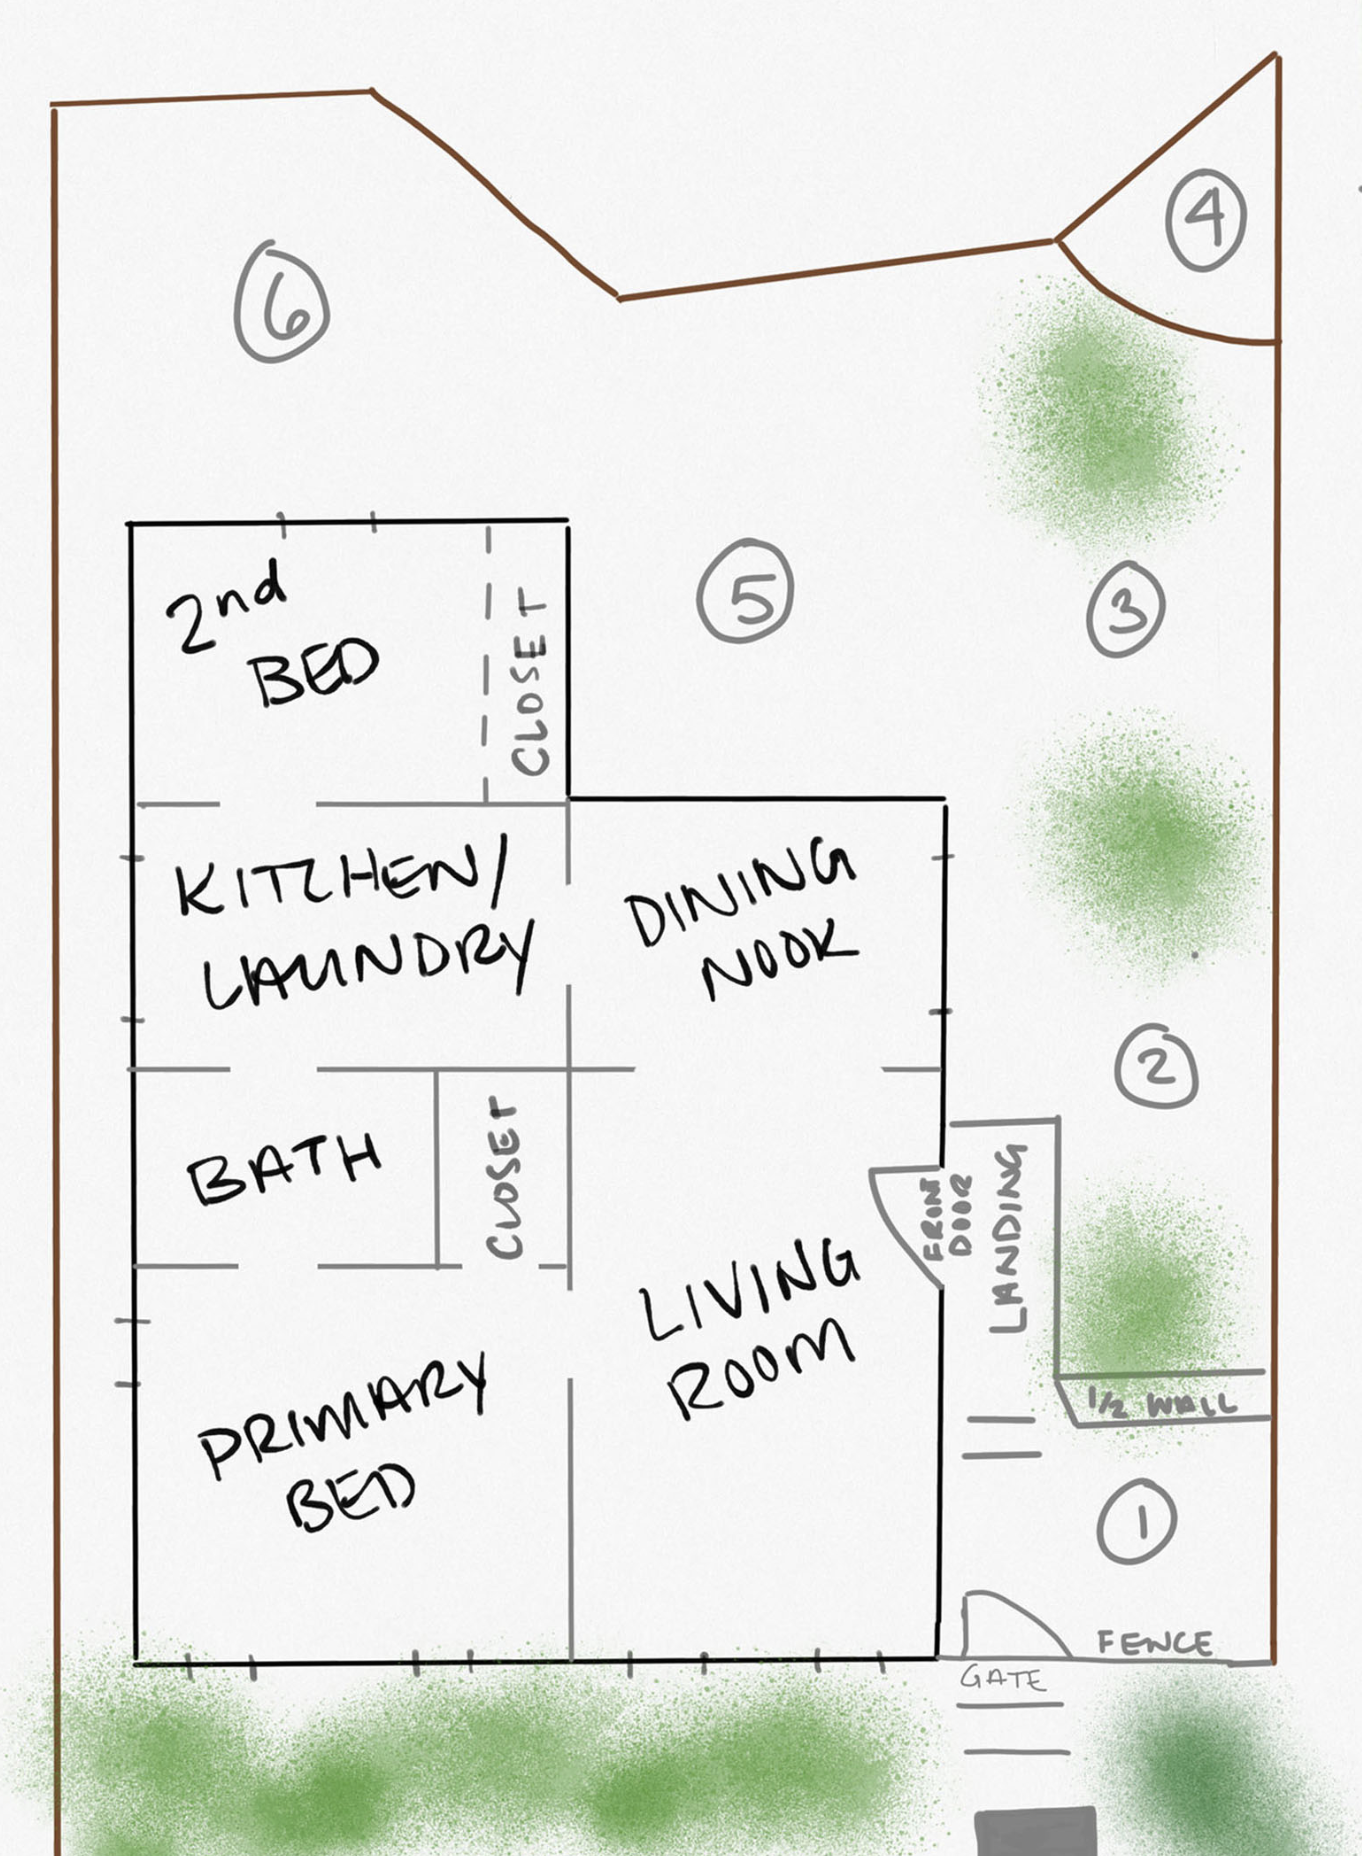
Before we get into the super fun stuff, let’s talk about the boring, time-consuming, frustrating, and costly things. My forte really 🙂
Although I would love to get new fencing around our entire property, I don’t have the funds for that at the moment so I decided to stain the fence myself which I 100% do not recommend:) It was time-consuming and my quads hurt for days. I would go out from 6 am-8 am and then work all day, come home and stain more by bistro light. It does look better though and should help while we wait for wood prices to go down (please dear Lord). Because I did the work myself and I had leftover stain, the cost wasn’t too high (financially anyway). I used English Chestnut by Minwax because, well, that’s what I had. They’re about $50/gallon and I ended up needing to buy an extra gallon. This isn’t a long-term solution, something that I just need to last me a couple of years so I did nothing except power wash the fence and then apply the stain.
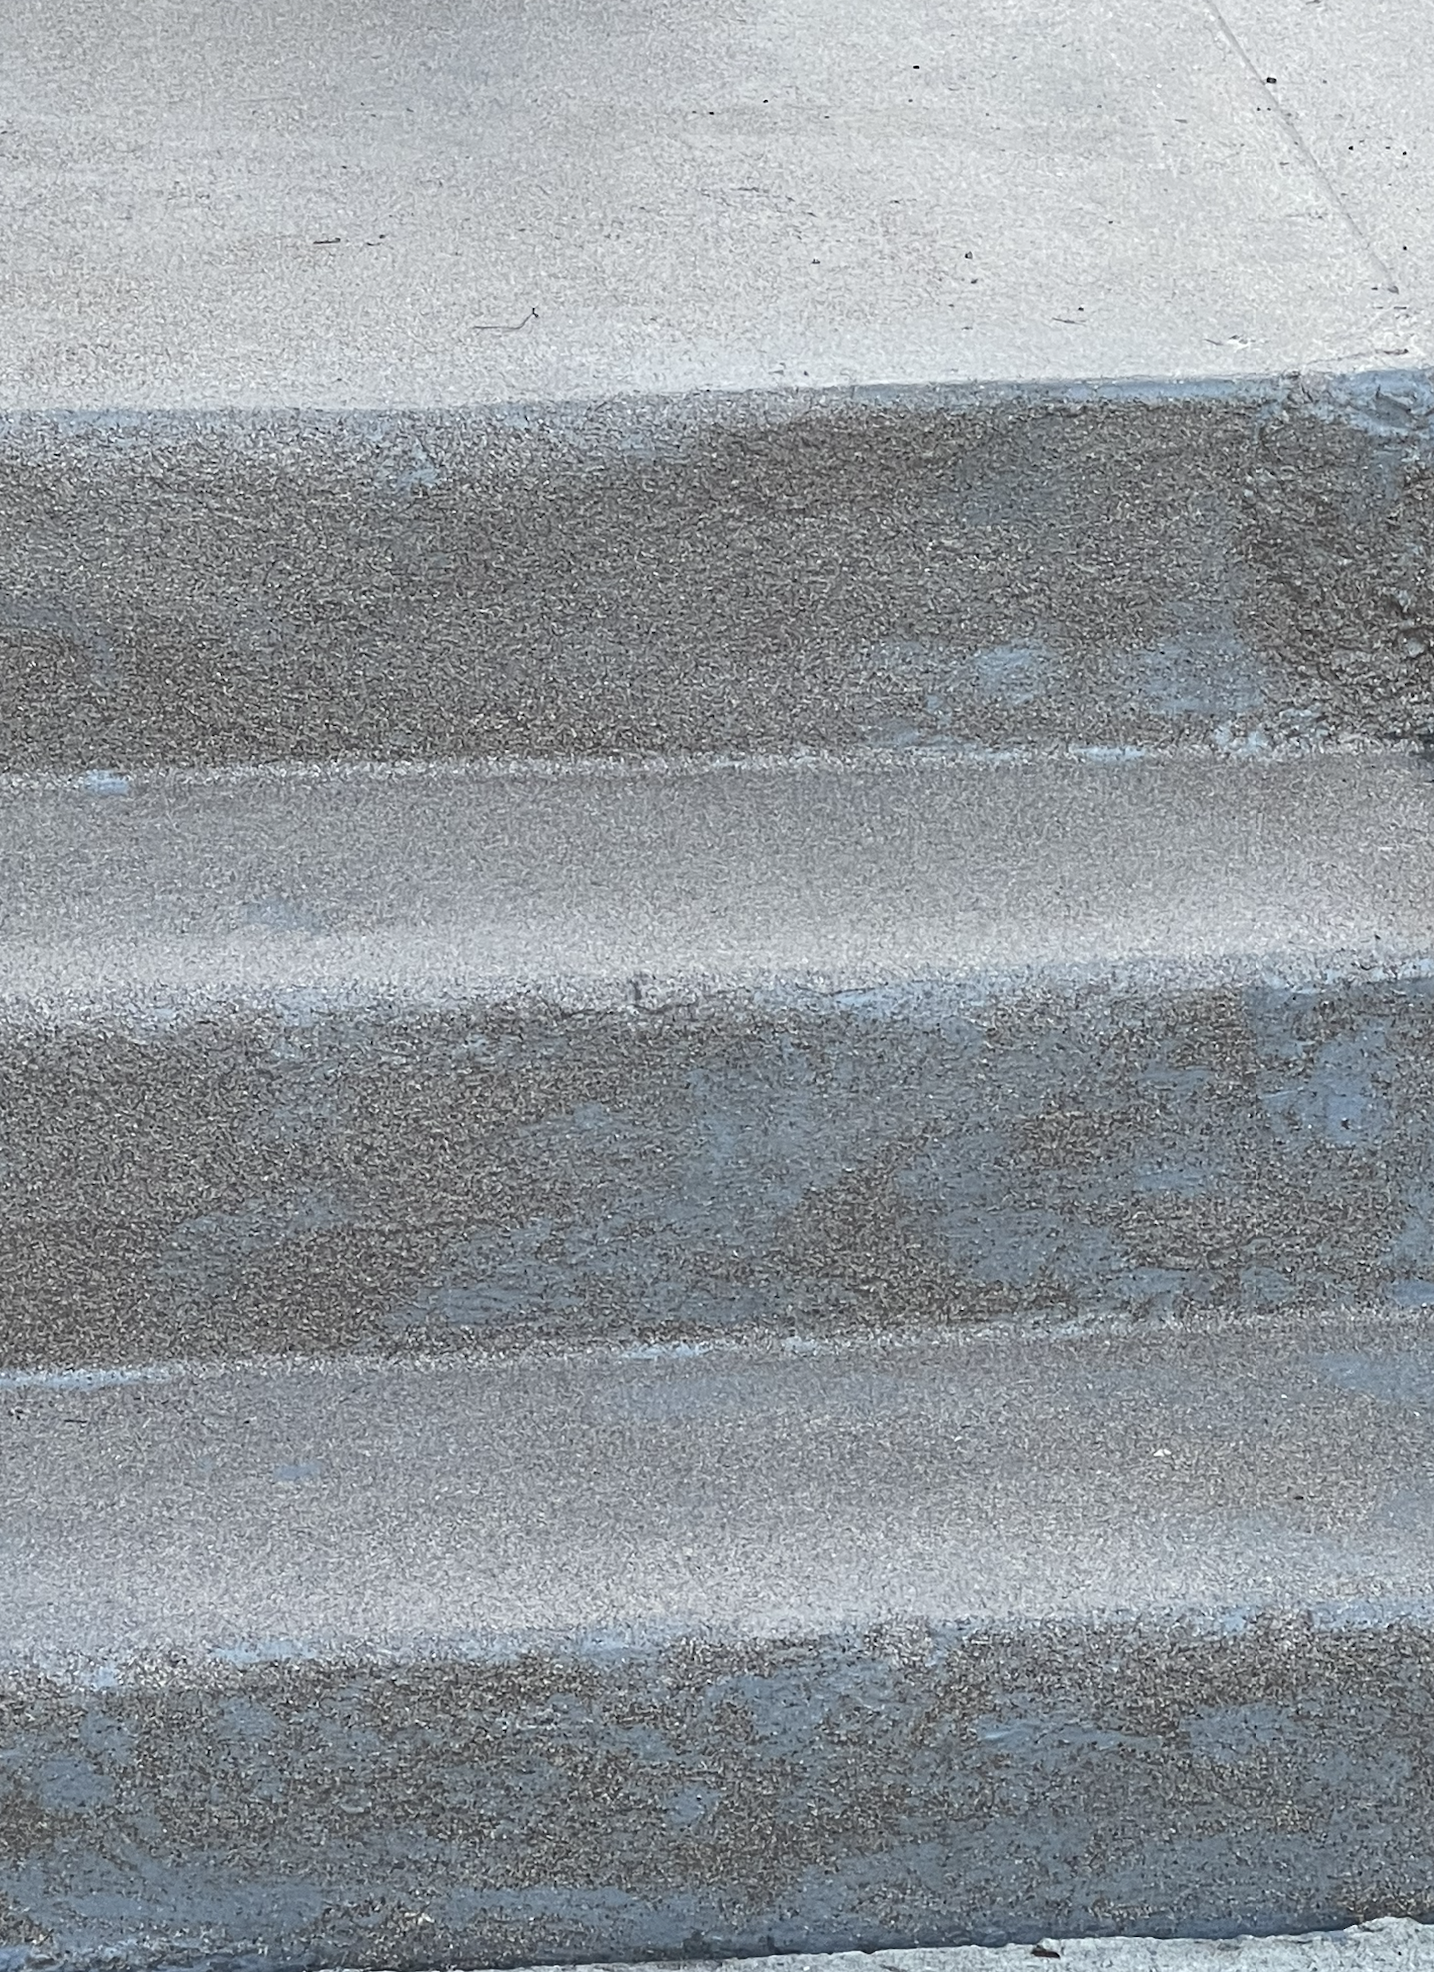
After staining I couldn’t stand the color of the concrete. I wanted something browner with more texture so that dirt would hide better. Ok, also because I totally got stain all over the ground and needed to cover it up. I did some research and decided to go with Behr Granite Grip in Tan and I have some information for you: don’t do it unless you are RICH. It is so expensive and you need like 5 times more than you think you would need. I finally just had to stop after 4 coats because it’s $300 for 5 gallons and it does not go far. Annoyingly after spending $1200 on paint (that’s TWENTY gallons) and $1000 to have someone else paint it for days because it took so many more coats than expected (and because I was slammed with work at the time) it still looks…meh. It’s better for sure but you can see a hint of blue underneath. We put on one more coat after this was taken, but as you can see the paint is way more texture than color.
I would recommend being a) rich or b) painting the base much closer to what you want and then adding the texture on top. I guess we will have to put more coats on it eventually? In my estimation, it needs another $900 of paint and I would probably just do it myself to save on labor. I’ve also wondered what would happen if I just painted something close to the tan on top? Anybody have any experience with this product? We are now in our rainy season so I’ll revisit this in the spring.
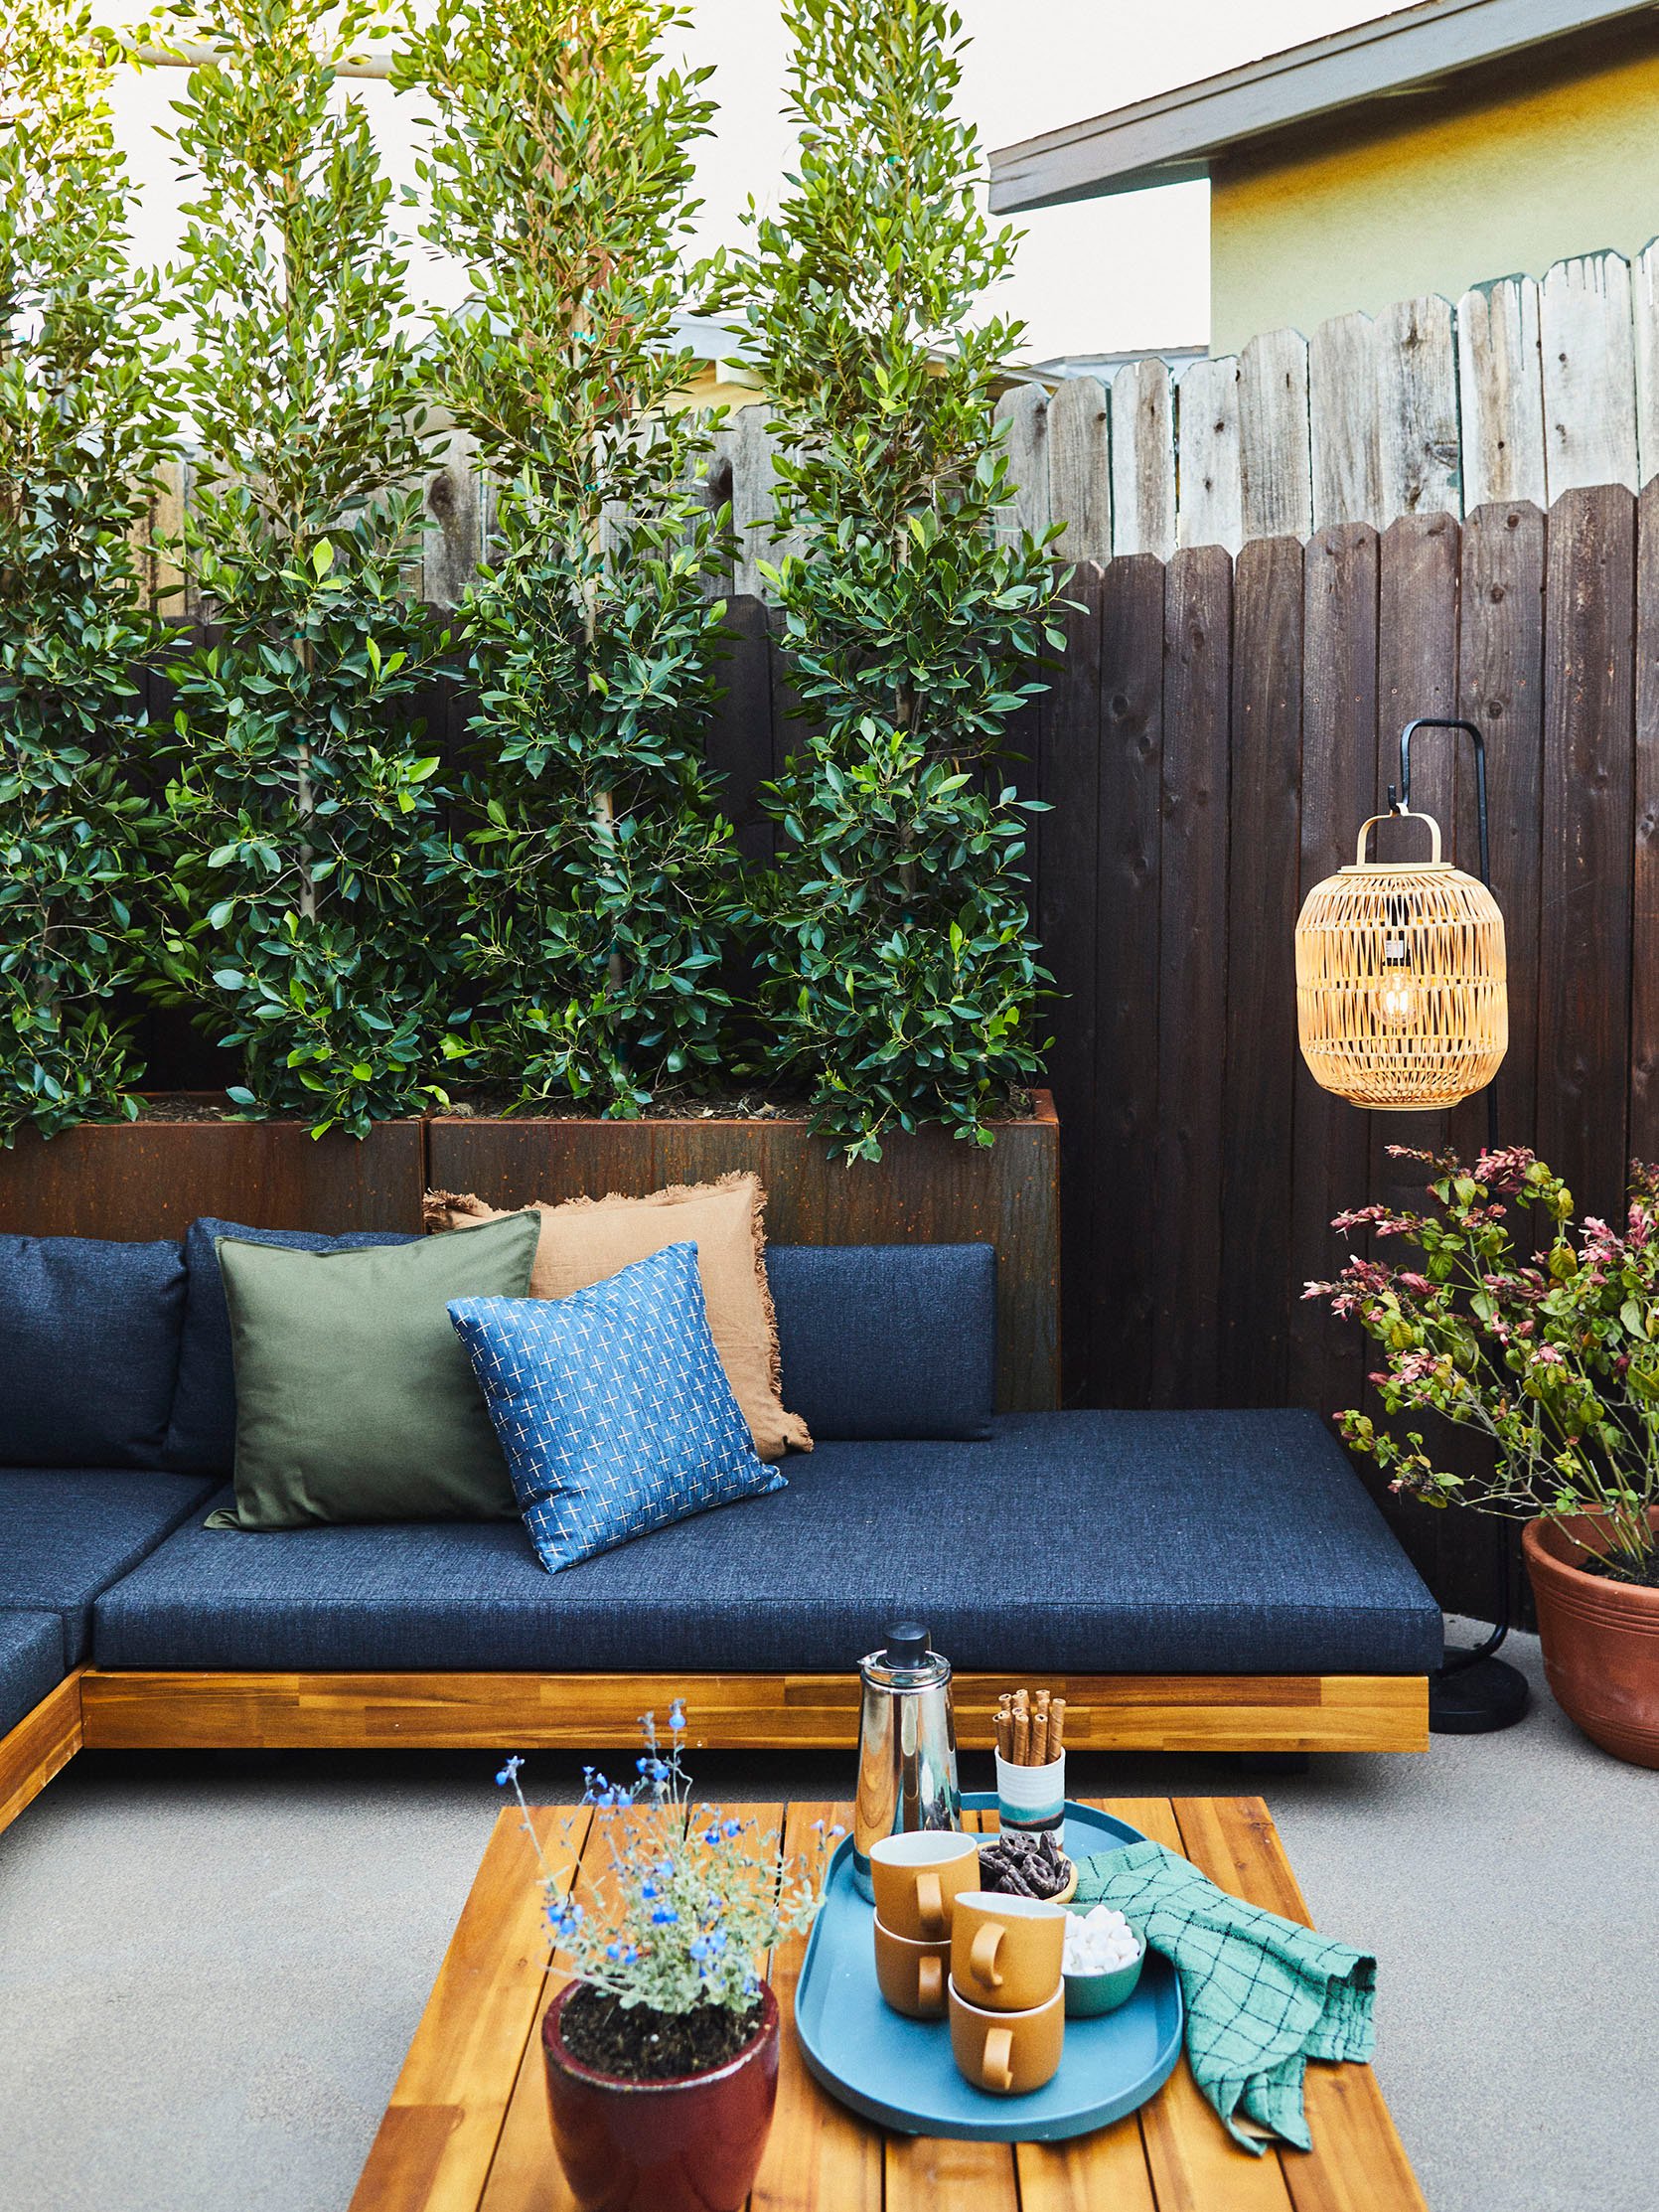
The other major cost that I underestimated was the cost of dirt/plants/irrigation for these Veradek planters. The very good thing about these planters is that they are huge, 32” tall, 42” wide, and 16” deep. They have a shelf inside that is removable. You can use the shelf to use less dirt and have the plant appear taller, or you can remove and use the entire space for dirt and allow bigger plants to really take root. I wanted massive planters because for each space I needed the plants to be able to mature. As you may remember, a big part of taking on this project was to cover up an unsightly neighbor’s roof situation (as you can see from the photos of the fence above). In the dining area, I wanted to break up the black walls of the house with greenery and along the neighbor’s fence on the right side of the property (area 1, 2, & 3) I wanted to plant something that would grow big enough to cover the backside of the fence. I also wanted to add as much greenery as possible to a space that is covered in concrete. Irrigation was also a must so that my tenants wouldn’t have to worry about caring for the plants and I wouldn’t have to let myself into their space on a regular basis. Plus I have ADD, out of sight out of mind. Those plants would be dead in a week if I was in charge of watering them. The bad news is this was not a cheap feat – especially because I wanted immediate results.
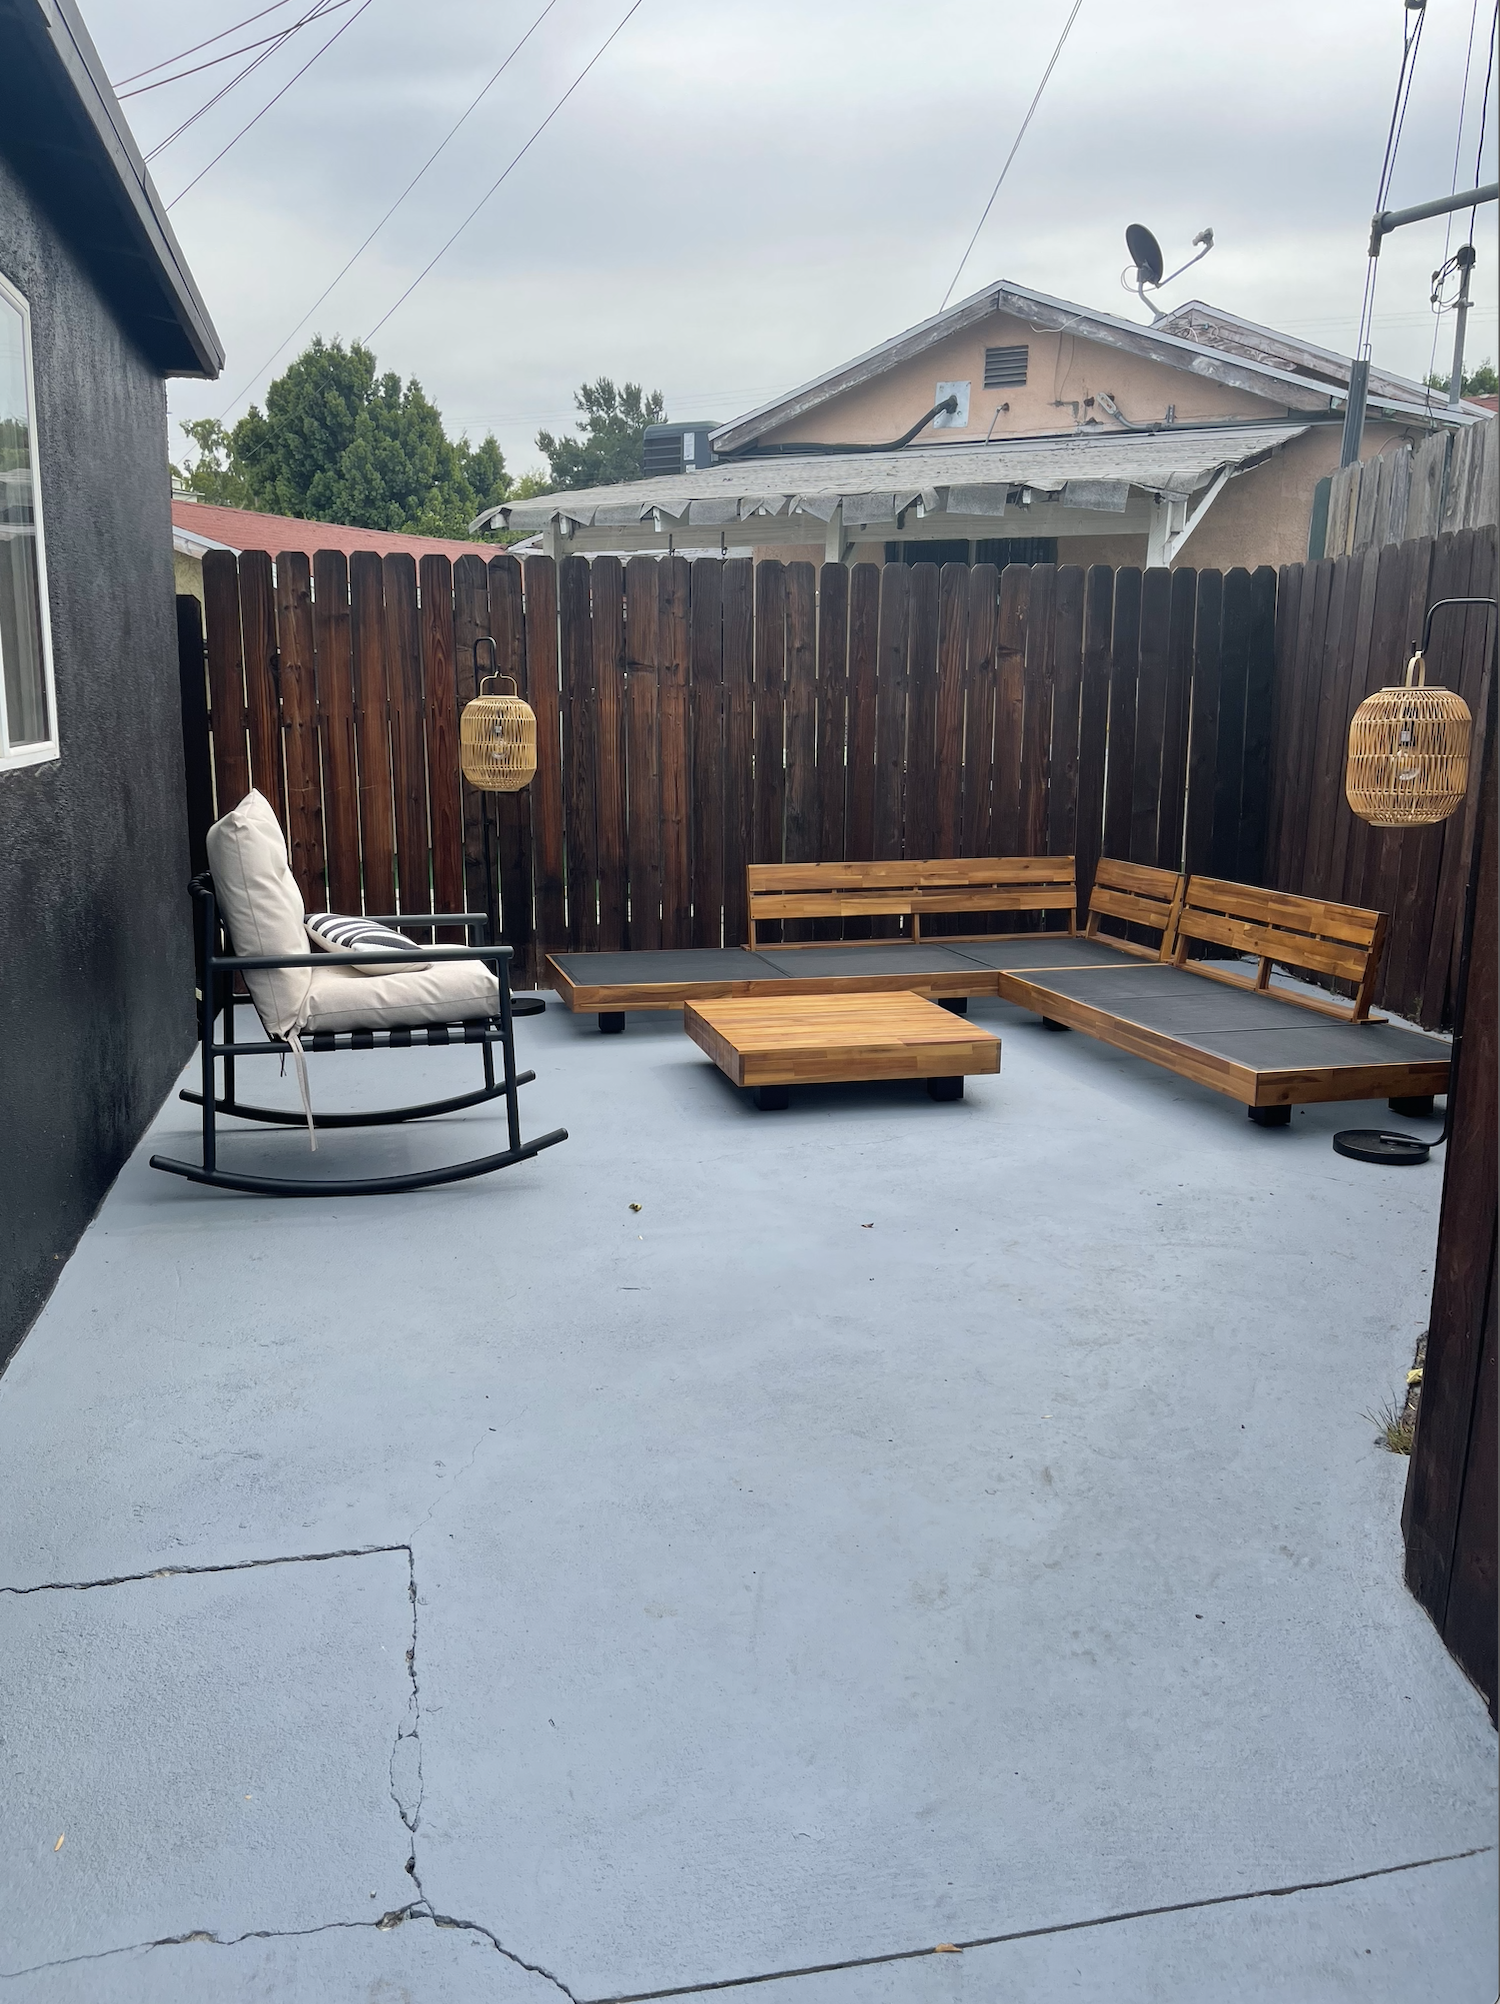
As we talk boring numbers, let’s take a break and look at how nice it all turned out. We had 5 large Veradek planters total and used 3 of them in the very back living room area (number 6 on the map) and we put 2 – 15 gallon ficus (same as the hedge in my backyard) in each planter.
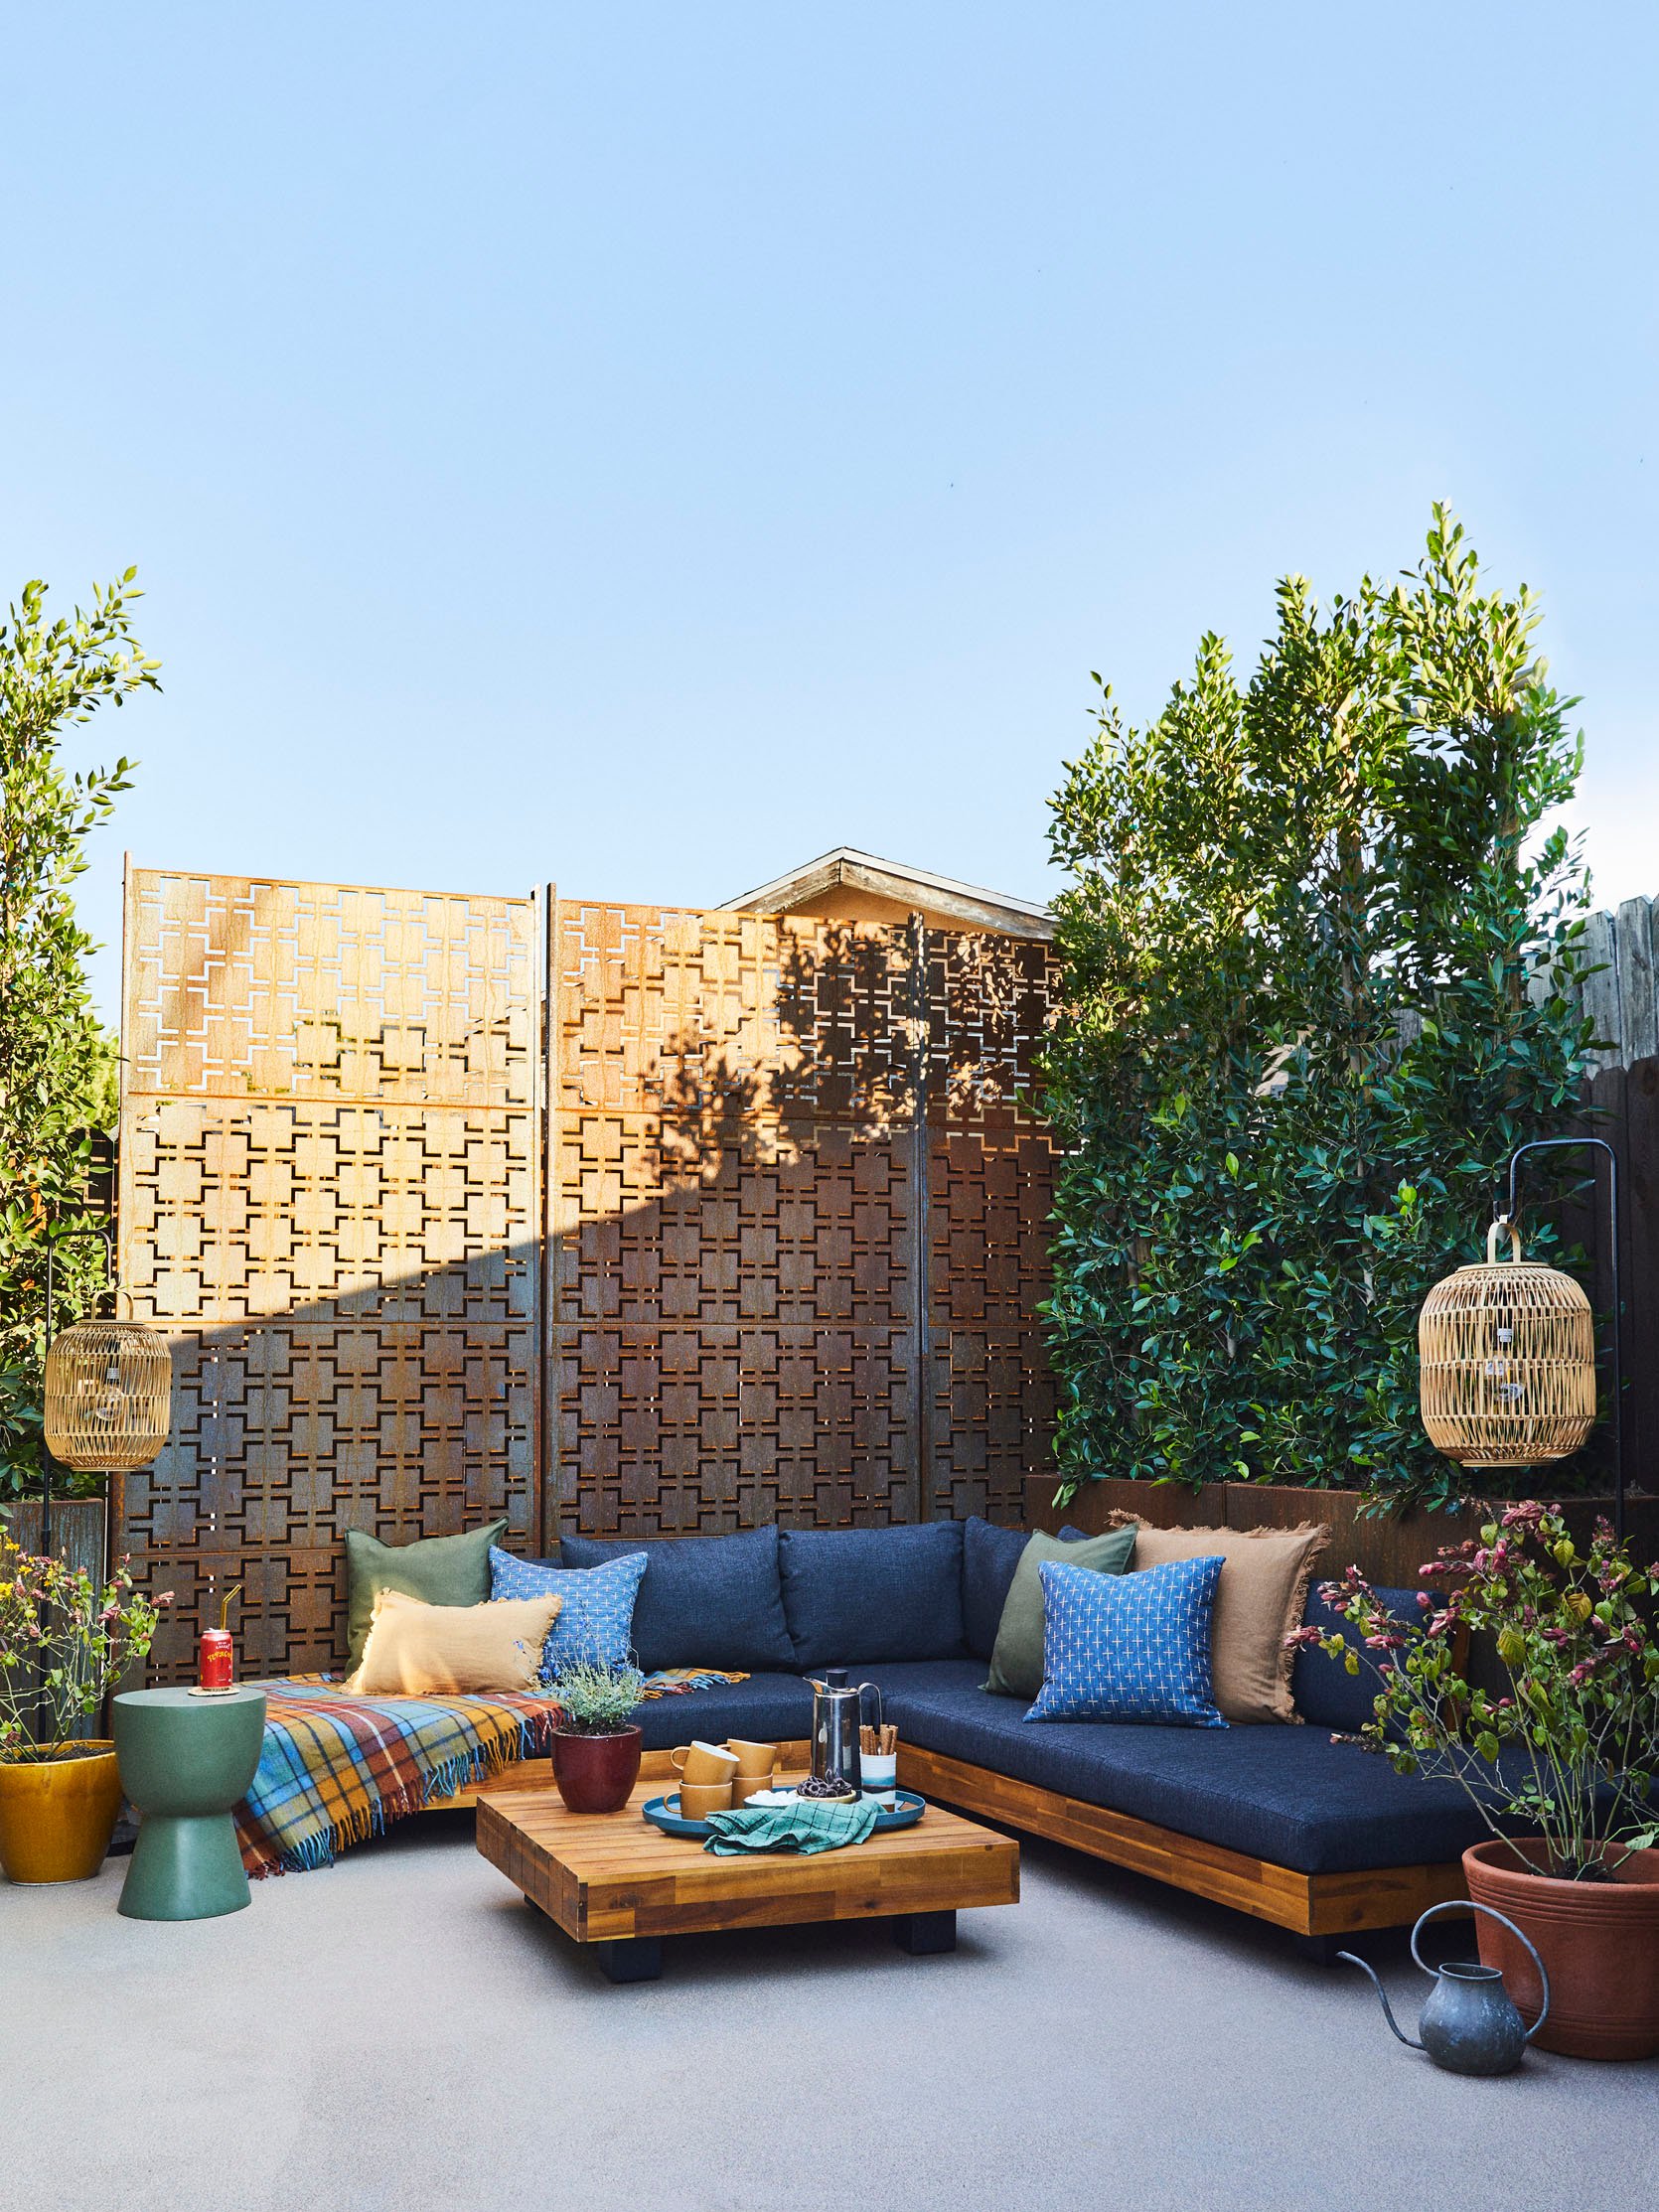
Sectional and Coffee Table | Outdoor Lanterns | Side Table | Privacy Screens | Planters
Oooooo ahhhhhhh!!
Look how little of that roof we see now! So much better. As you can see, the ficus is huge. The privacy screens from Veradek are very tall (100” to be exact) and the ficuses are a good 2 feet taller than the privacy screens. Ok, now that the blow has been softened, 6 – 15 gallon ficus with dirt and install cost $1400. The cost of adding a zone of irrigation for these planters was $1100. Not a cheap situation. HOWEVER, this is now a pleasant area to spend time in that was formerly not being used – and that is priceless. These privacy screens are a game changer. They are heavy-duty and I‘m not a bit scared of them tipping over. They bring so much visual interest to the space while creating both privacy and a sense of coziness – it feels like you are in a living room. It’s obviously not *just* the planters. Article’s gorgeous (and durable!) outdoor sectional (with coordinating coffee table!) also helped out the situation greatly. We decided against adding string lights to the area because the outdoor lanterns do the job, and they cast such pretty shadows while doing it! Hendry side table is great for moving around wherever you need it.
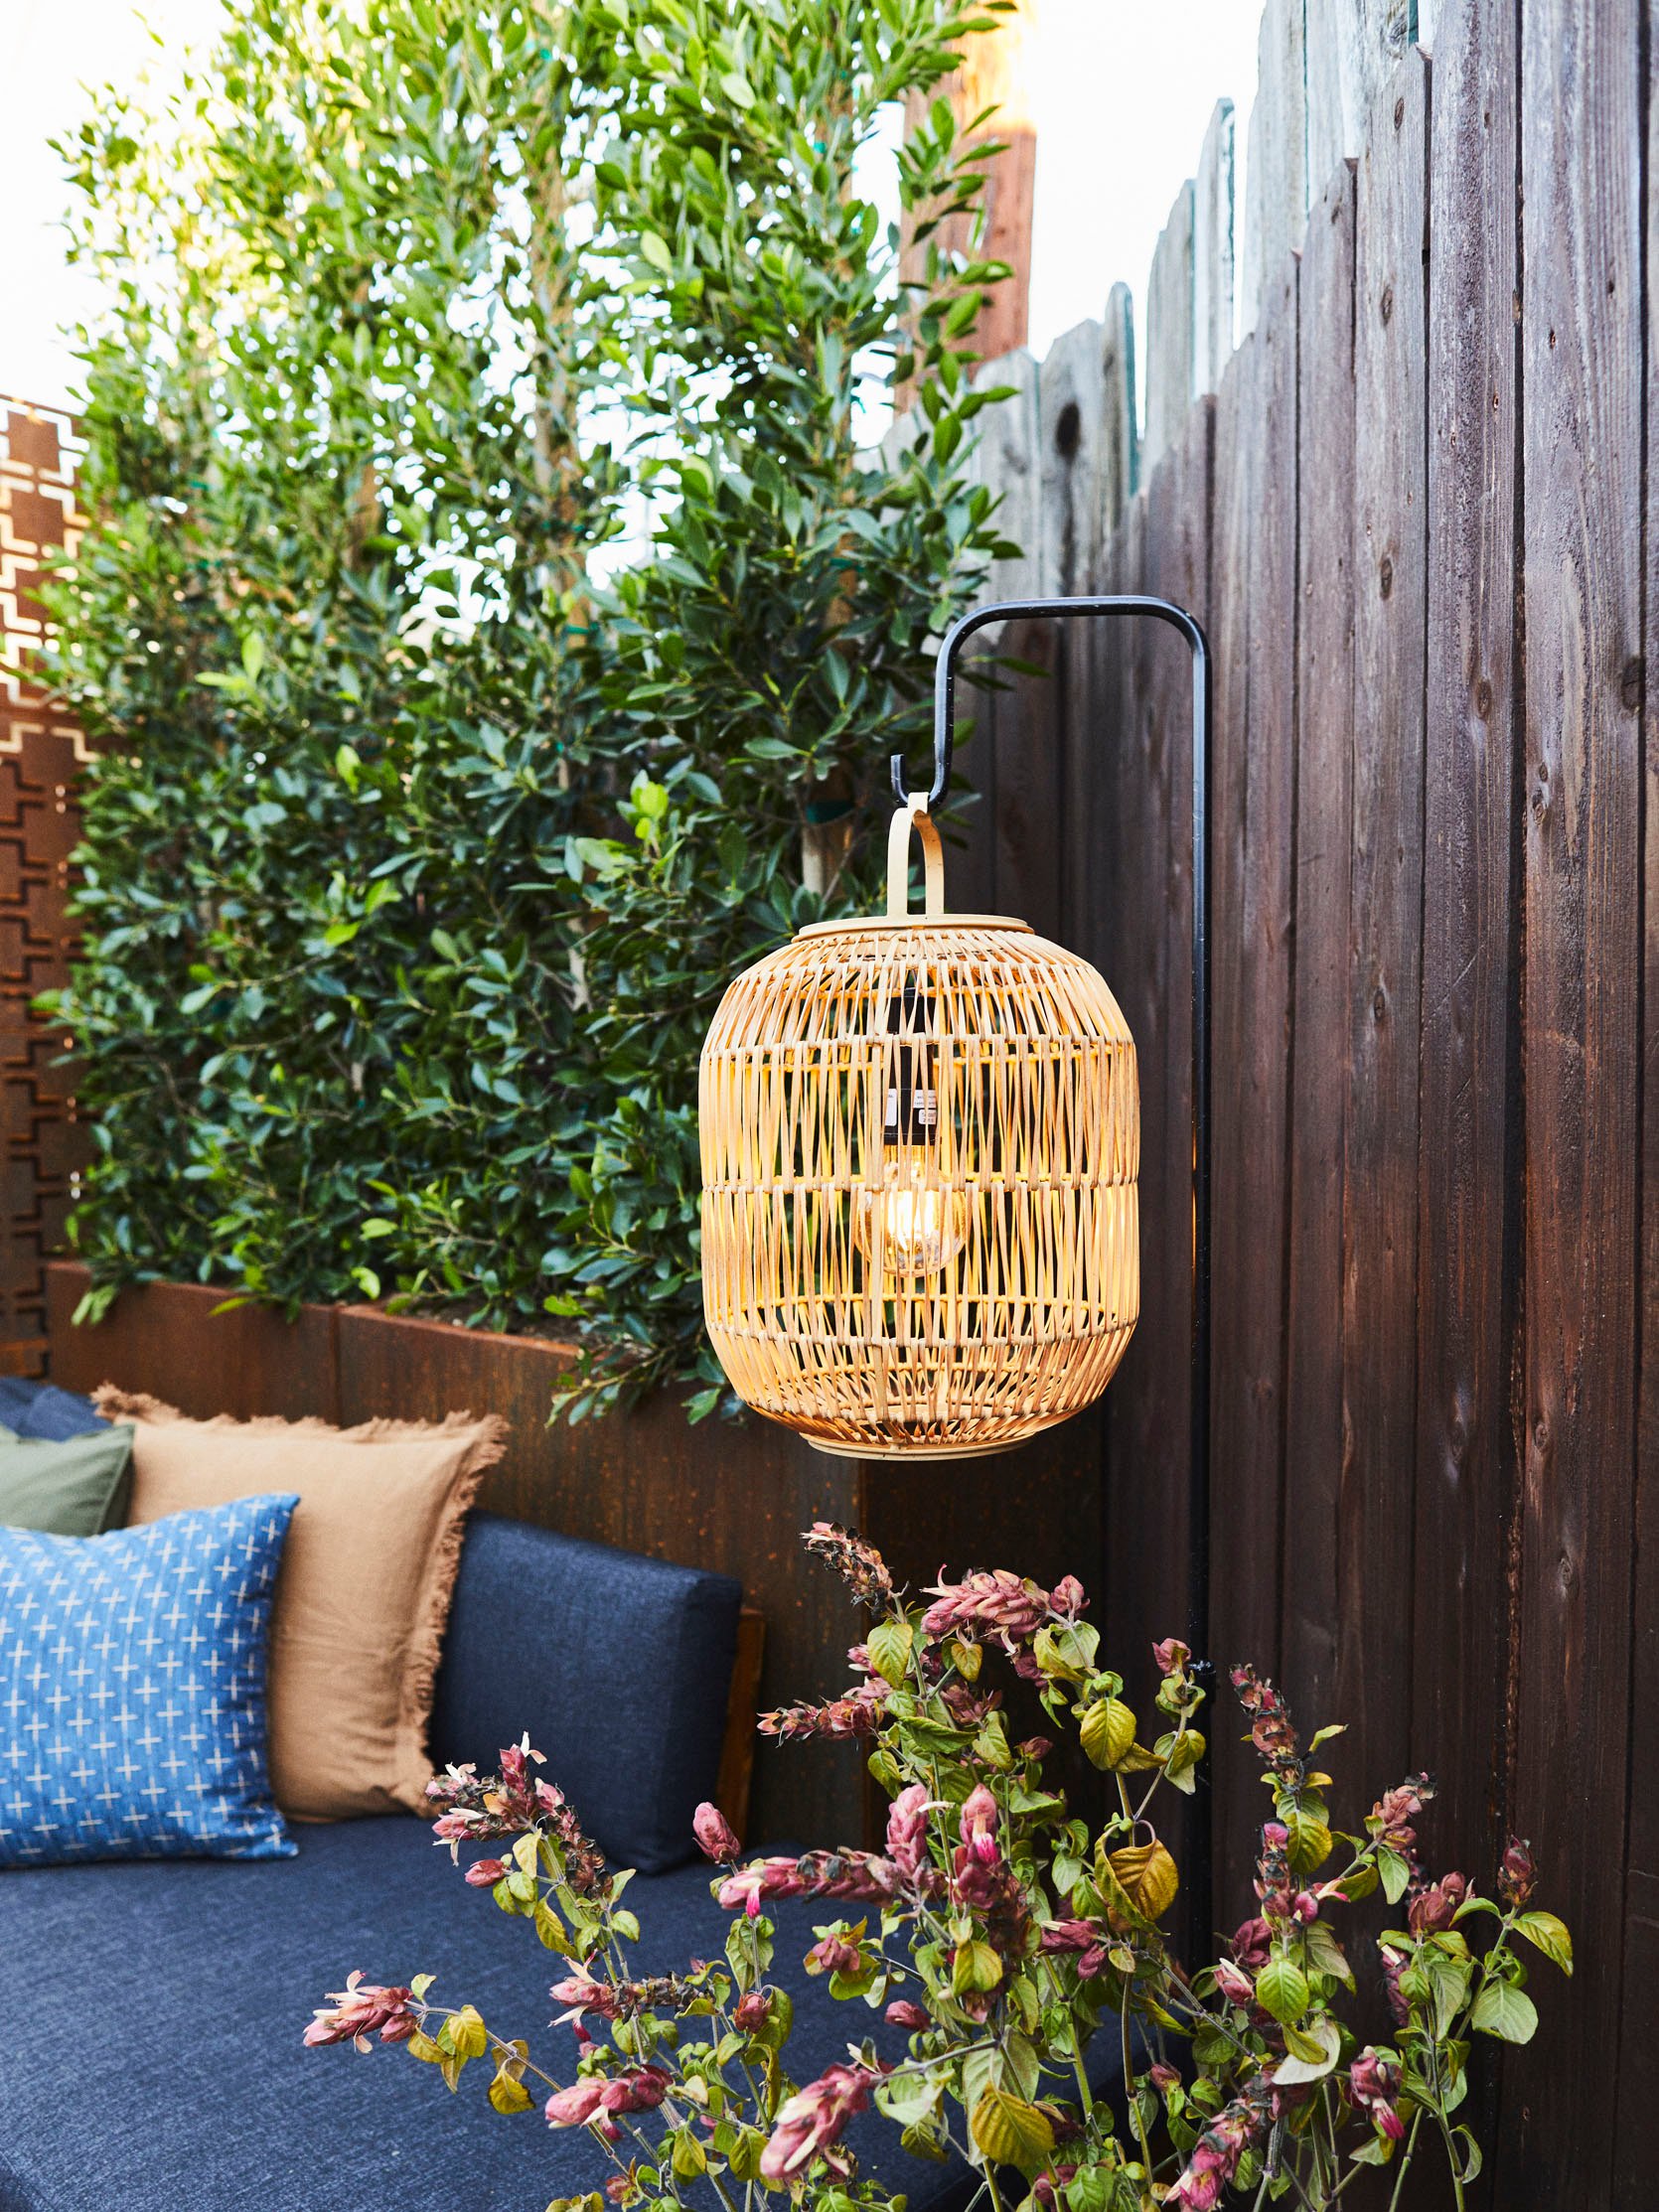
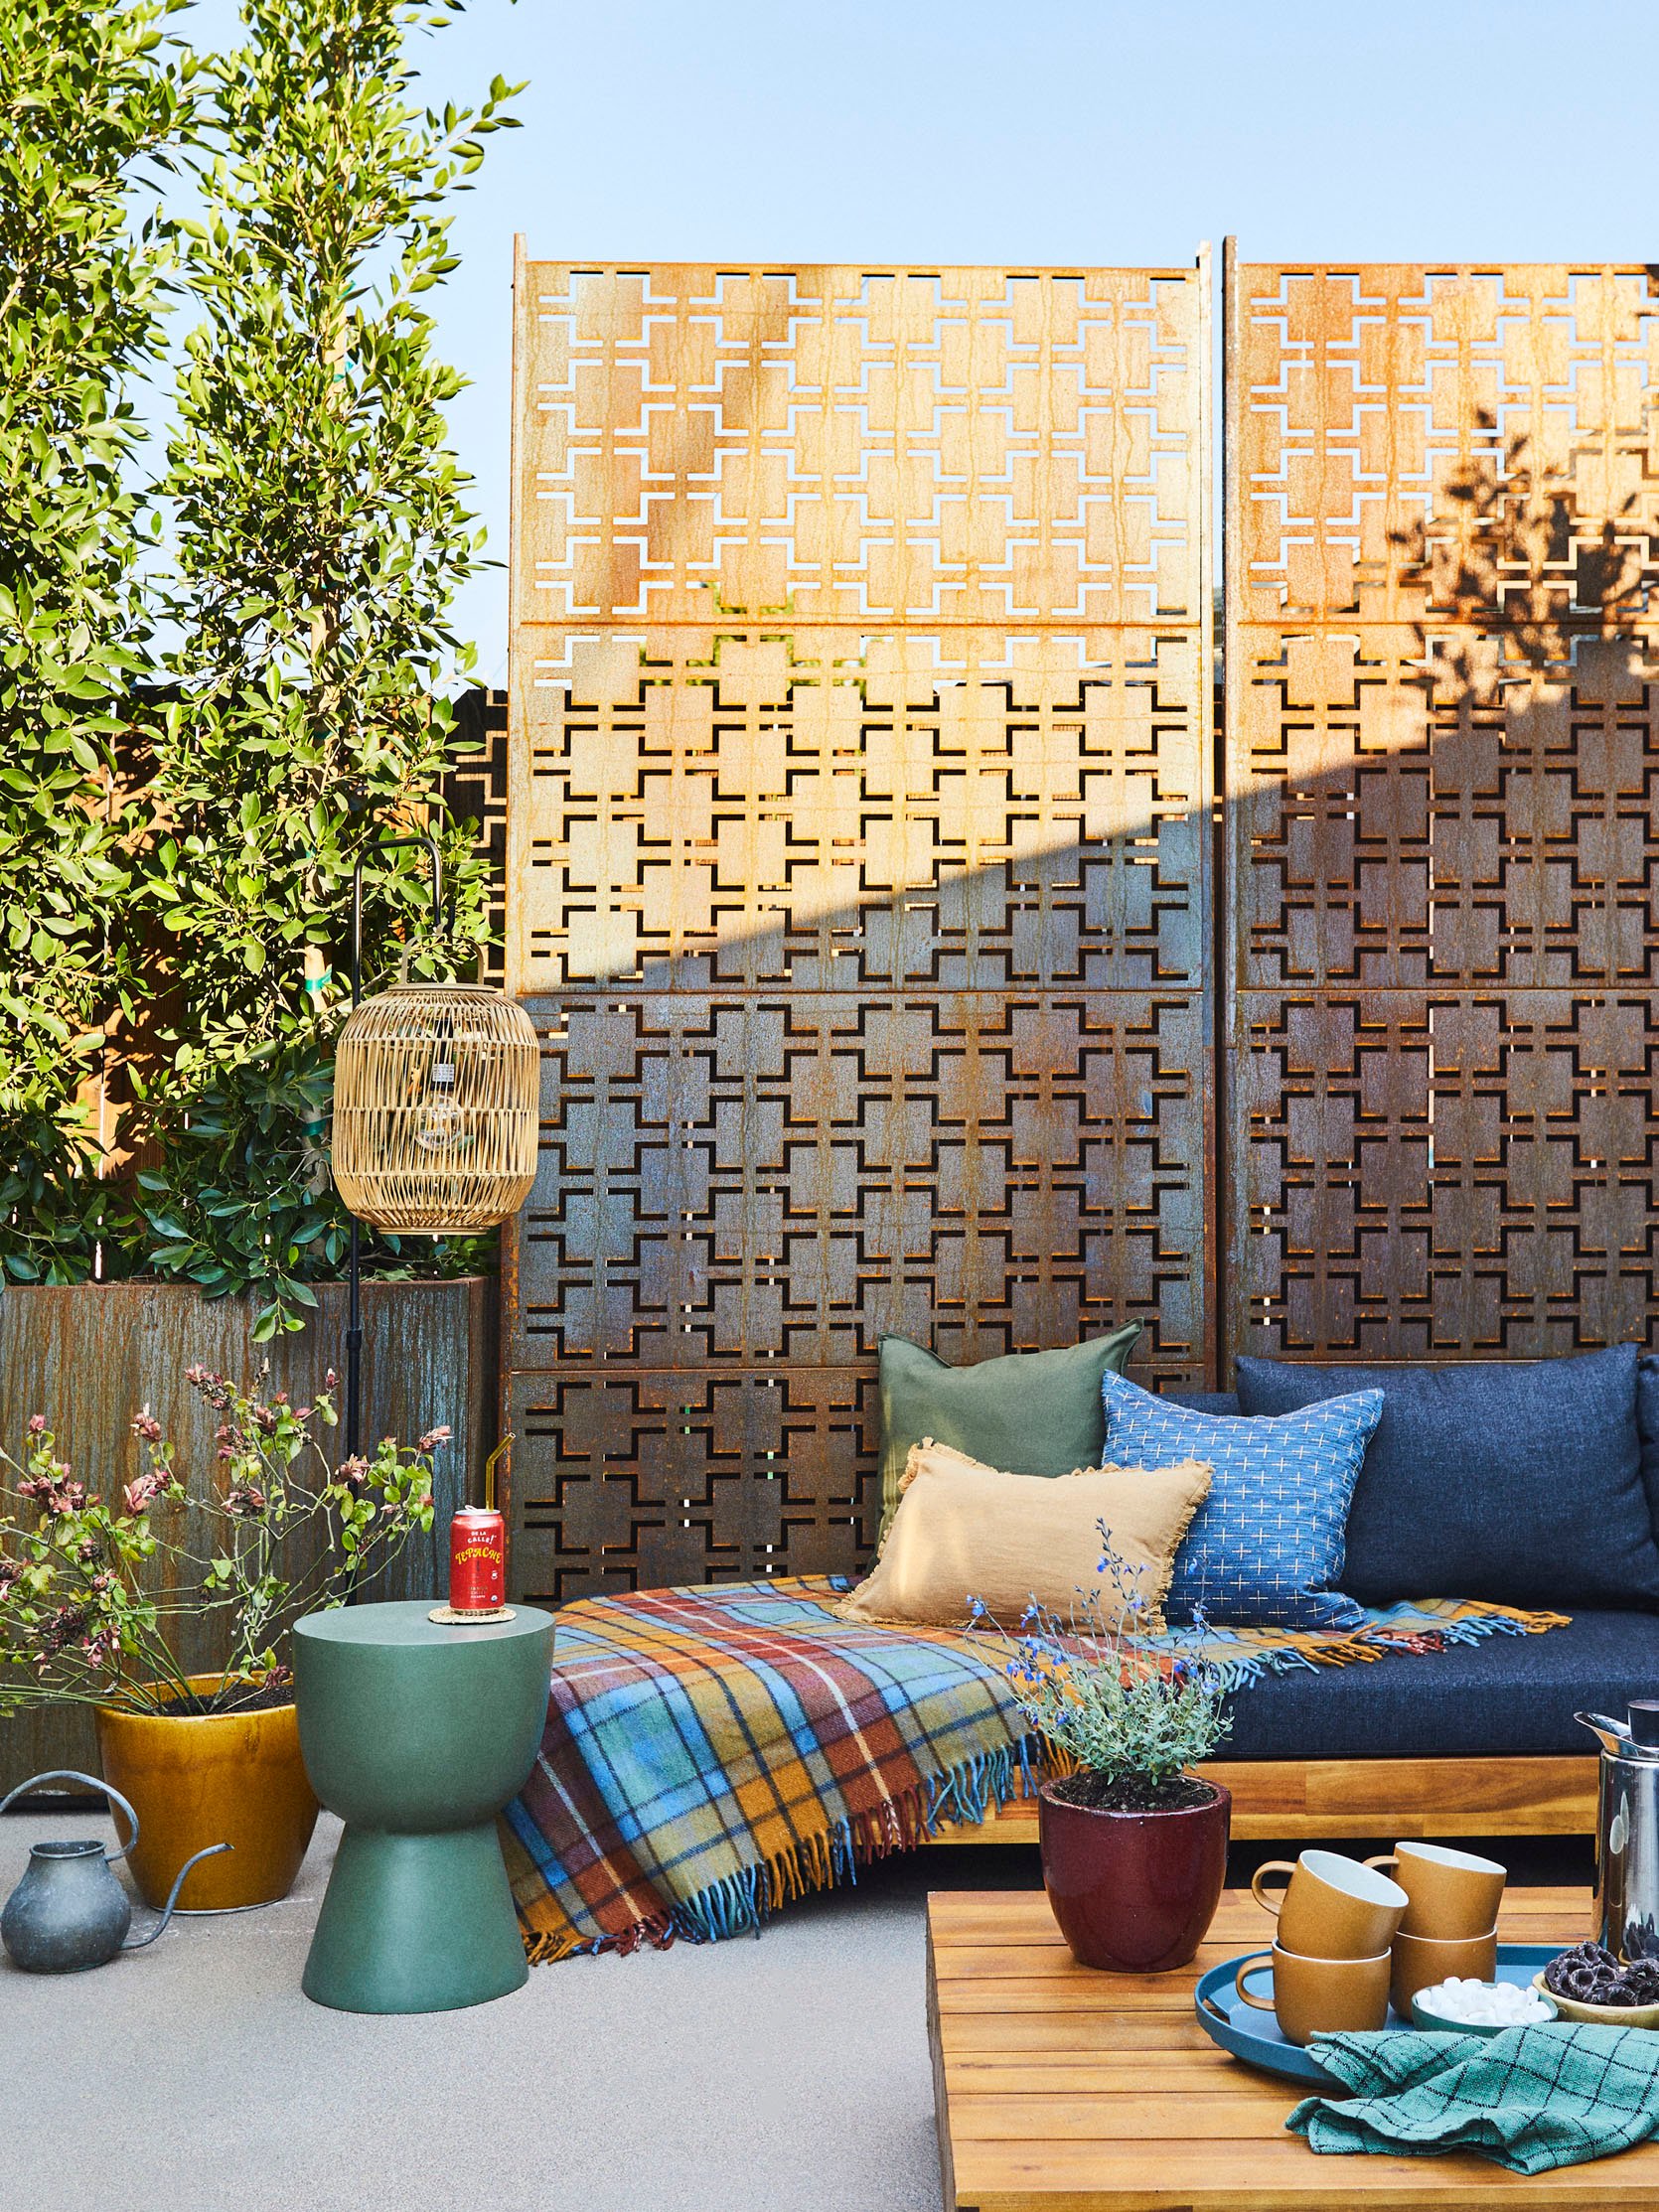
As you can see in this close up, I’m allowing the corten steel to age naturally. There is a way to speed up the process but I’ve been enjoying watching them slowly change with the weather. I think if I got them during a drier season I would have aged them myself. I know Orlando aged his Veradek planters and screens faster with a vinegar mixture which was probably a smart choice as he was prepping that reveal during a drought. You can see the blue-ish hue of the steel peeking through the drops of rust LIKE YOU CAN SEE THE BLUE PAINT PEEKING THROUGH THE TOO EXPENSIVE “GRANITE GRIP” ON THE GROUND. Ugh. I added in some accents of blue so maybe it was all on purpose after all??

Blue Pillows | Green Pillows | Mustard Lumbar | Plaid Wool Blanket
Fun fact about me: I don’t believe in outdoor decorative pillows, blankets, or rugs. Never once have I had them not get gross or just be gross – they’re never a nice material. I opt for keeping pillows and blankets in a waterproof box (like this one) along with covers for the furniture so they are easy to grab and put on if weather is coming. A ladder that can stay outside can be used to put your comfy throws out for people to help themselves to when it gets chilly.
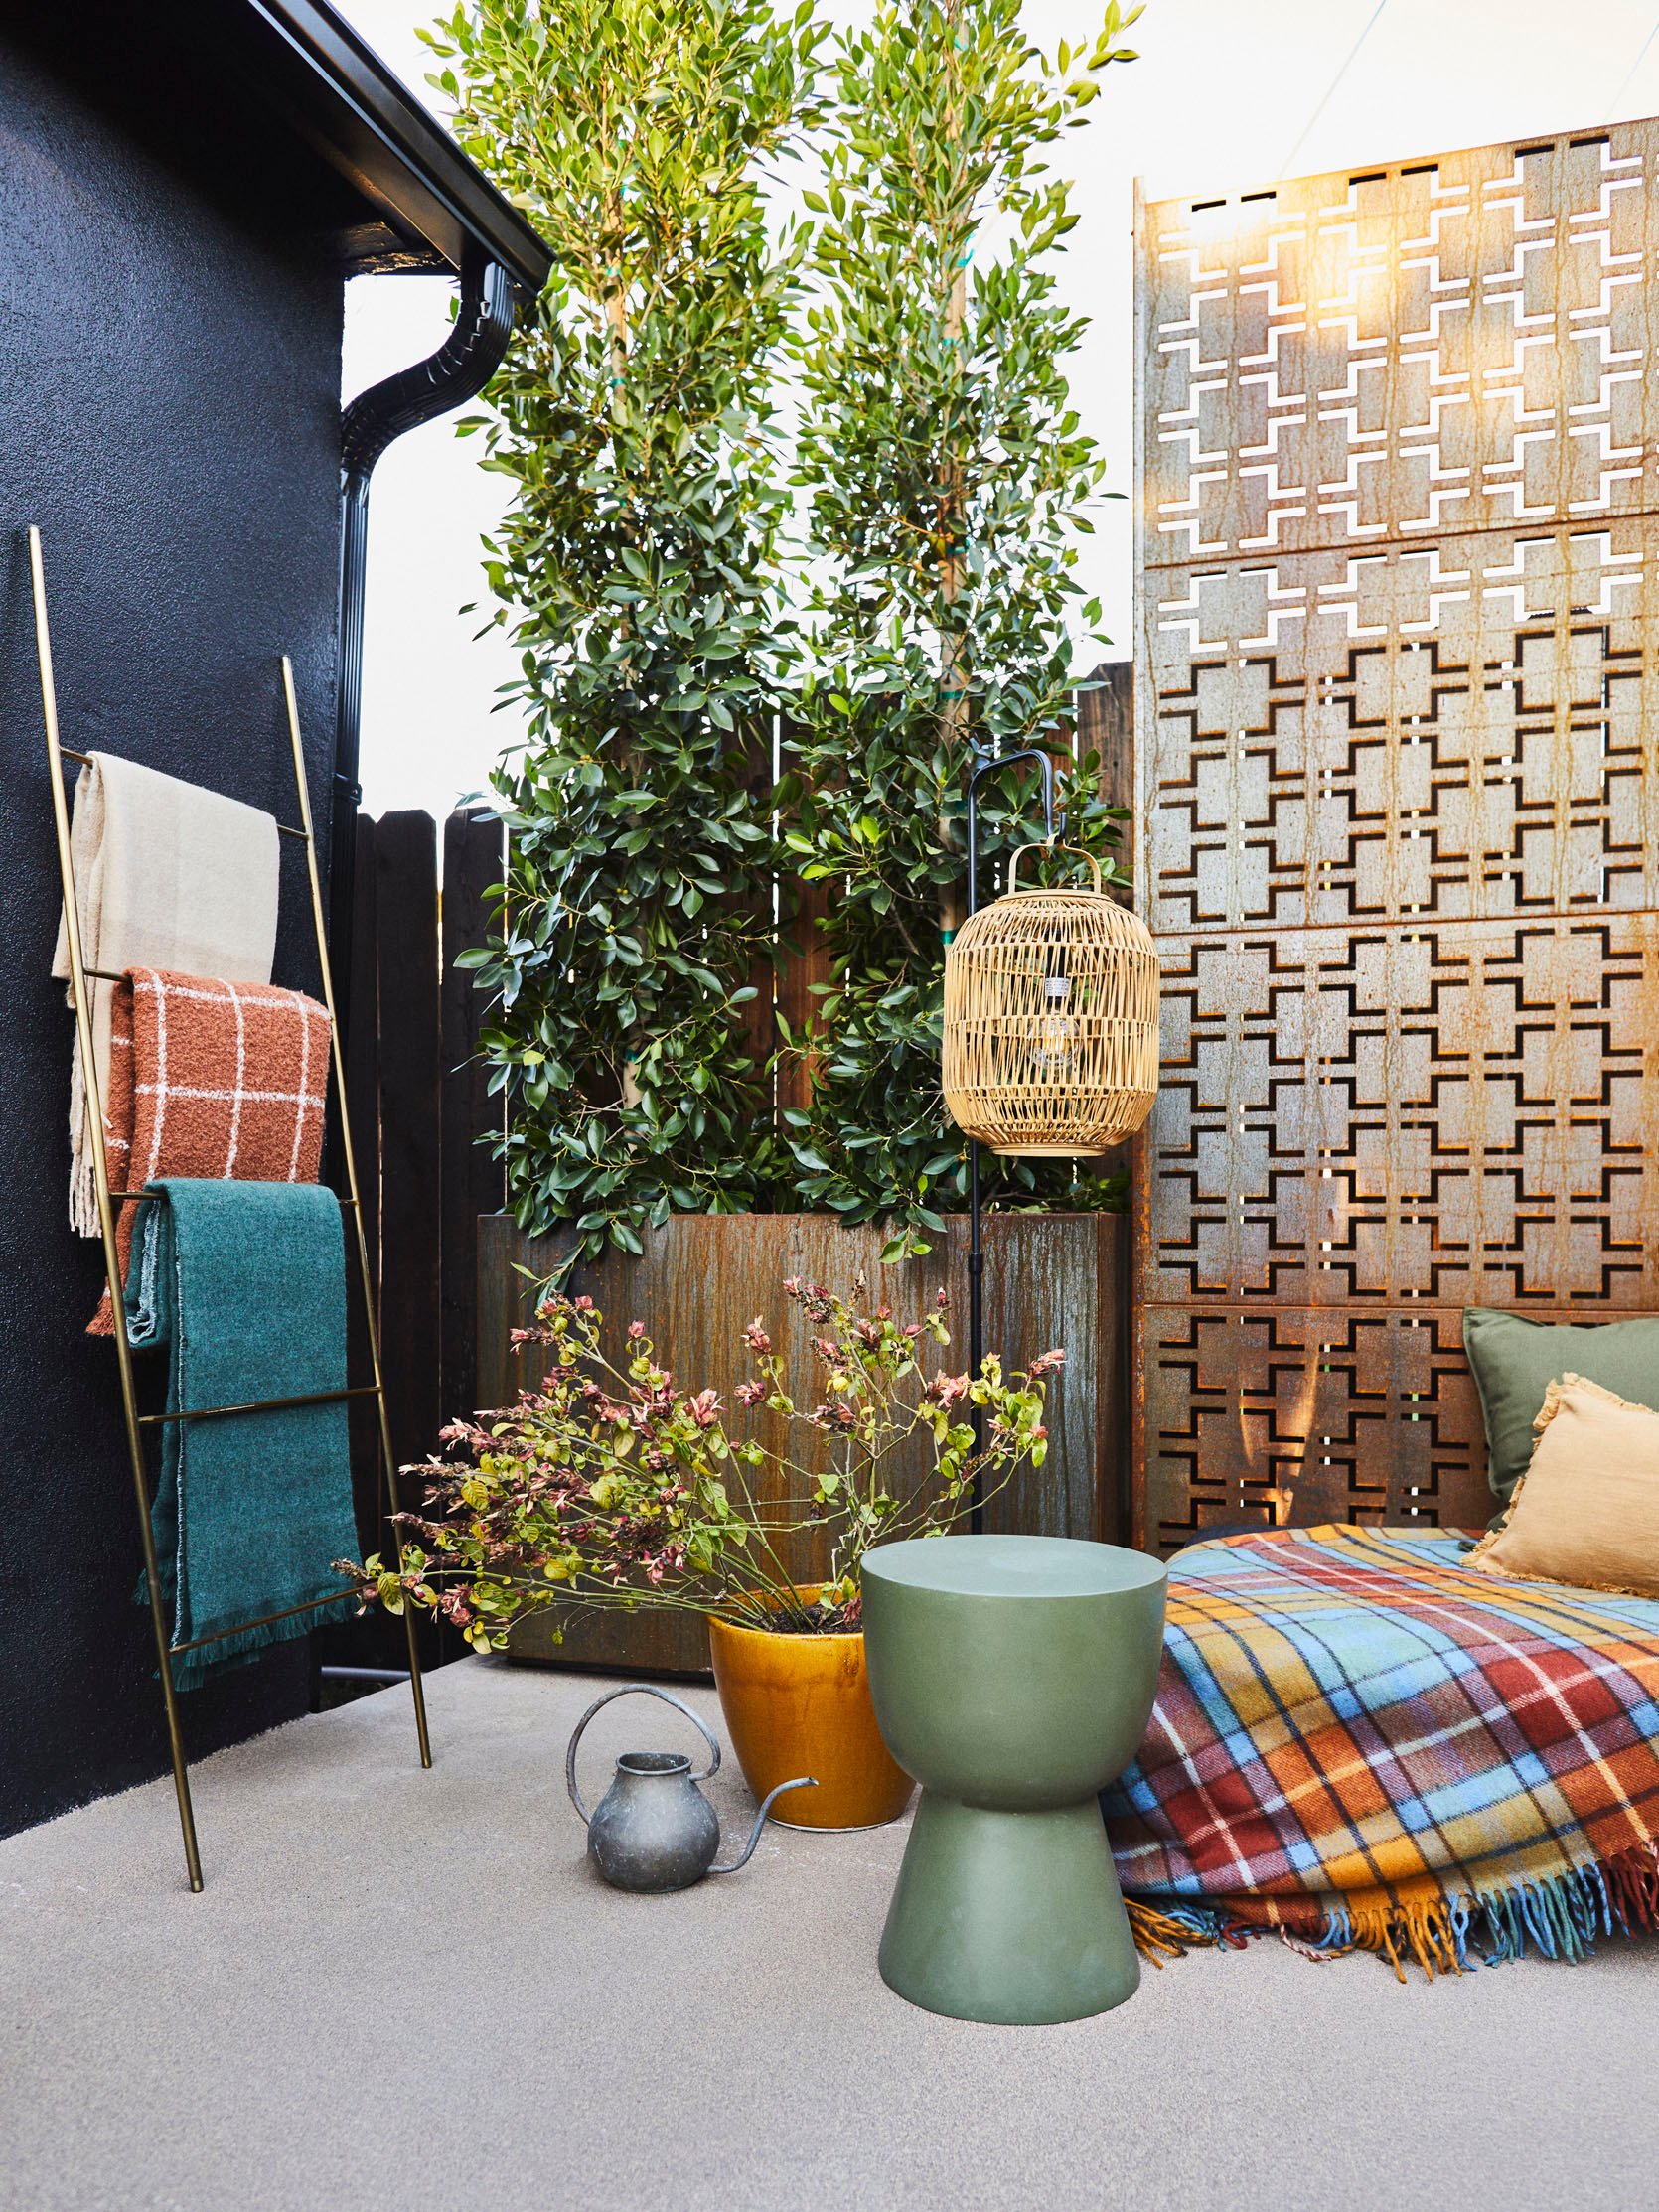
Ladder (similar)
Unfortunately, this ladder is “vintage” Target 🙂 but this one is similar. If you are curious, the plants in the smaller planters are justicia brandegeeana or the “Mexican shrimp plant”. They have a nice fall vibe this time of year for southern California.
As you can see there was little to be done about the neighbor’s taller fence behind our fence situation, and it’s hard to see but the fence takes a pretty sharp diagonal turn in towards us so I couldn’t continue with the planters or privacy wall without losing valuable square footage. It’s hard to capture in these photos, but I took some video at the end of the shoot day, head to my instagram or Emily’s instagram for some BTS.
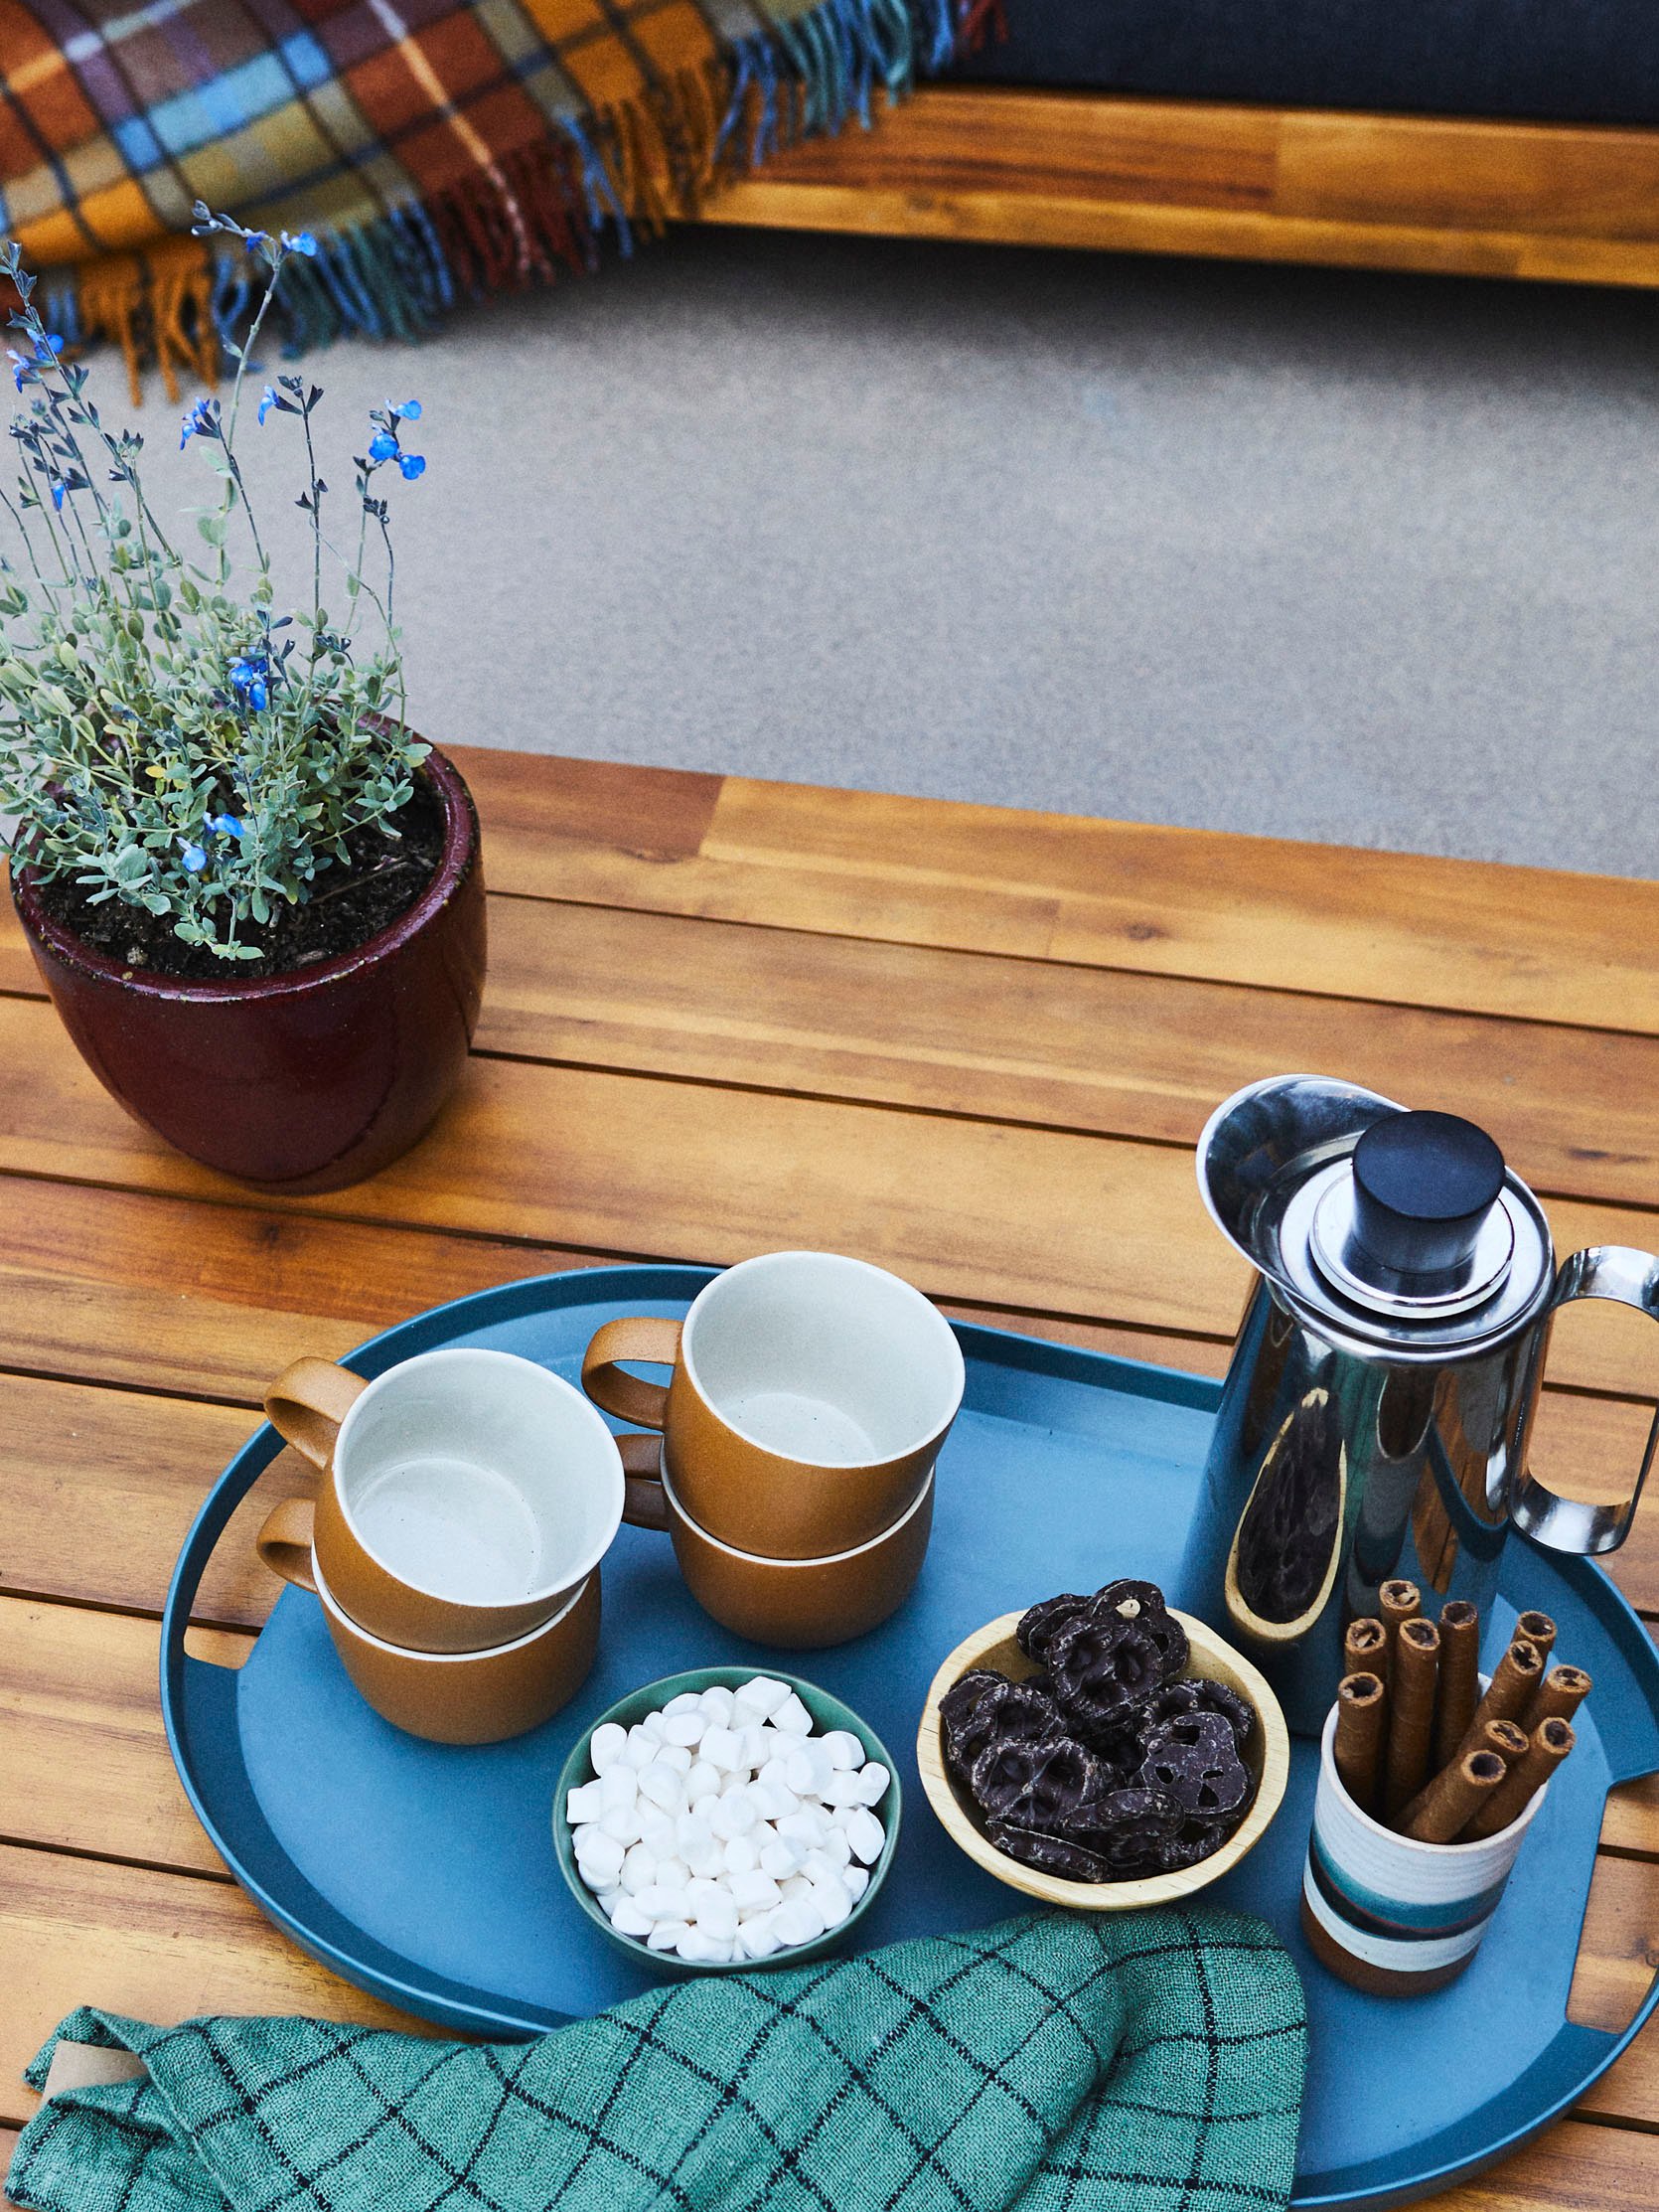
Thermos | Blue Tray (on sale!) | Mugs (on sale!) | Towel | Cup (handmade/vintage) | Snacks (Trader Joe’s:))
In early 2022, before everything went nuts for us, we were so excited to host outdoor hangs and every Sunday we would make food and invite a different couple or small group over.
~Resolution #2: More friends and outdoor hangs~
An easy host moment is a DIY hot chocolate station, as pictured here.
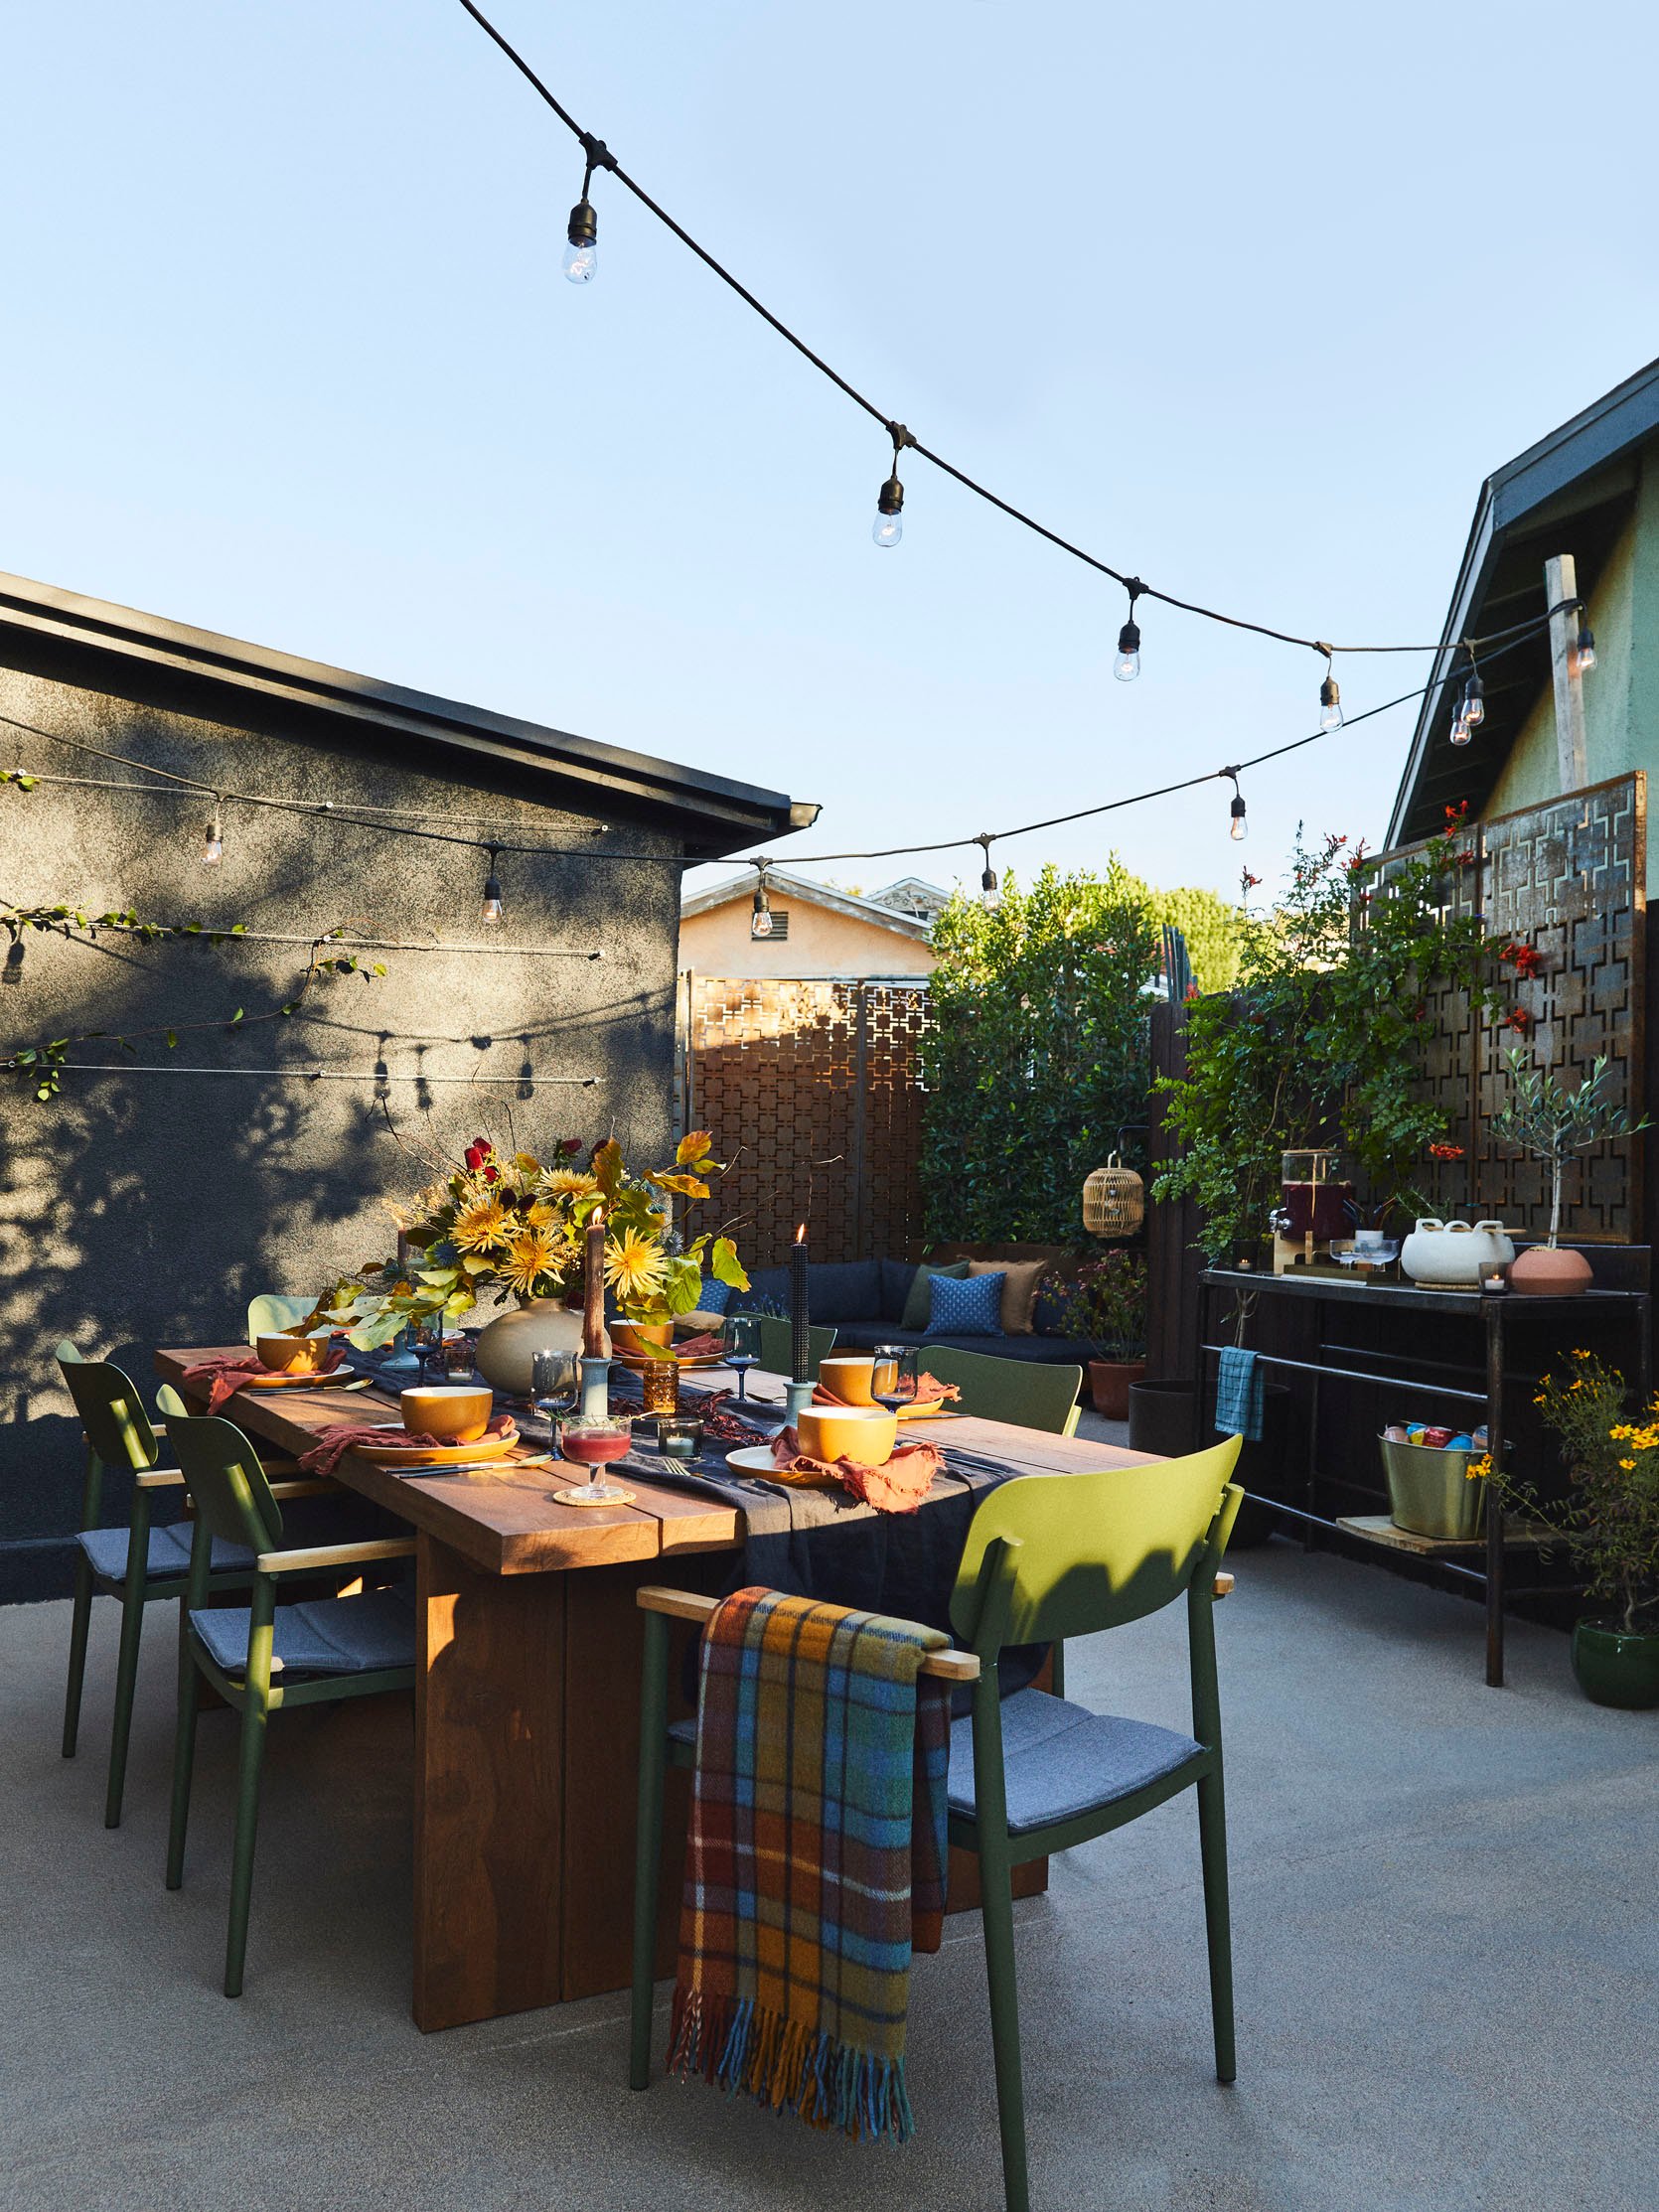
Dining Table (similar) | Chairs | String Lights
Speaking of hosting, may I present the dining/grill/bar area! This photo helps in trying to understand the confusing layout of this space. You can see the sectional in the far corner, bar to the right, house on the left. Not seen: to the right of the bar is the tenant’s grill, which they use often. Hope and Daniel (the tenants) are great cooks and wonderful hosts. A large table with comfortable chairs was a necessity. Article doesn’t have this particular teak table at the moment, but they have this teak table. I’m a big fan of weather-resistant teak that will silver over time and last forever(ish). The chairs are a nice colorful punch as well as very comfortable and will stand up in weather. The metal is powder coated and the arms are teak. The slim seat cushion is easy to remove, throw in the wash if needed, and will dry fast if it gets wet.
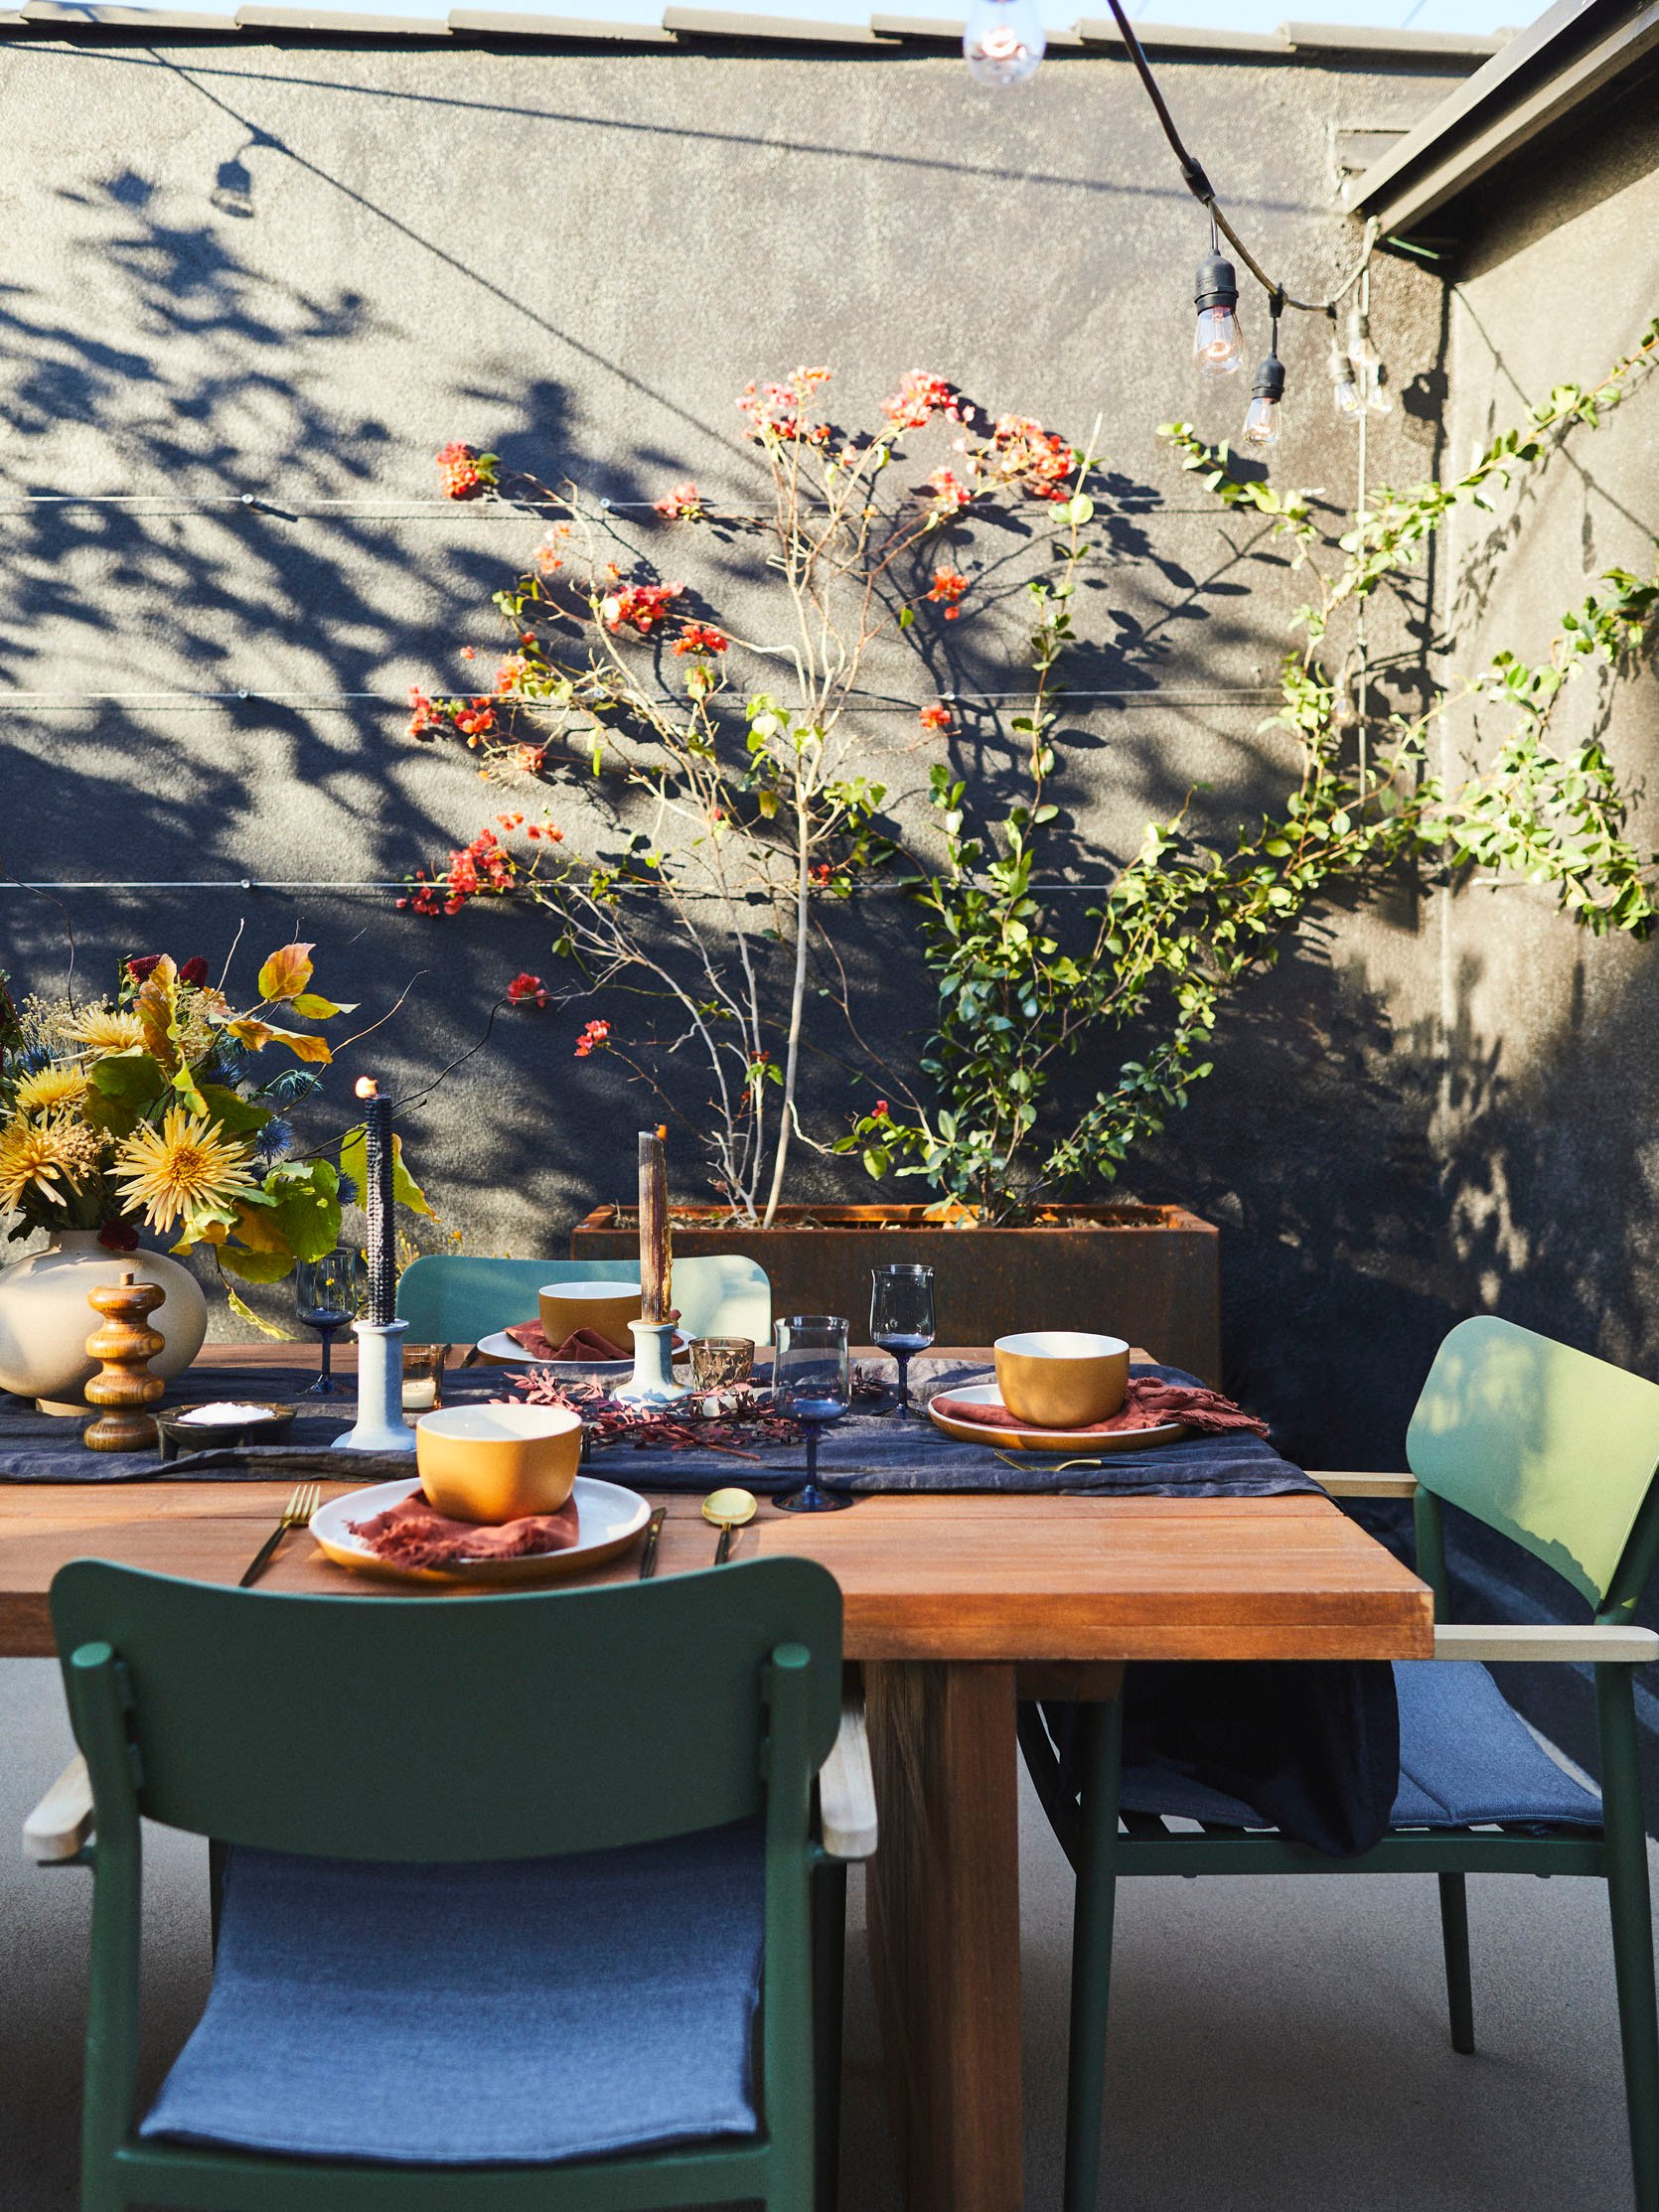
For the planter in the dining area I wanted jasmine and bougainvillea to break up the black wall of the house. They aren’t too impressive yet but are both known to be fast growers, we’ll have to check back in a few months. My landscaper put in the wire because I don’t know if you have ever drilled into stucco, but I have and there’s little I hate more. I needed wire here, by my front steps and in my backyard (for my upcoming Goodland hot tub area reveal!). The stainless steel trellis and install was $823.96 for all three spaces, so this area was maybe $300 of that bill?
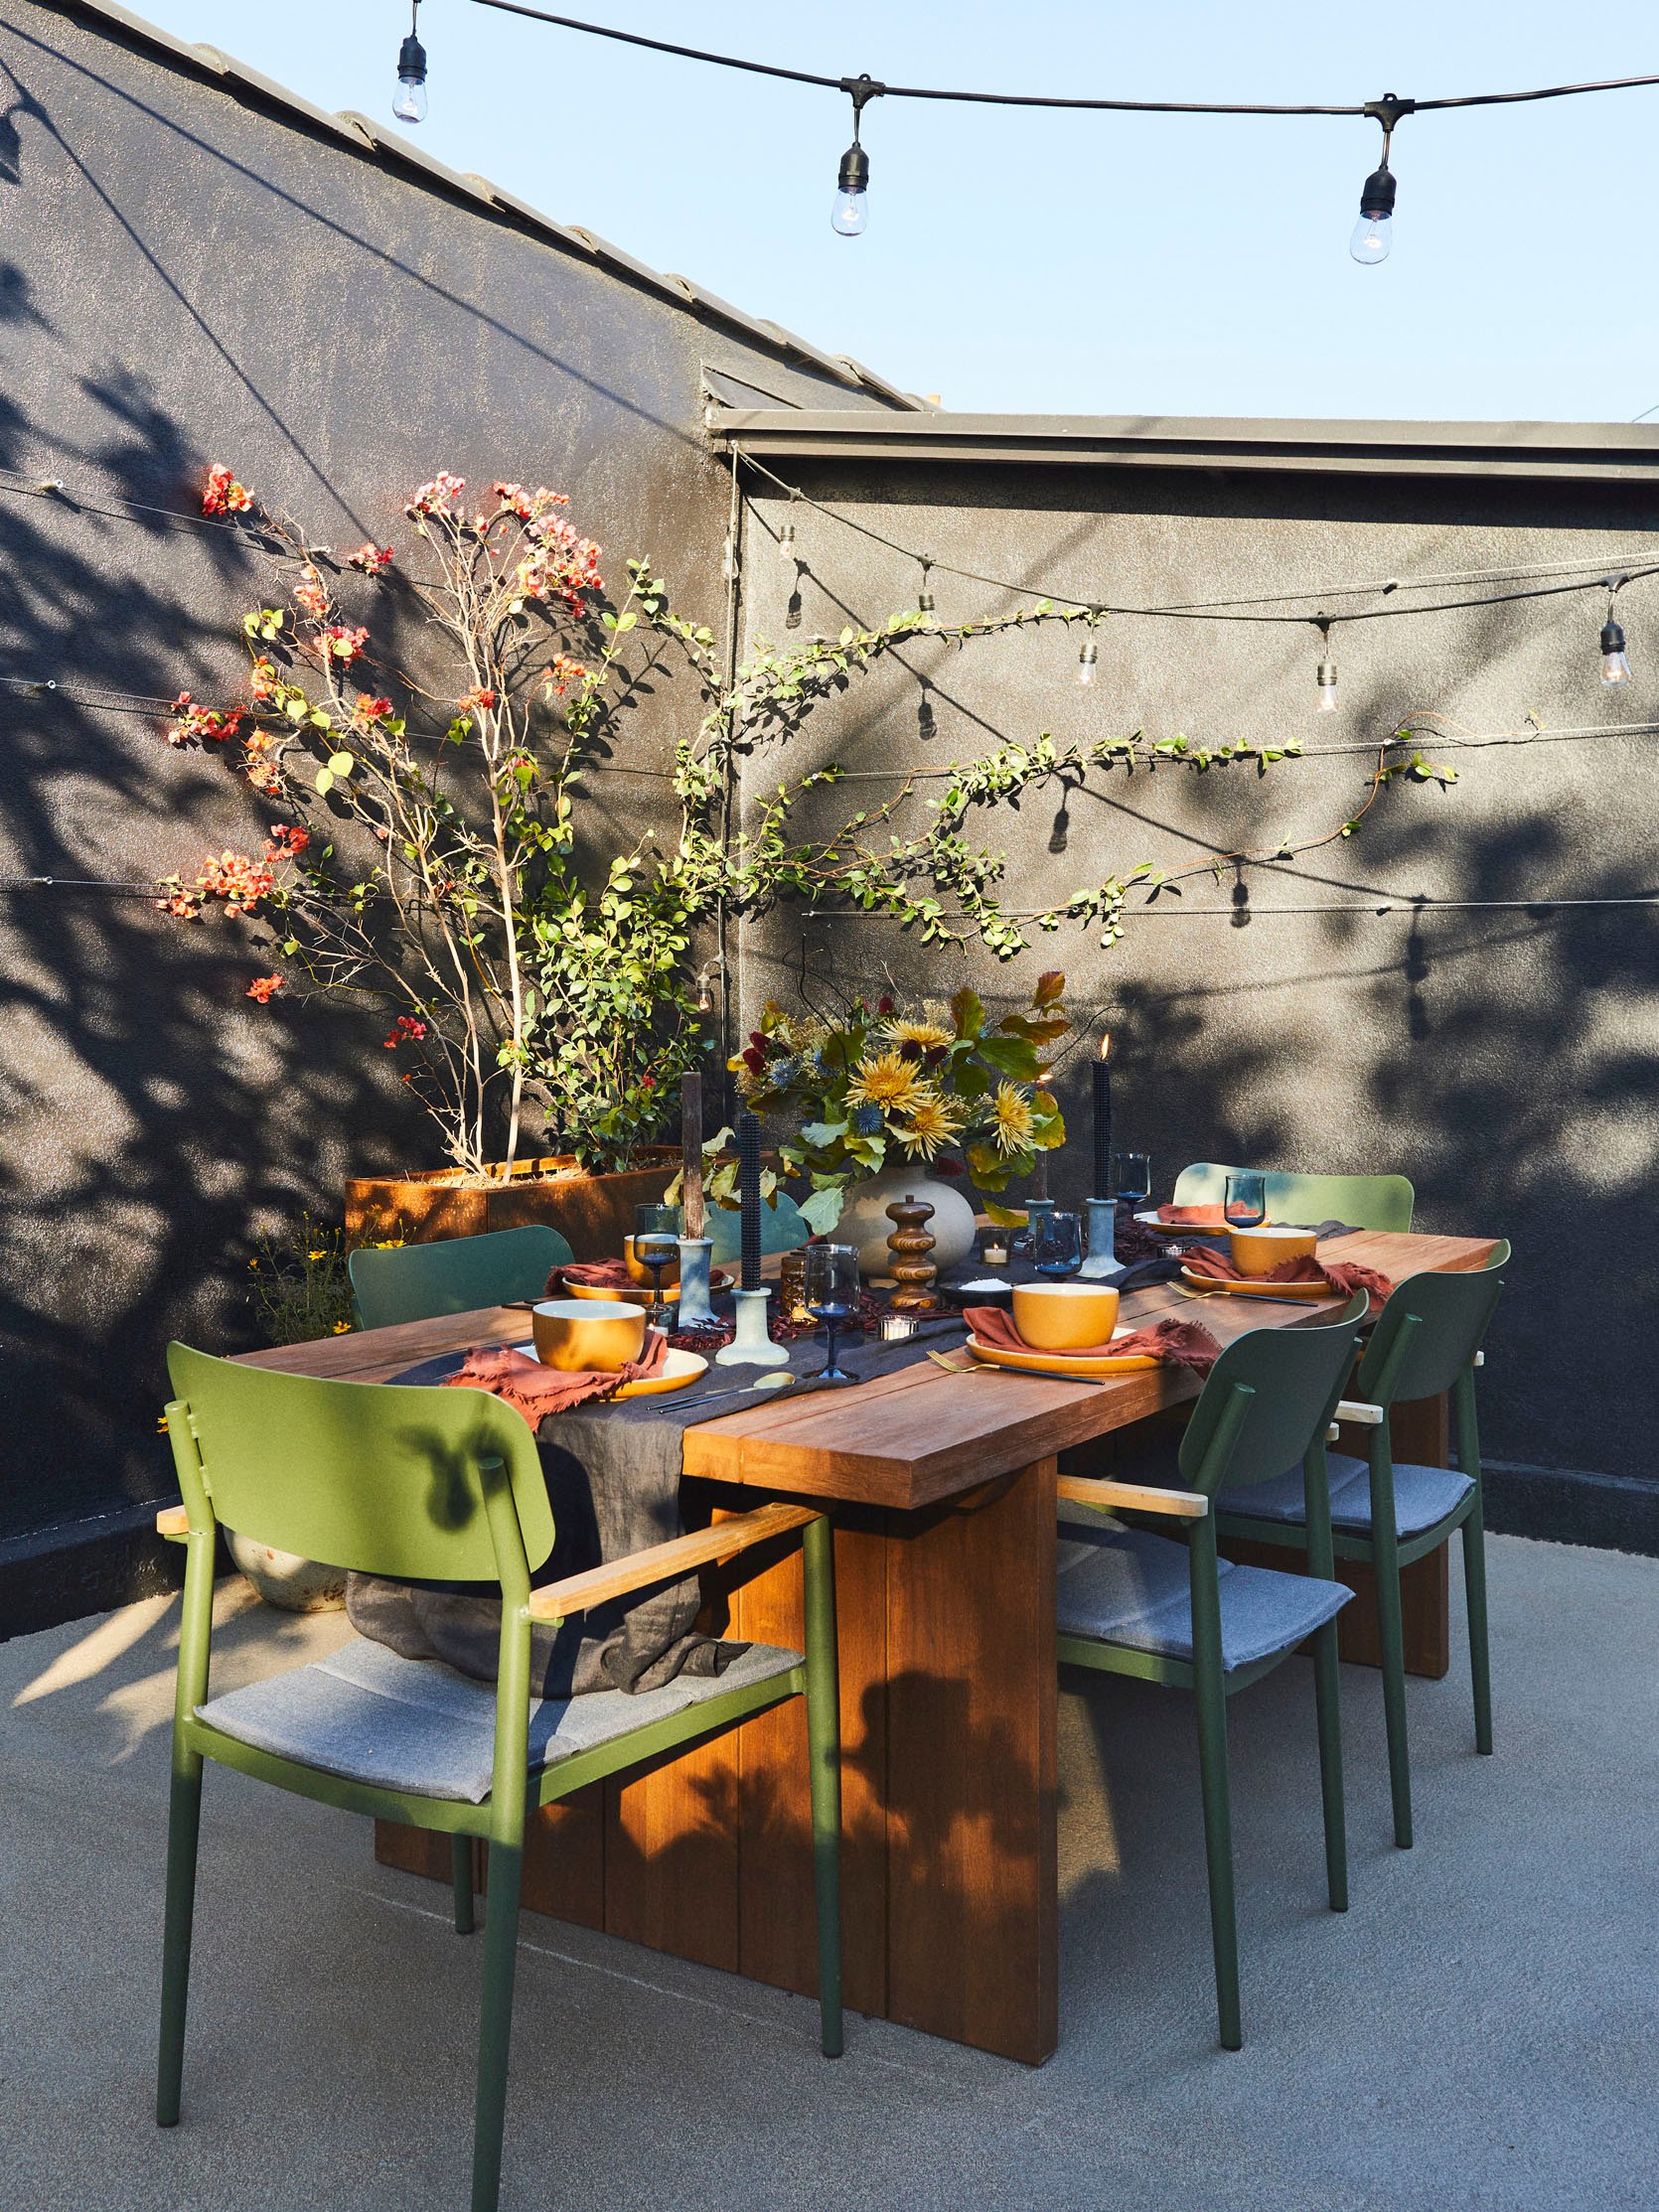
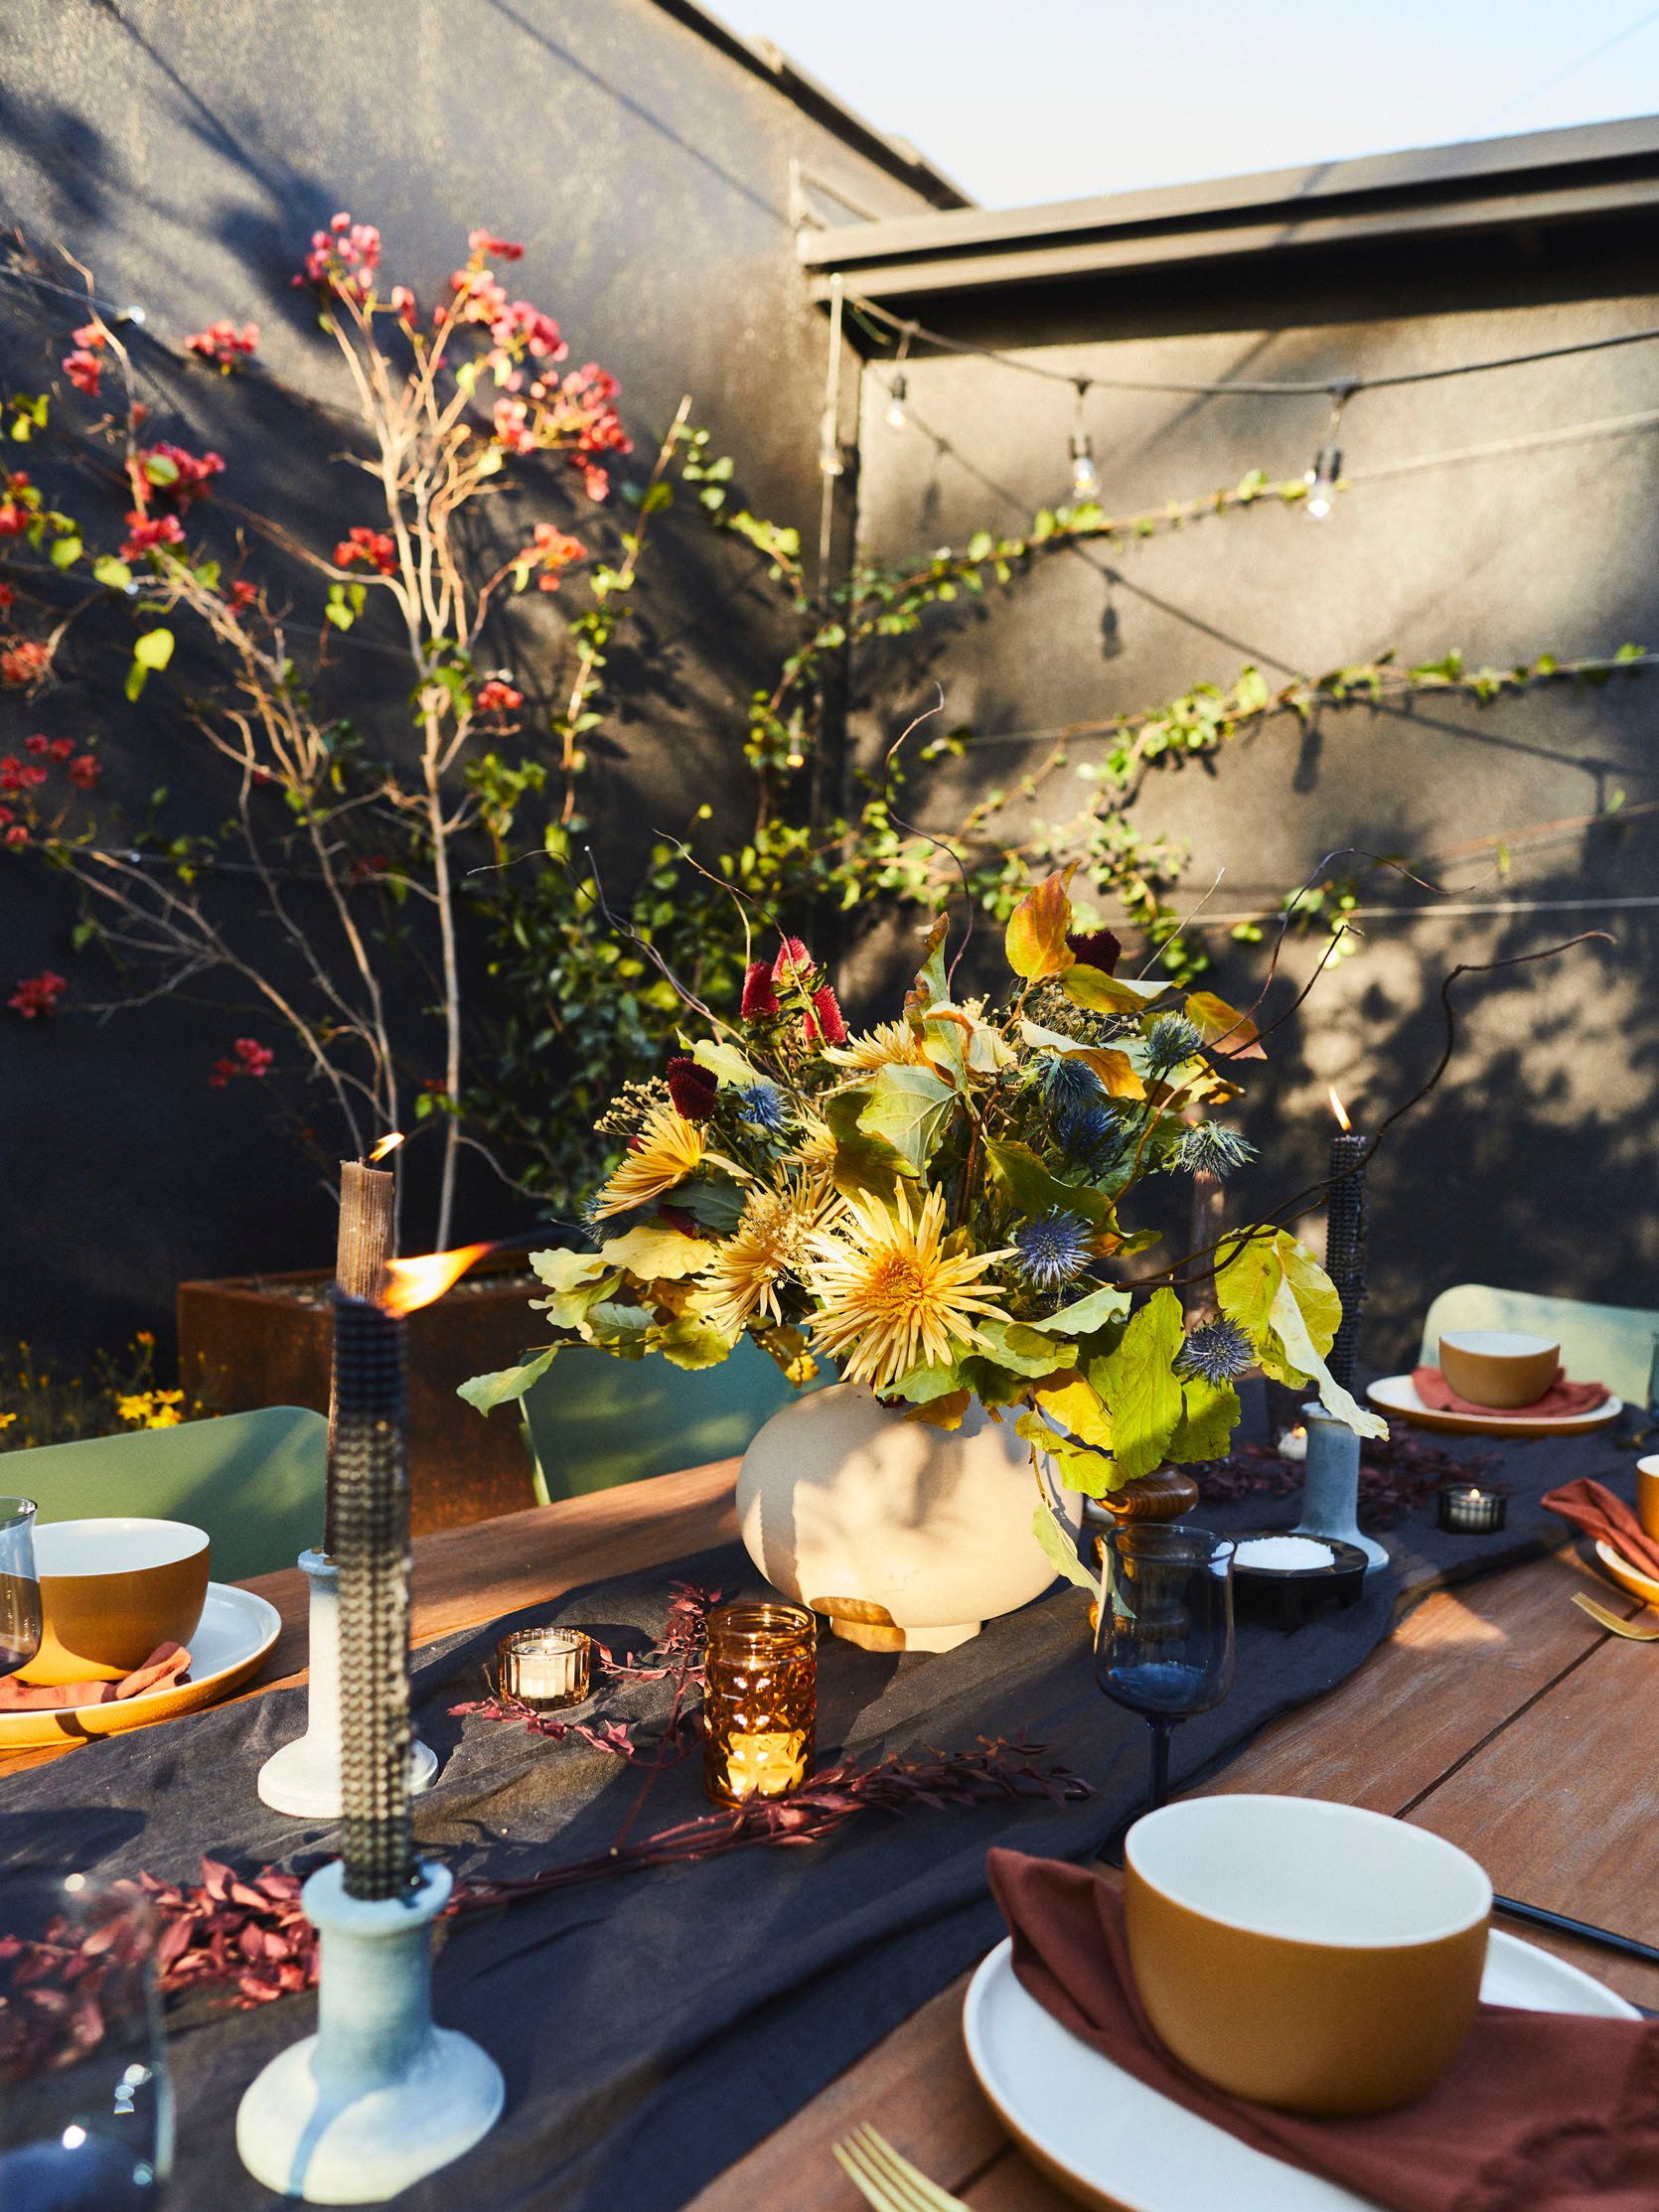
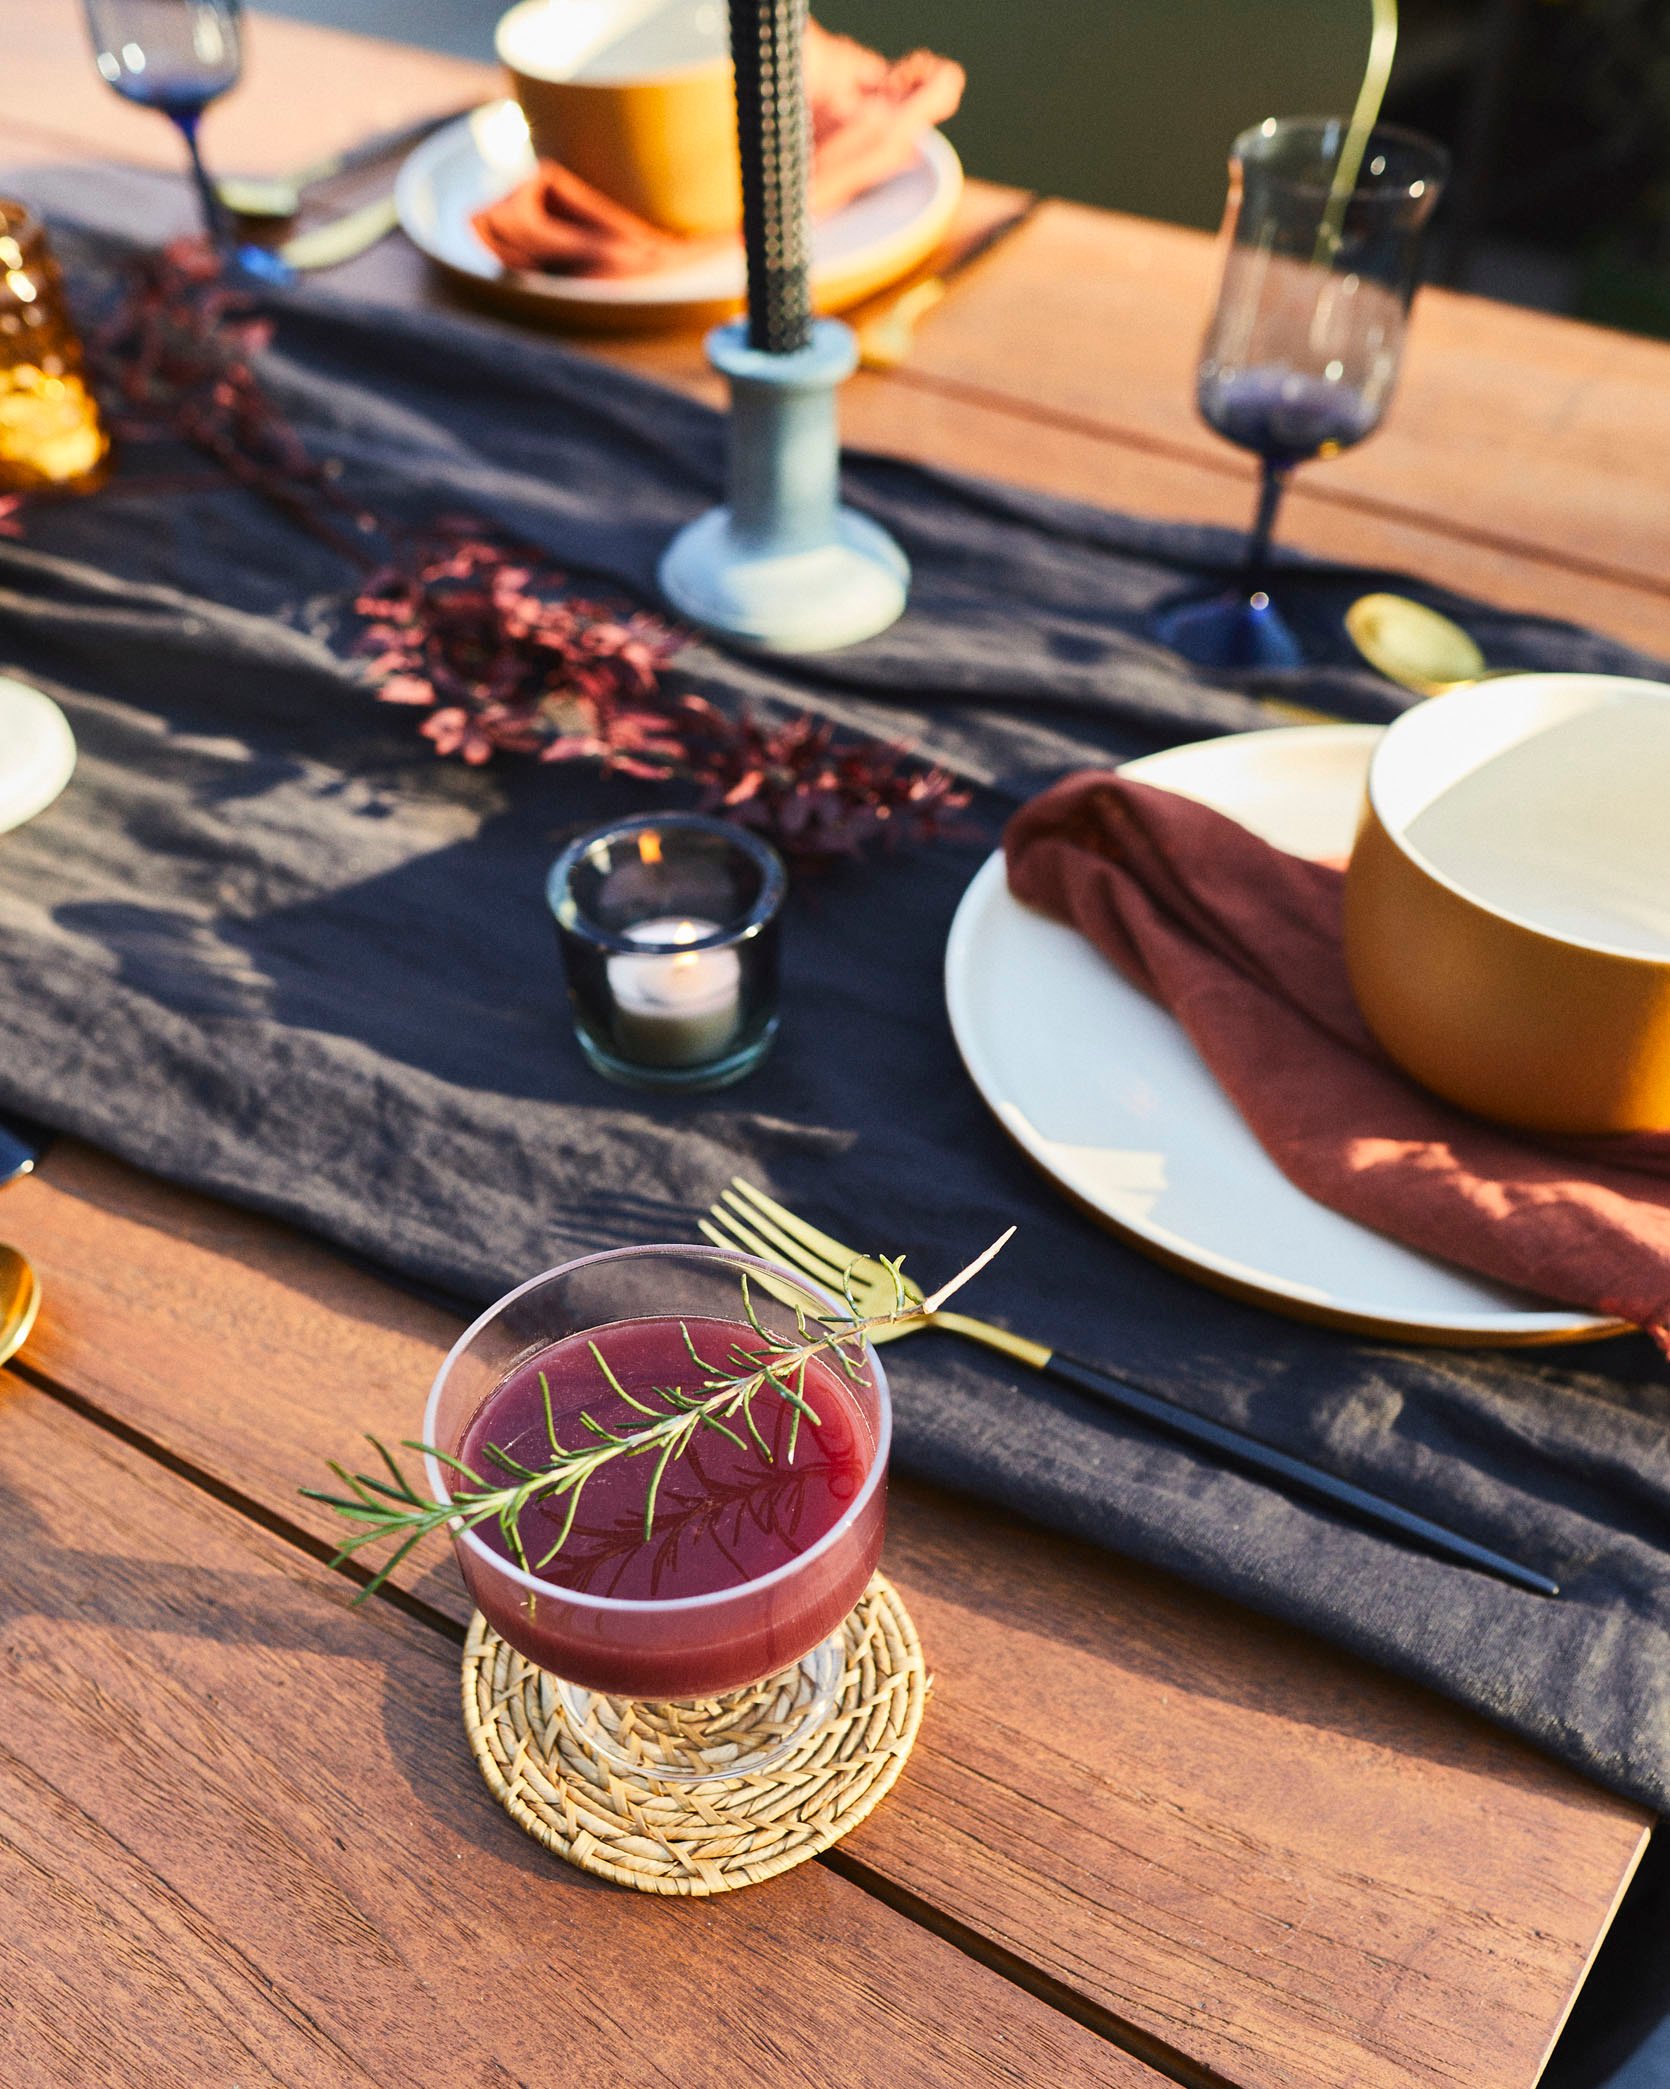
Vase | “Runner” (it’s a folded tablecloth) | Tealight Candle Holders | Candlestick Holders (Studio Mcgee for Target a couple years ago) | Black Candlesticks | Brown Candlesticks | Plates | Bowls | Flatware | Napkins | Cocktail Glass | Woven Coaster | Wine glasses (vintage – similar) | Pepper Grinder (vintage – similar) | Salt pinch (vintage)
The light was really difficult for this shoot, even in sunny Southern California the sun does not get high in the middle of the winter. You can see the cables if you look closely, I will probably have to add a row on the left if the bougainvillea takes off, as it is prone to do here. I tried to make a pretty tablescape for us but by God is it hard to see.
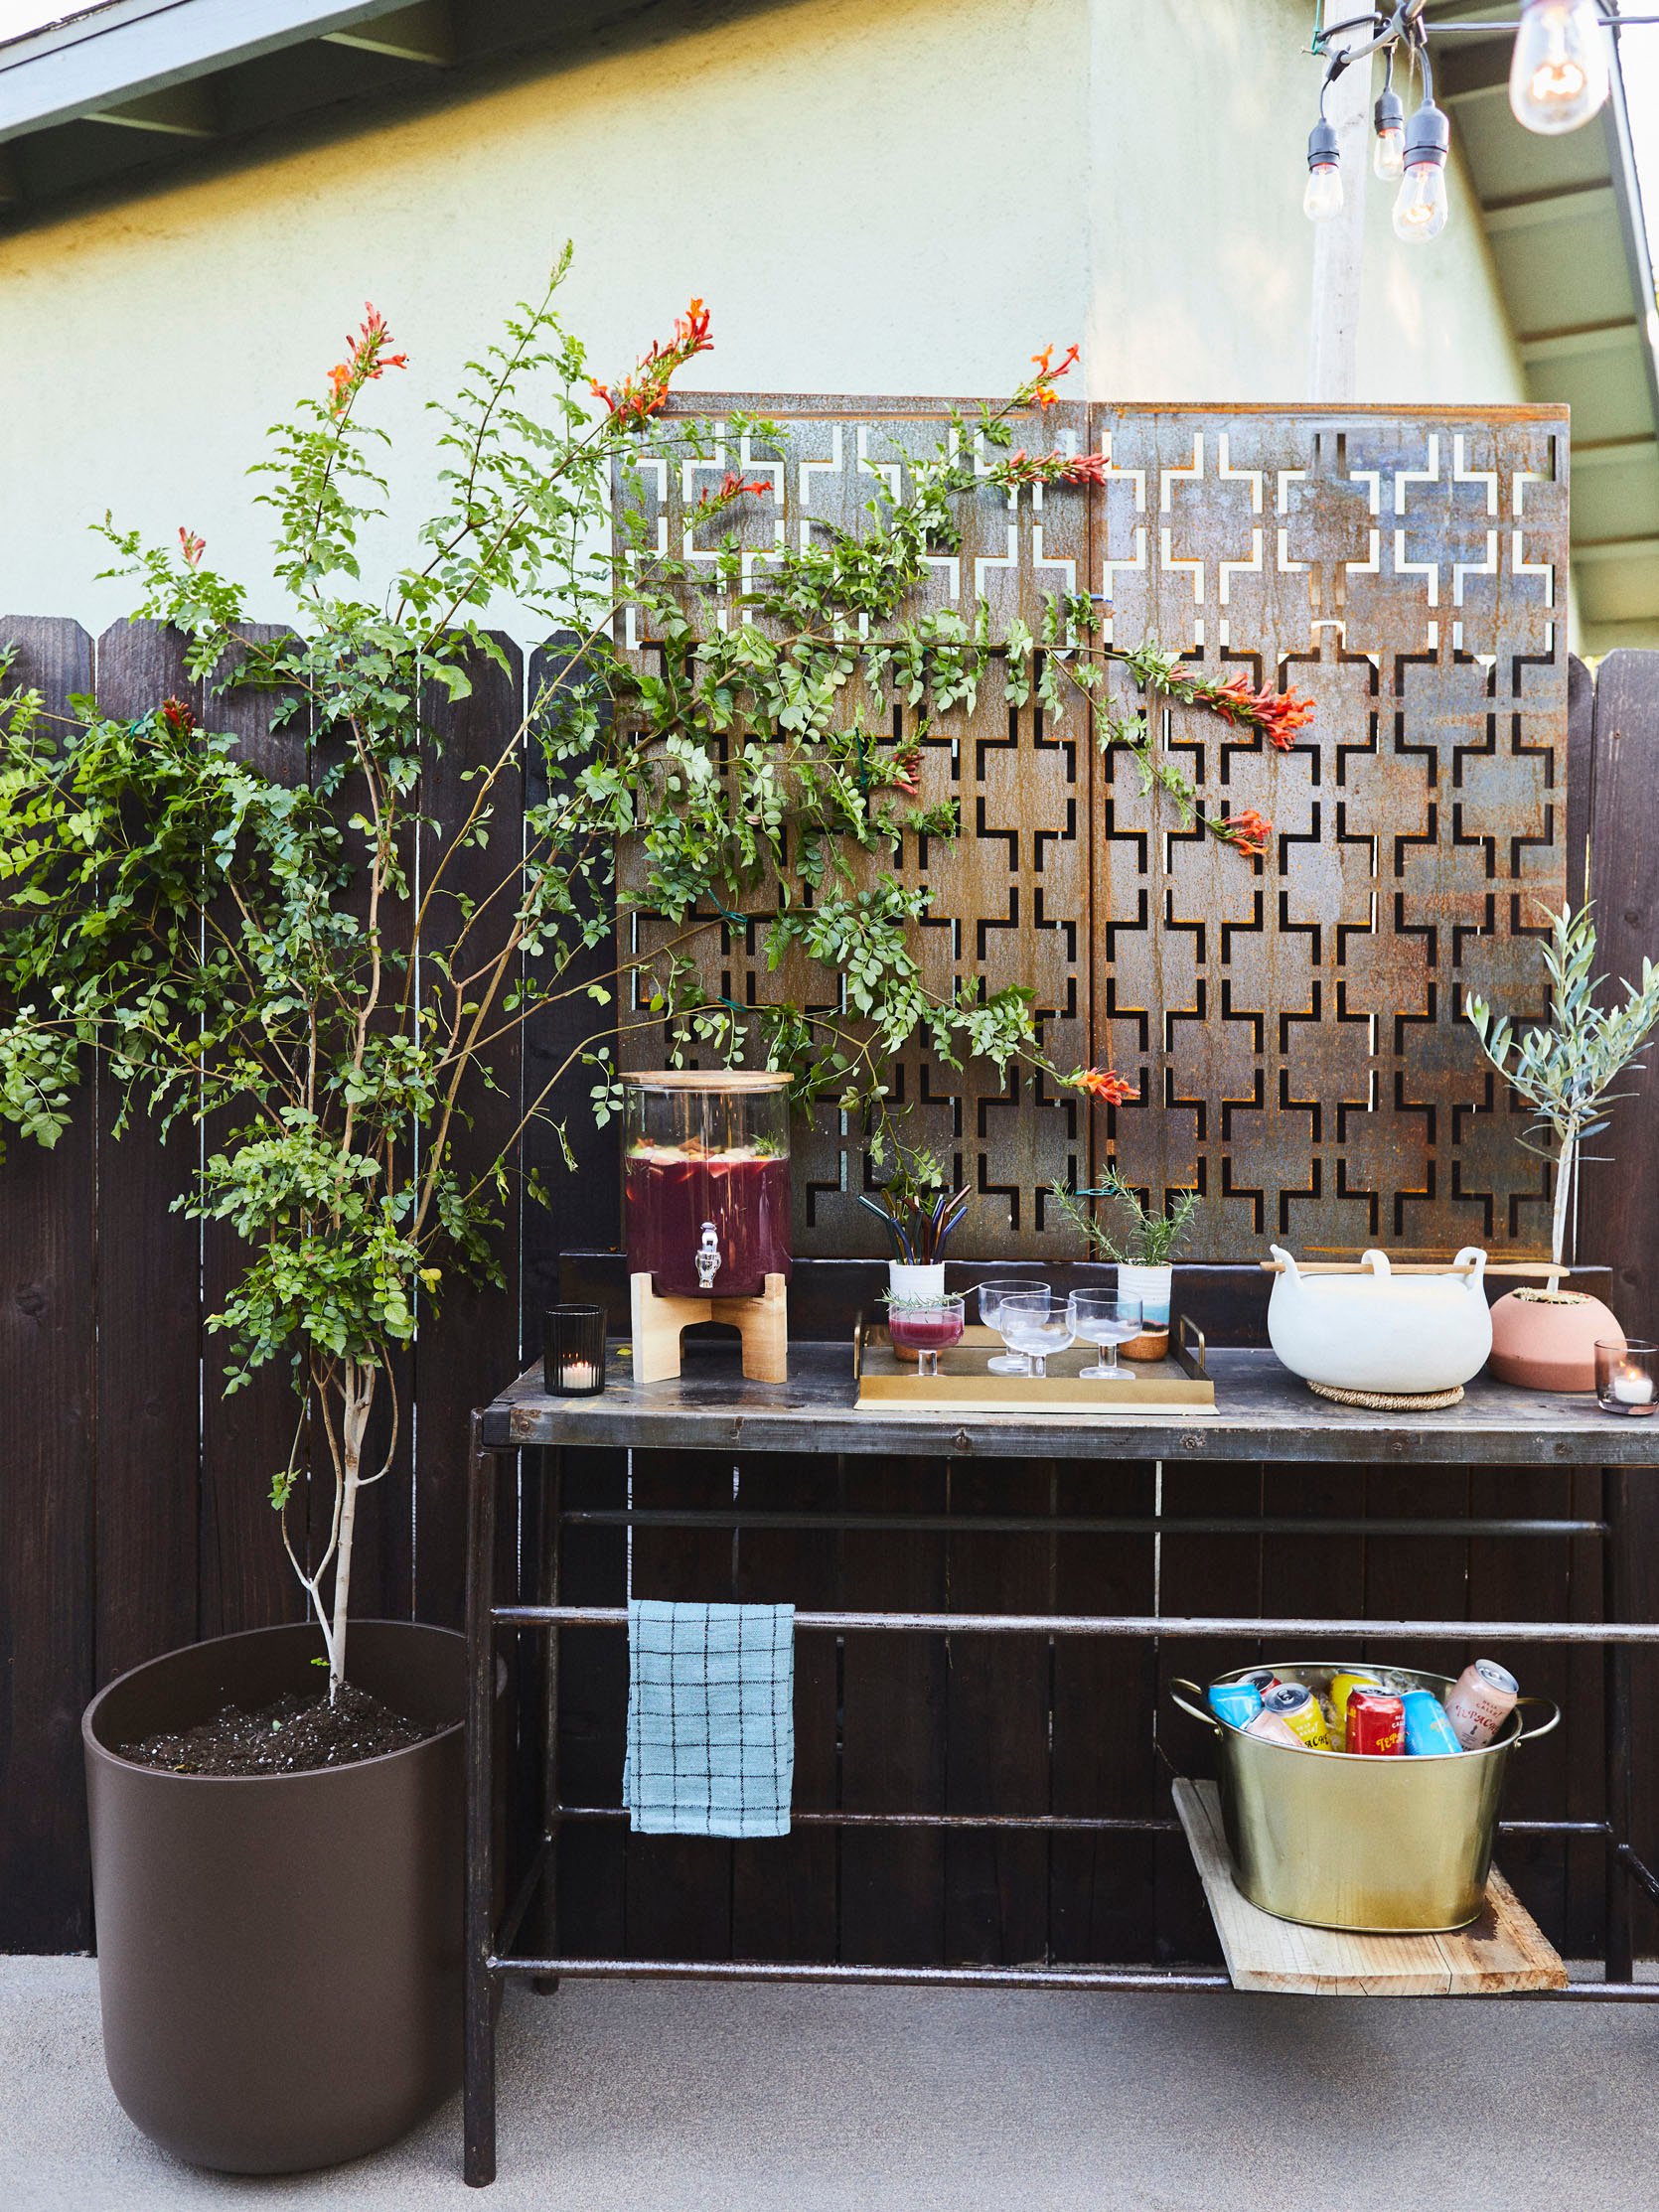
Planter | Table (vintage ) Drink Dispenser | Tray | Coup Glasses | Glass Straws | More Glass Straws | More Glass Straws 🙂 | Pot with Spoon | Trivet | Beverage Bucket | Towel
This is the Daffy-haze flea market bar find. I chose it because it was the perfect size and made of steel, already patinated, so it will last just fine outside. I fancied it up by screwing two of the Veradek privacy panels vertically to the top of it and planted climbing lonicera ciliosa (orange honeysuckle) next to it in a Pure Kona Planter from Veradek. If you’re like me and end up moving planters around a lot you’ll love these pots, they don’t look like plastic but they are, which means they are lighter and don’t break the bank. You’ll be seeing more of them in my urban garden reveal.
When hosting more than two people I want everyone to be able to serve themselves when possible to take some pressure off of me. In this case: chili, sangria, and non-alcoholic drinks are all available on the bar. Those pretty cans are De La Calle Tapache, my new favorite beverage for dry January. They are absolutely delicious and feel like you’re having a cocktail. Come to think of it, I‘m sure they’d be great mixers as well. De La Calle let’s work together! Slide into my DM’s! (hey, it worked for Goodland!)
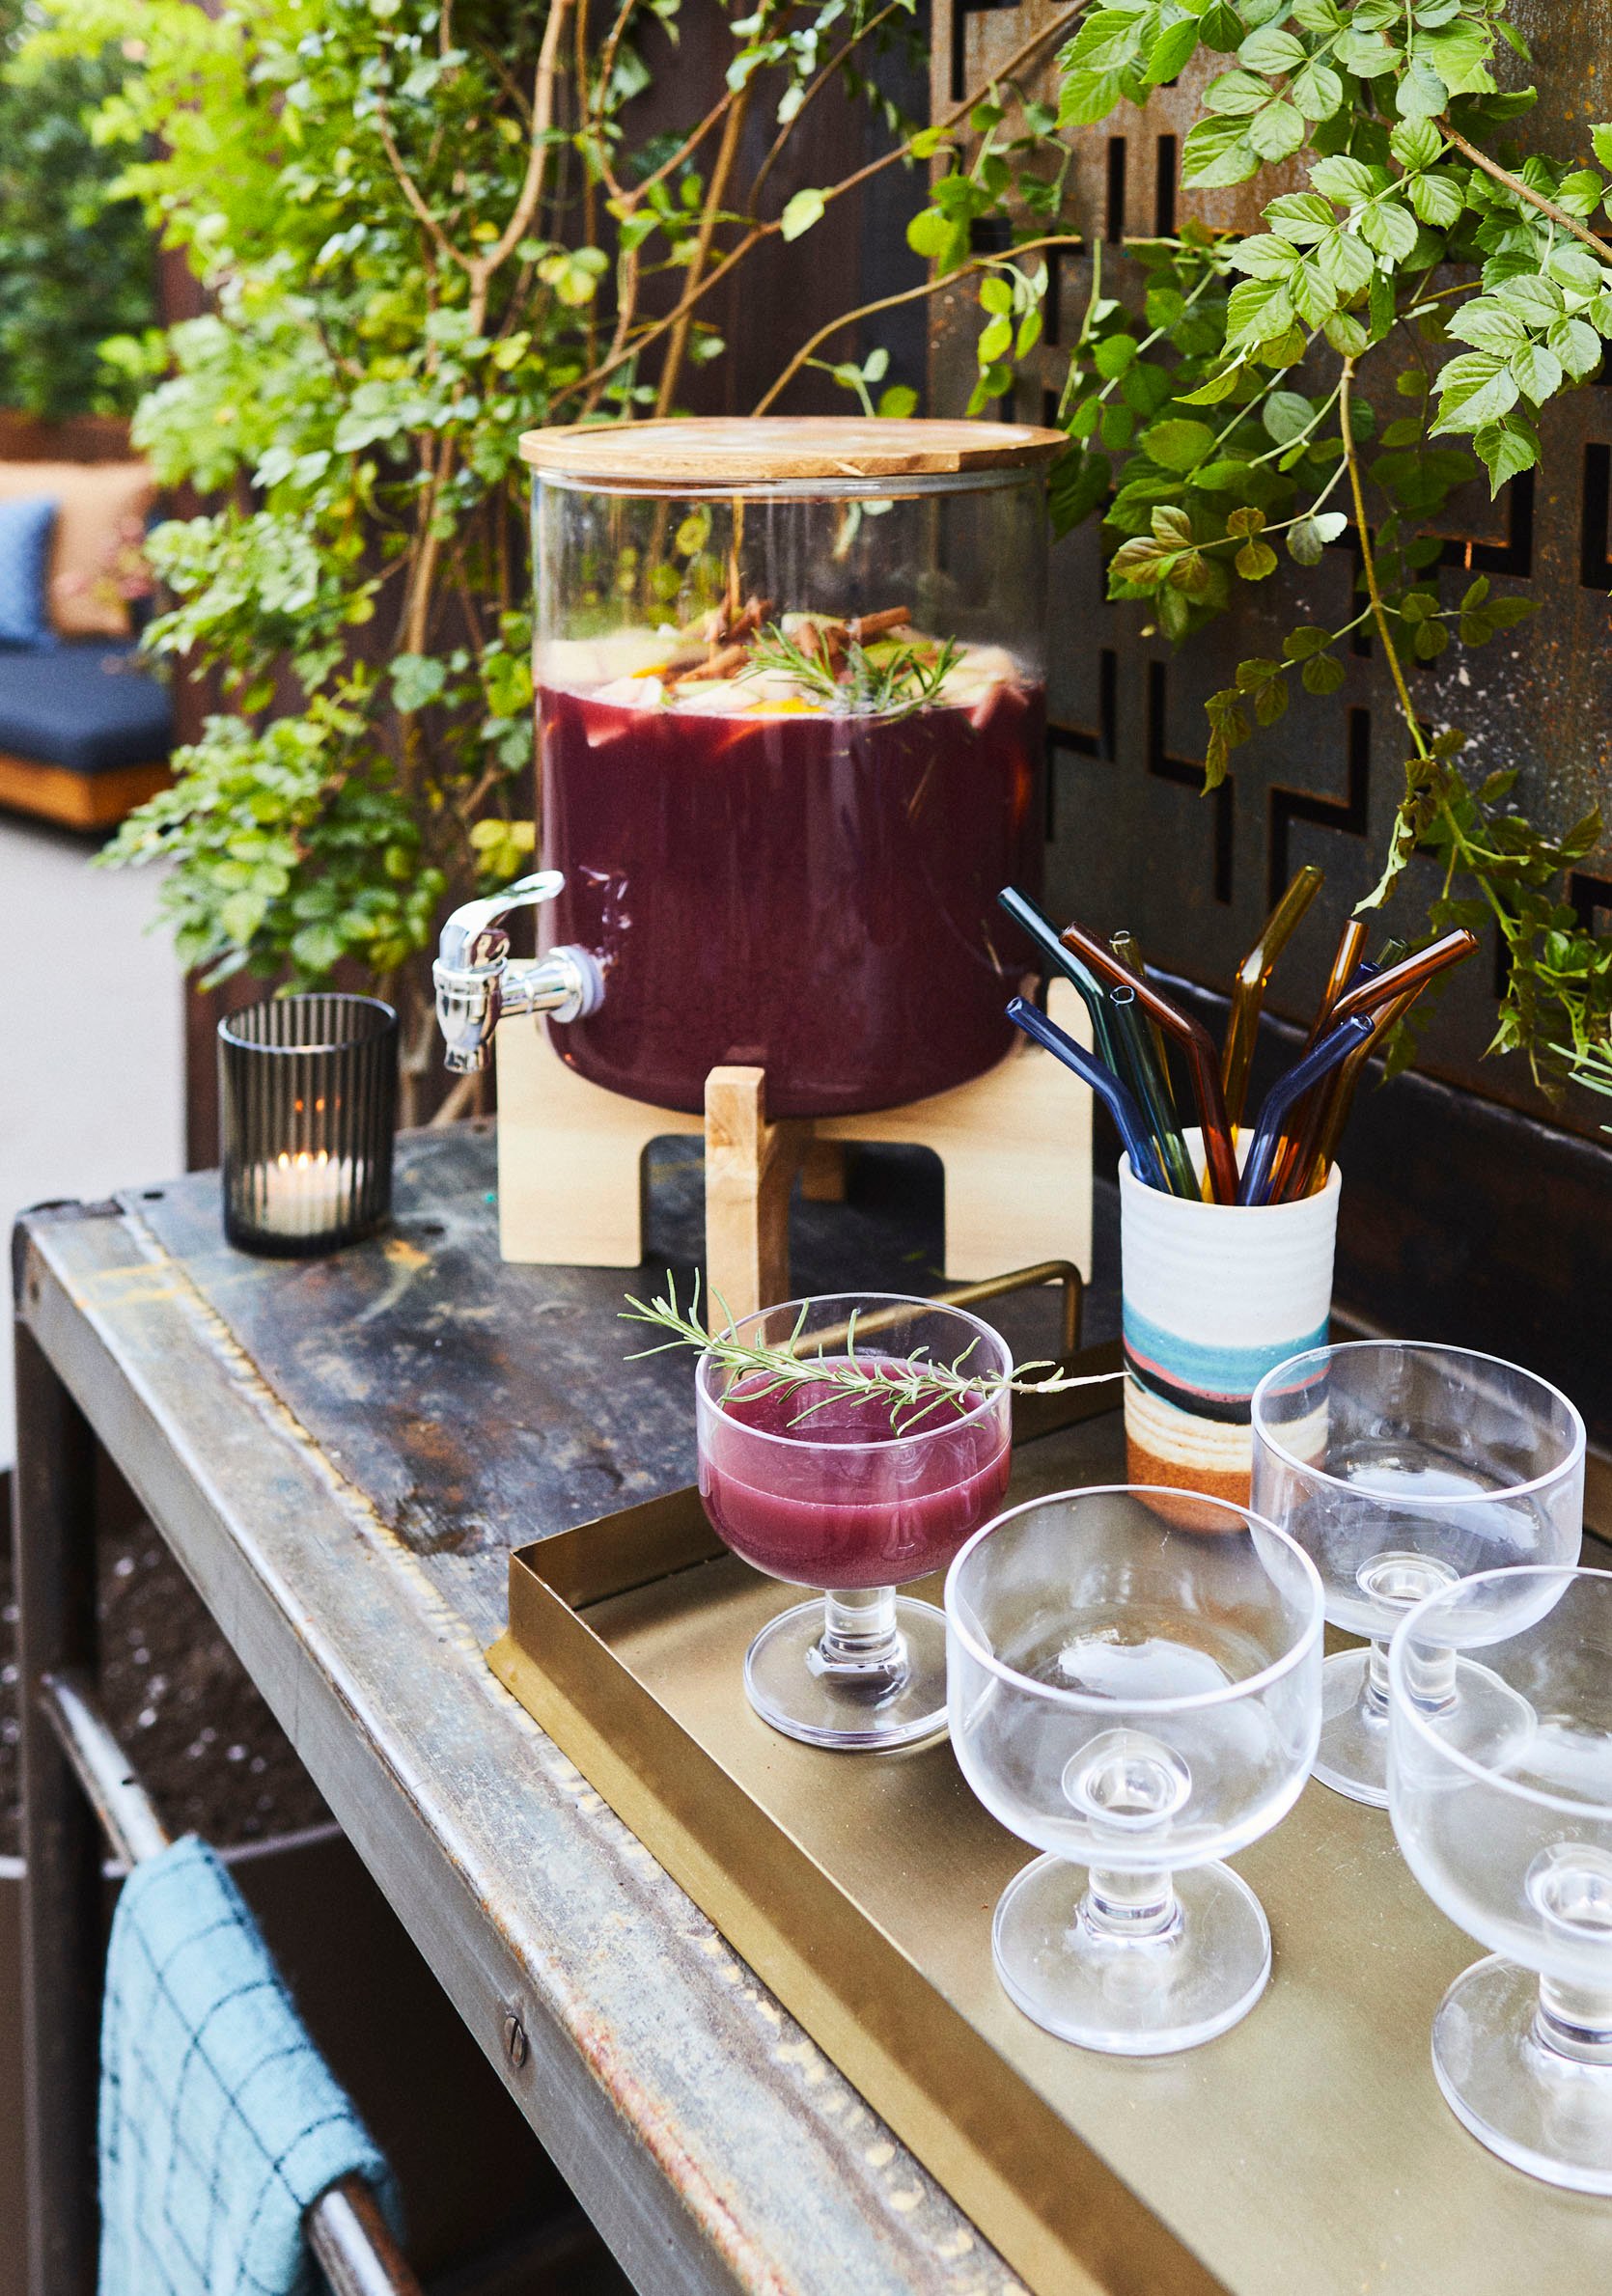
I own more than a few drink dispensers (weird flex) and this World Market one may be my favorite yet because of the design and price point.
Rosemary Sangria Recipe that no one asked for but everyone needs in a hosting pinch :
- 1 apple skin on, chopped into small pieces
- 1 orange rind on, sliced in rounds
- ½ cup sliced strawberries
- A few sprigs of rosemary
- 1 cup orange juice
- 1 cup brandy
- 1 bottle dry Spanish red wine
Note: I don’t prefer the extra sugar that most sangria recipes call for, if I want it sweeter I add more OJ but if you have more of a sweet tooth would add a couple of tablespoons of sugar to step 1 below…
Instructions
- Add apples, oranges, strawberries, and rosemary together and muddle, not too mashed but a little mashed – maybe a minute of muddling. Obvi not an exact science.
- Add orange juice and brandy and muddle again.
- Add red wine and stir.
- Garnish with orange rounds or rosemary or both!
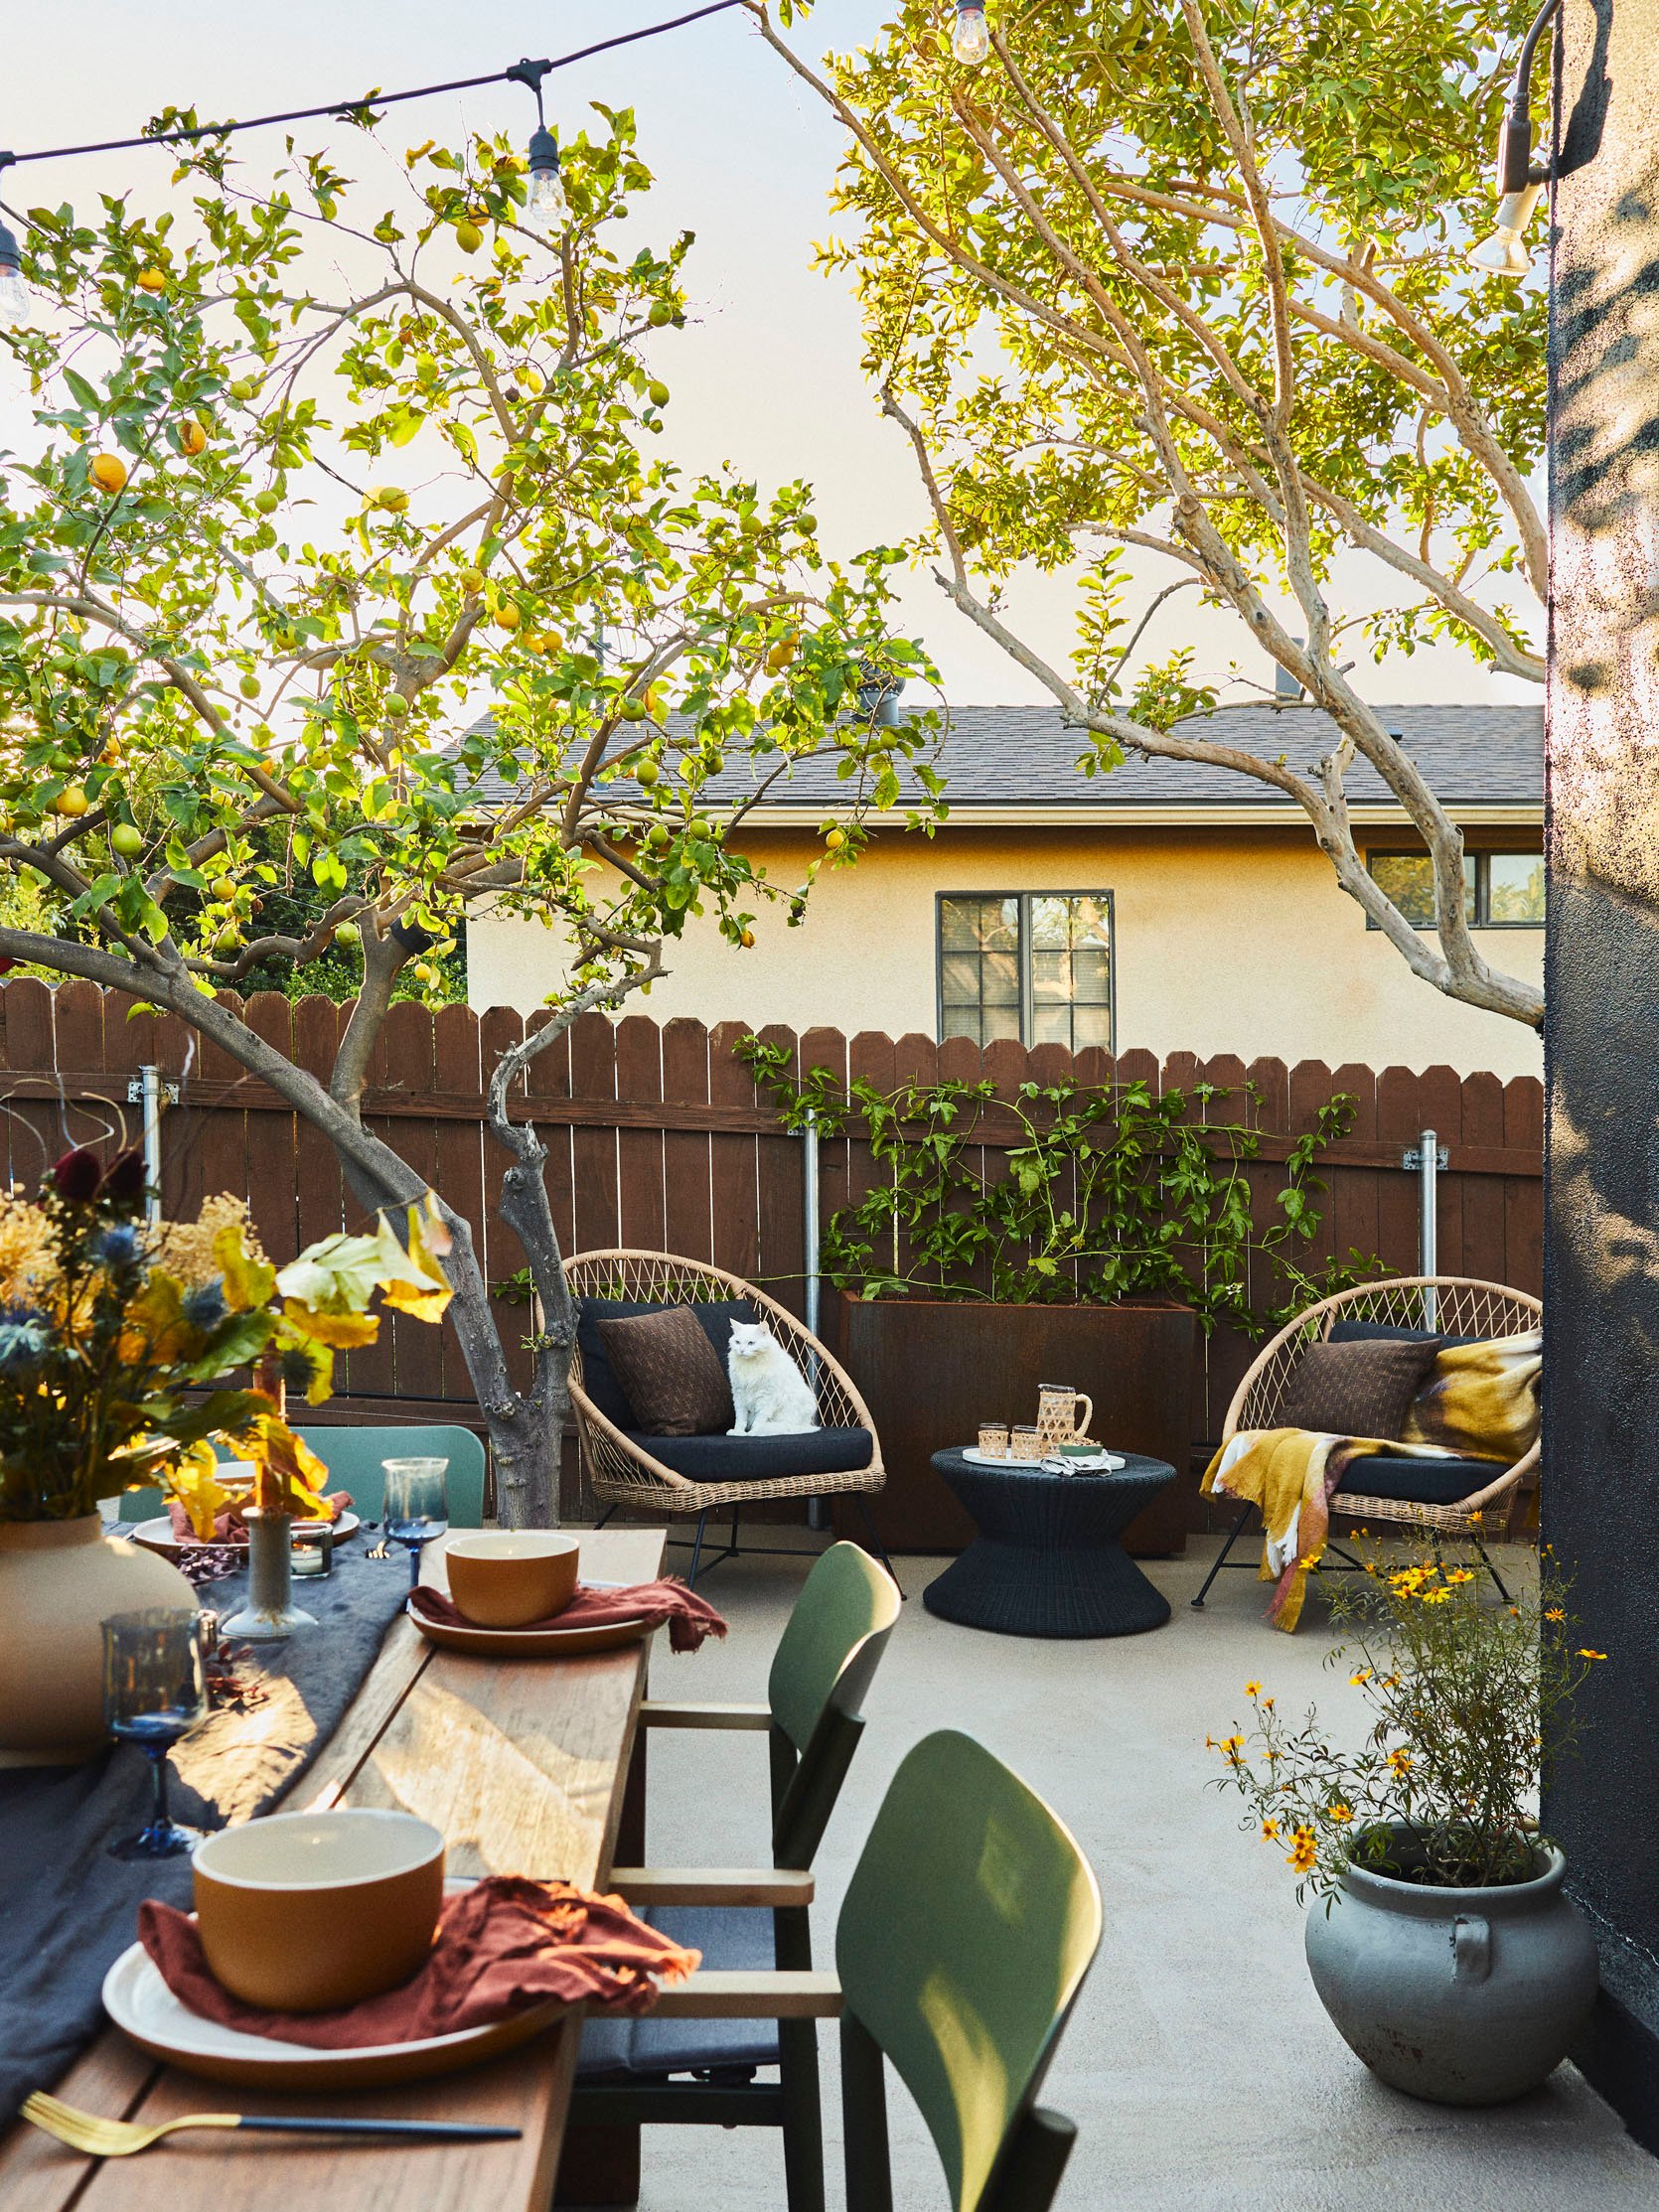
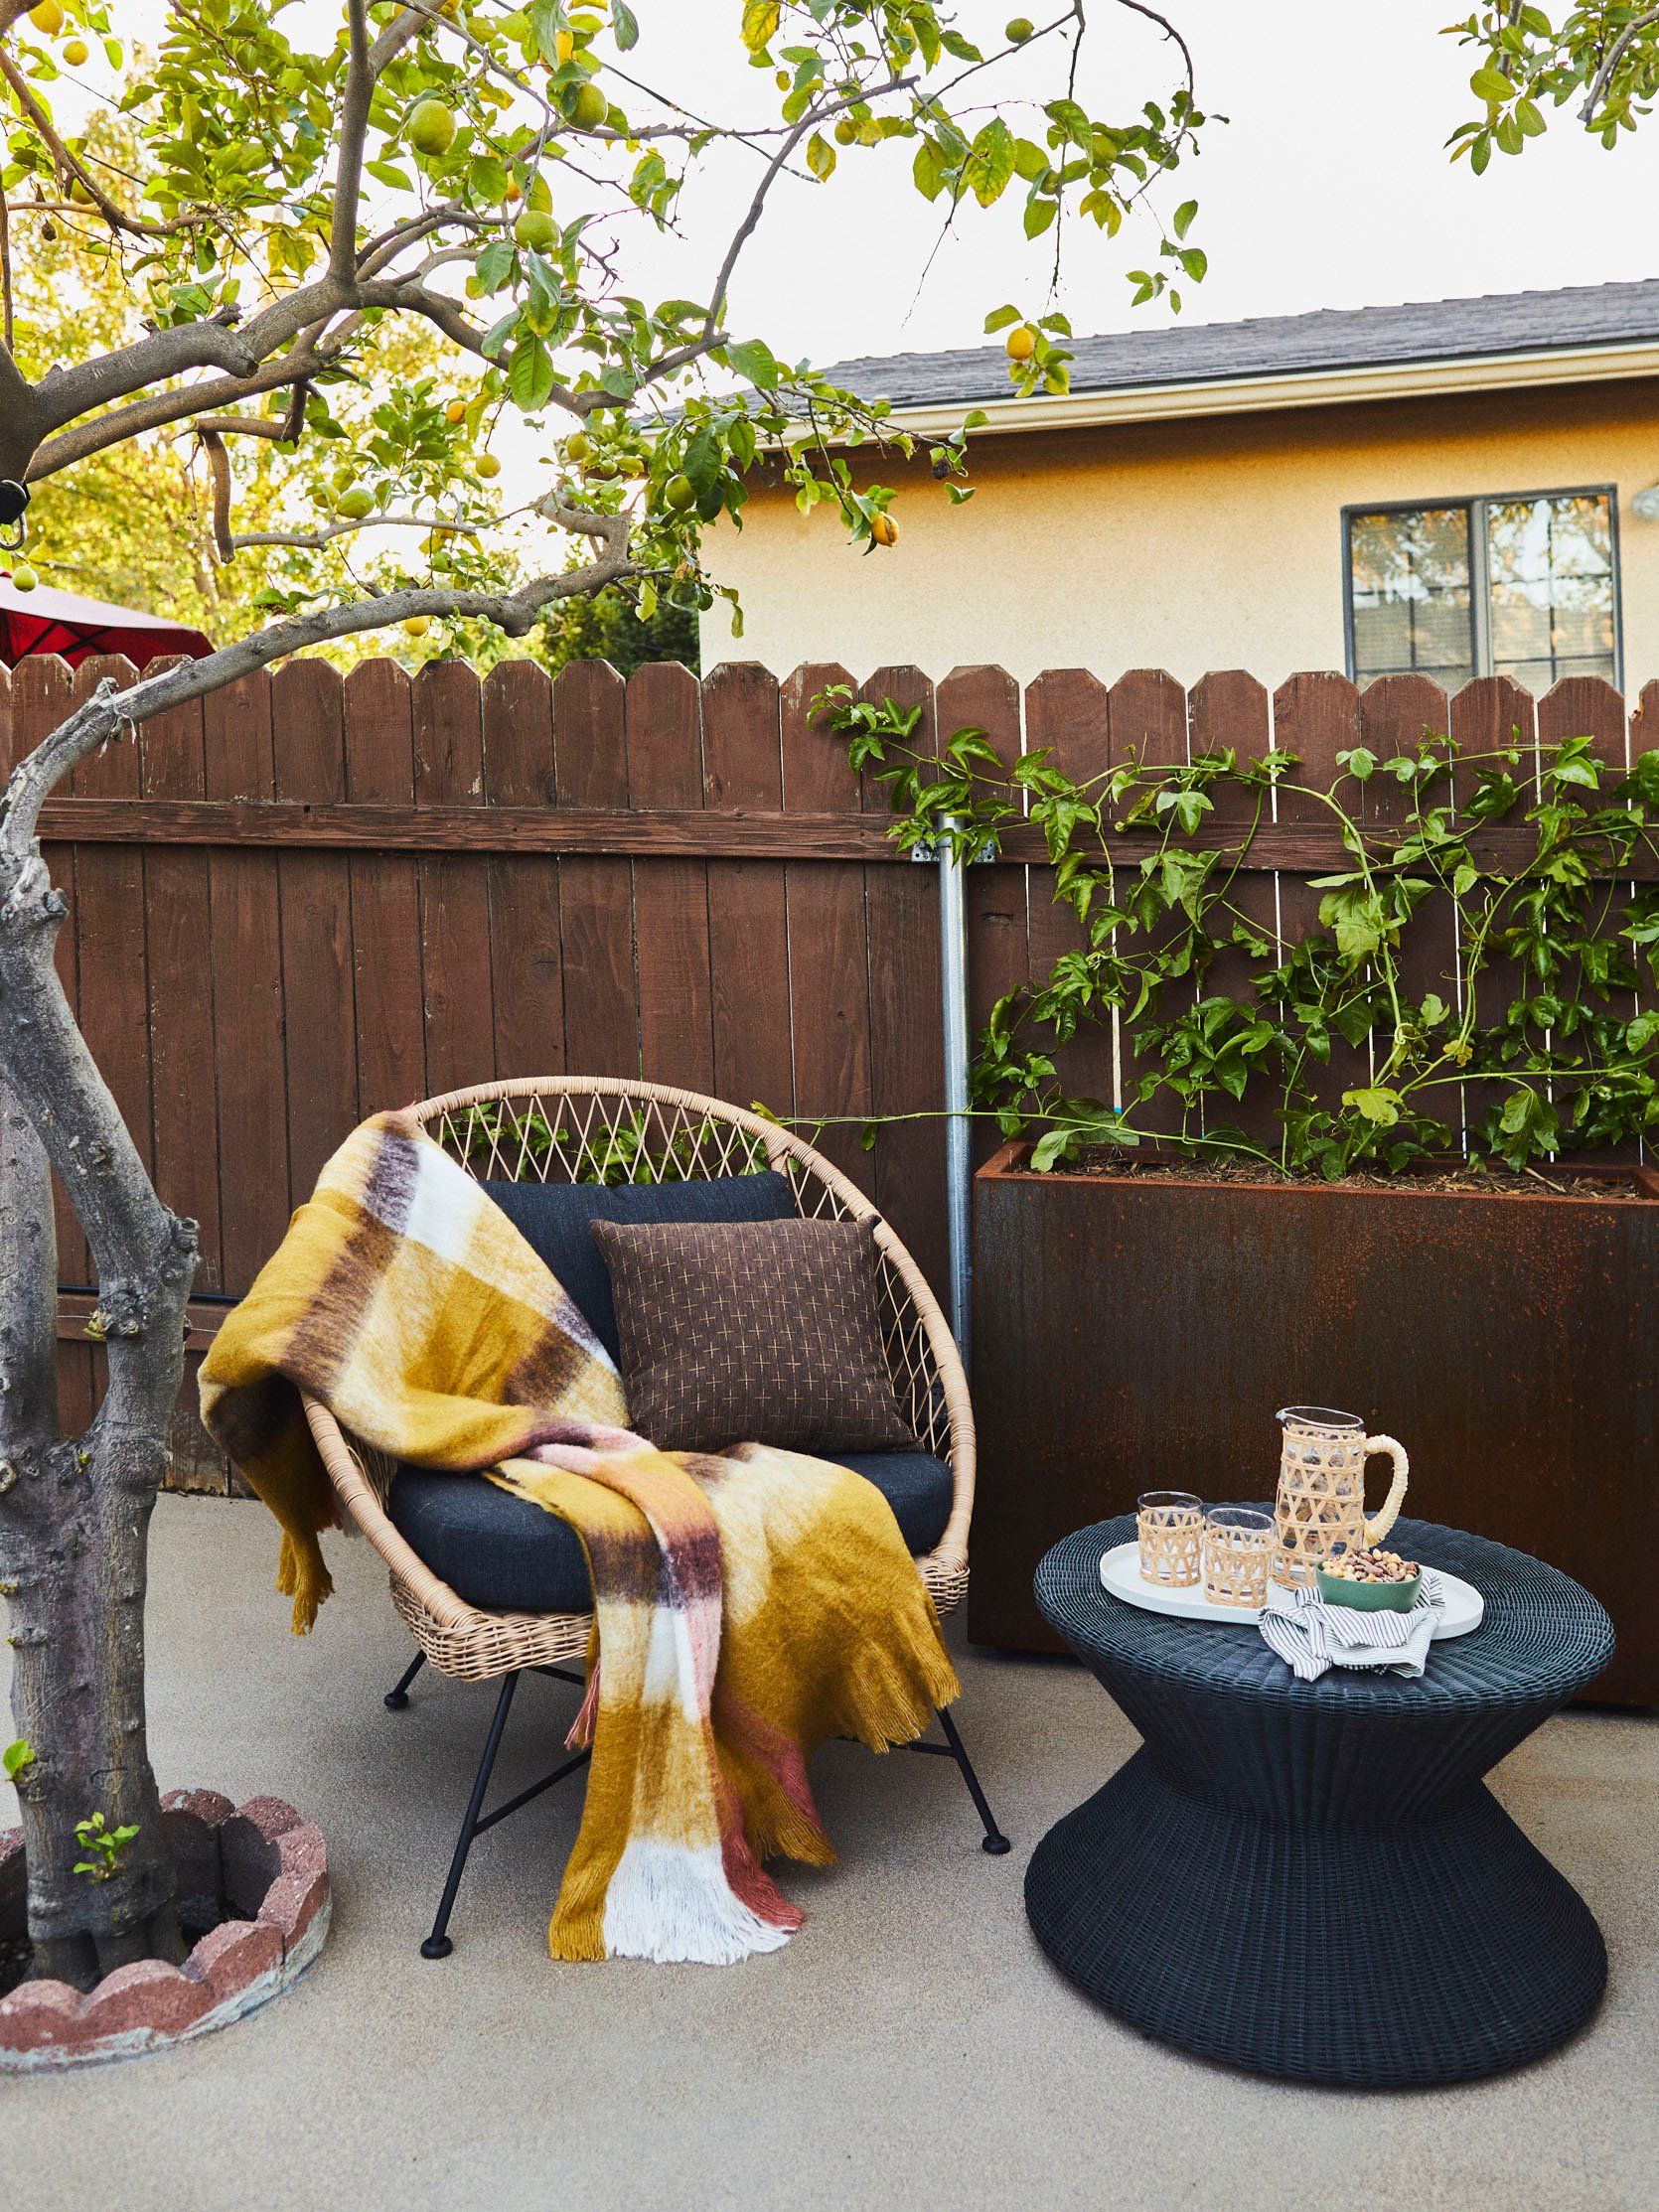
Moving from the dining space over into the cozy coffee area (peep Daffy on the chair!). This is area #3 on the map, it’s closer to the front door and where I imagine Hope and Daniel drink their morning coffee, do the crossword, and talk pleasantly about their landlords. For context, this is the same back side of the neighbor’s fence that I‘ve managed to cover with a hedge in my backyard, and the same fence where I recently planted passion fruit in my front yard. Because I’ve had so much luck with it in my front yard, for the final planter along the fence I decided to go with passion fruit again.
~Resolution #3: Figure out what to do with passion fruit.~
It 100% understood the assignment in the front and I’m hoping it does the same here. BTW: we shot the front yard and it will be coming to a blog near you (this one) in the coming weeks. My desire is that the passion fruit will cover a majority of that fence and again, the plant should be able to get pretty mature in the extra-large capacity Veradek planter.
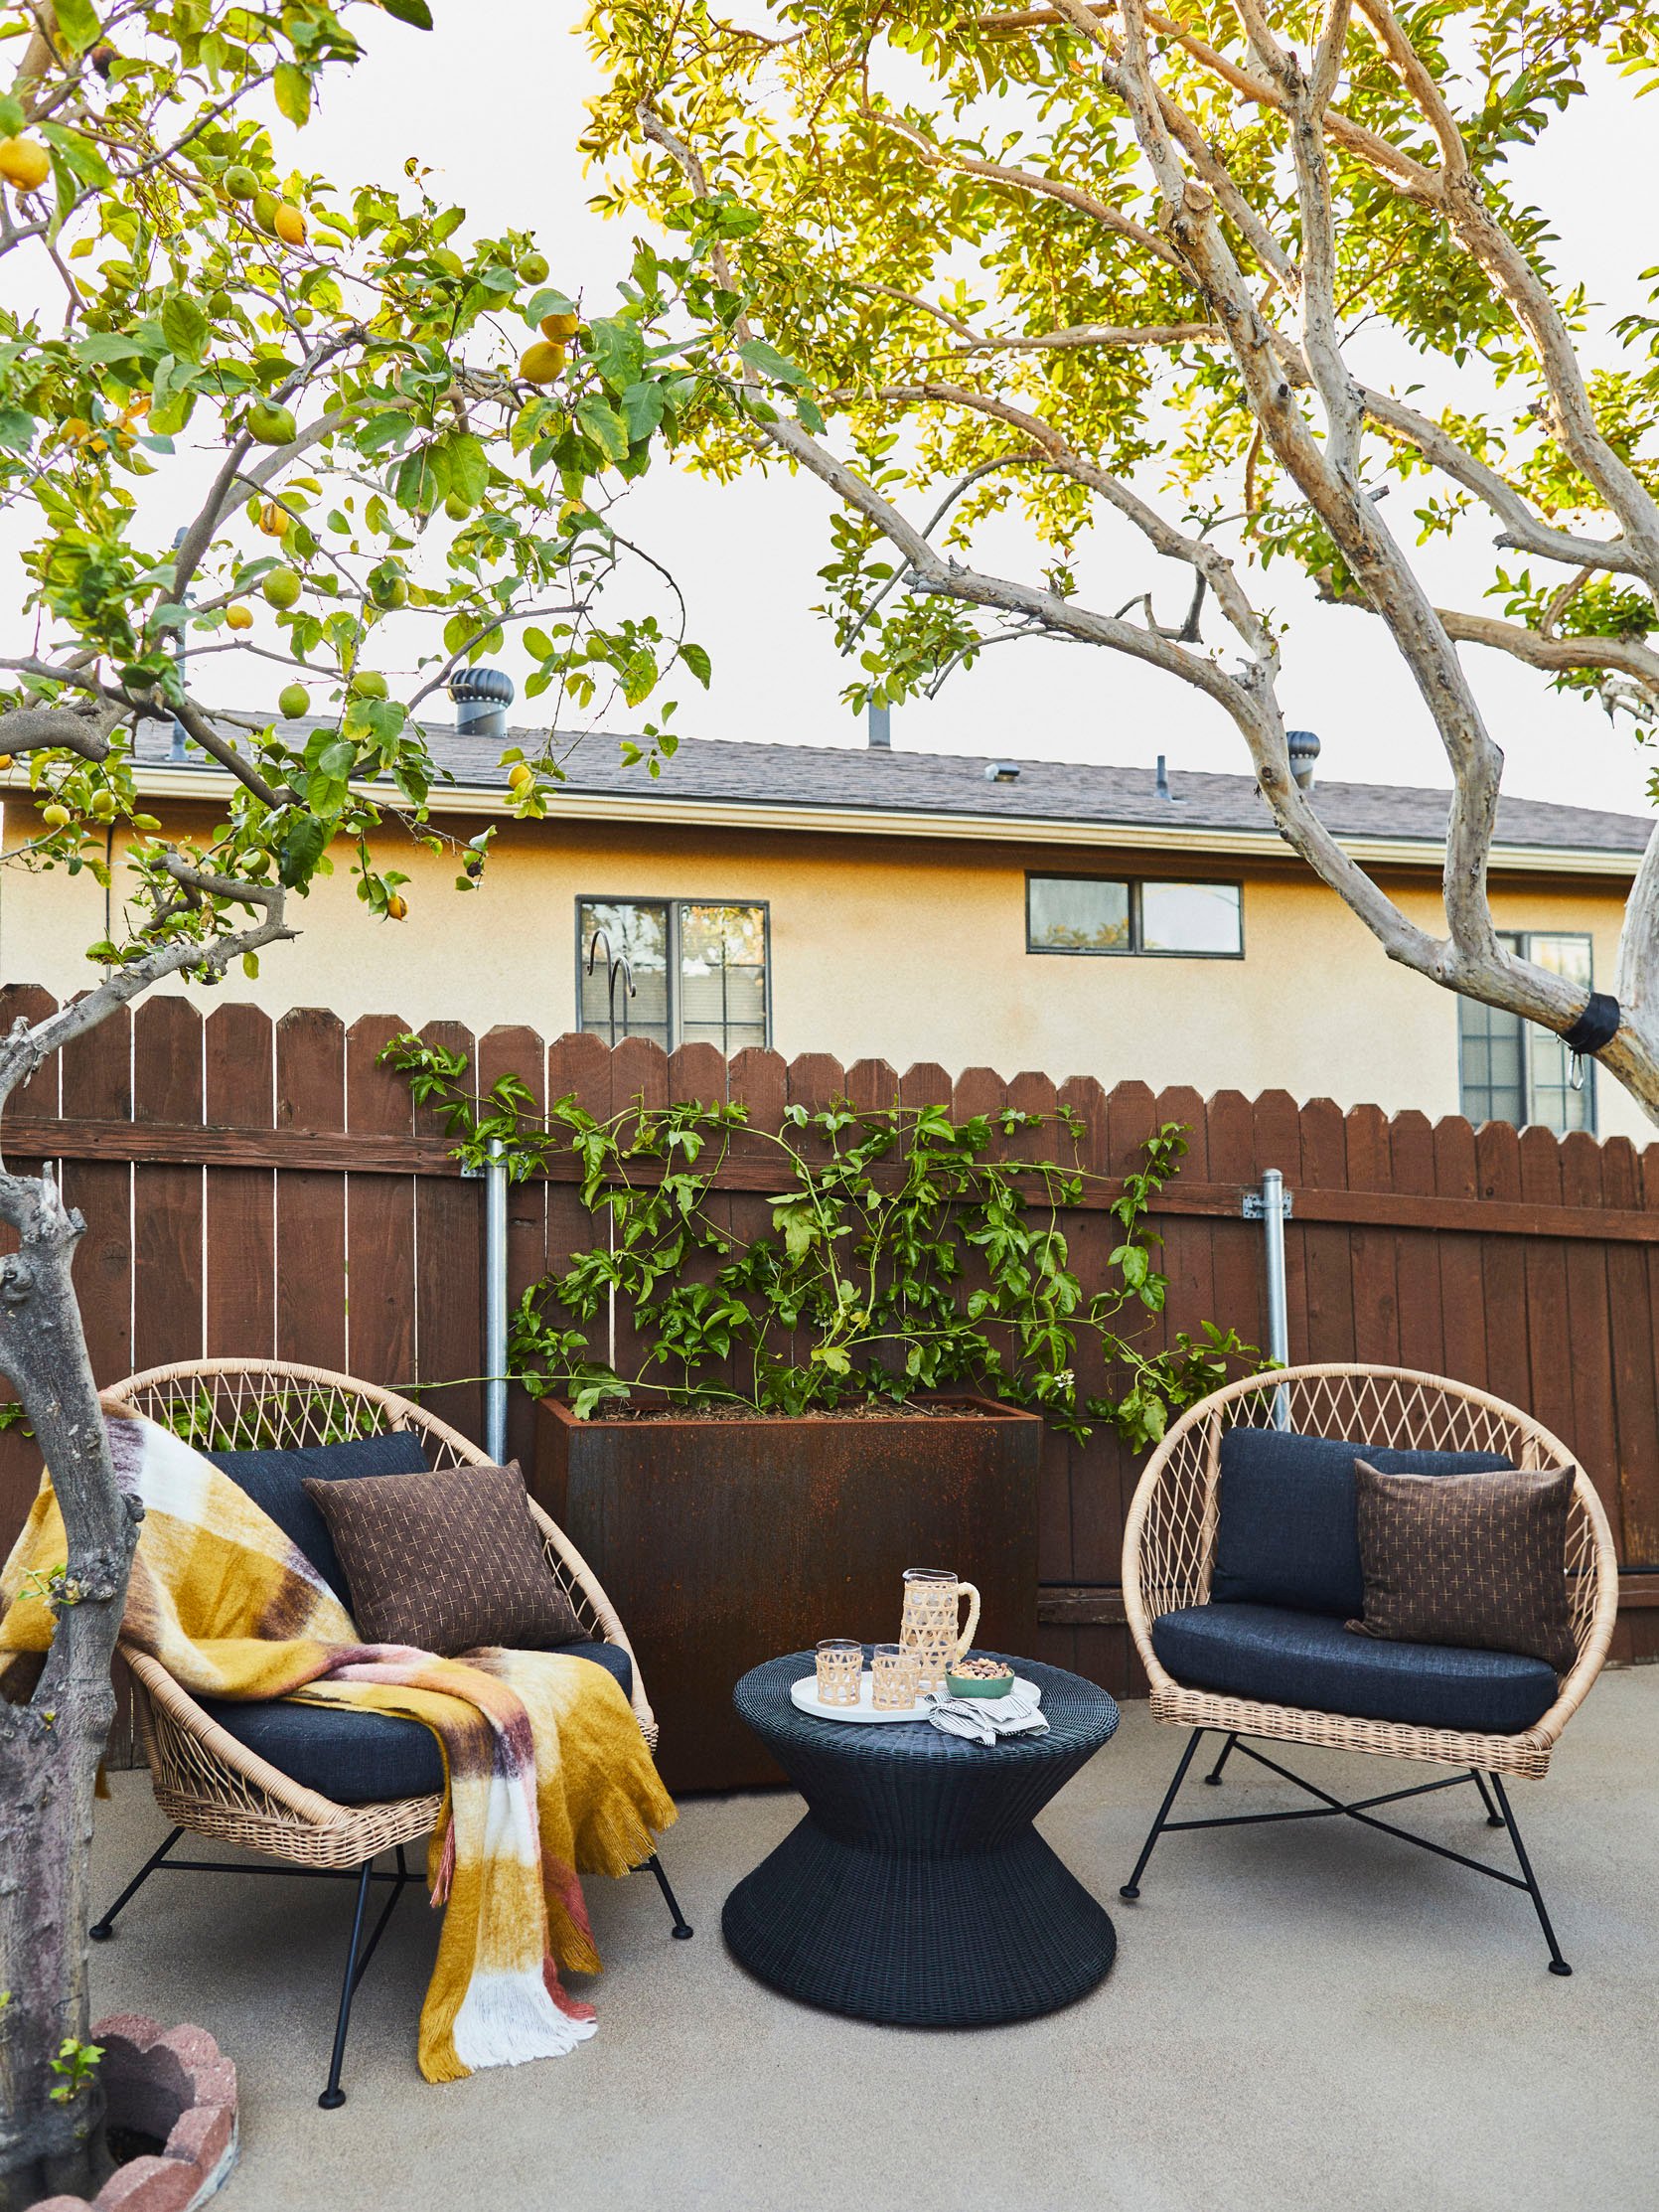
Chairs | Coffee Table (unavailable right now) | Banket | Pillows | Tray (similar) | Pitcher | Glasses
Granted, the vine looks a little sad here. We had just planted it and it went into a bit of shock. We will check back in in the spring and you all will be so impressed. We’ll also check in on this PATCHY AF CONCRETE. Let’s talk about something more pleasant: these beautiful Article chairs. Y’all. I talked about this in the intro about this space but it bears repeating: I went to see Dirty Dancing this past summer at Rooftop Cinema Club (furnished by Article) and sat in this chair, the Aeri Chair, and I was like “damn, this is extravagance”. She’s big and comfortable. 10/10 recommend.
It is still absolutely wild to me that these trees have survived with all the concrete on top of them. Asking why I didn’t just dig up the concrete or suggesting that I do came up a lot in the comments on my first post about this space. The simple answer is: it’s very costly. I’ve had a lot of concrete dug up and what I’ve learned is, 1) there’s usually a reason it is there, in the case of my property, I live on a hill so it was an attempt to keep water away from the front house and to make this back space more level (and thus more useable), 2) you have no idea how thick it is until you start doing it and the thicker it is, the more expensive it is to remove. 3) grading, building retaining walls, and landscaping is expensive and necessary after removing concrete on a hill. The point of this mini-makeover was to make it as nice as possible without huge reno costs and mostly without getting myself into one of those reno situations where it keeps growing and growing because the more you tear up the more you find to fix.
Do you know whyyyyy I can’t spend a ton of money back here?? DRUMROLL…
MY
GARAGE
FLOODED
AGAIN.
I’m unable to process it fully to be honest. The garage seemed like it might be ok with this latest bout of rain but about a week in it finally failed. Luckily my (new) contractor was over helping me put up the kitchen shelves (yay!) when Andrew went down to his office (right side of the garage) to find it had flooded, which means my side (because it is lower) was completely flooded. This has happened so many times so my side is ready for it, everything is in waterproof bins and off the ground – his side is not. My contractor went under the house and came back with pictures. According to him, all the waterproofing that we have paid quite a bit for wasn’t done correctly.
This is fresh and I’m unsure how I’m going to move forward but you all have been on this journey with me so here we are. It’s supposed to rain the next couple of days and we got everything off the ground on the right side, are ready with a wet vac, box fans, and dehumidifiers and we will be meeting with my contractor, talking to my insurance, and sussing out our options in the coming weeks. I’ll keep you updated.
On the plus side, my Down to Farm garden is really happy with all this rain 🙂
Coming up: Urban garden reveal (I eat salad every day, it’s magical), Goodland Hot Tub space (Spoiler alert: we LOVE it), and my much anticipated (at least by me! 7 years in the making!) kitchen reveal. I guess we can add to this list a lot of screaming about my garage and oversharing about my finances (what’s new).
See you soon!
Opening Image Credits: Design and Styled by Emily Bowser | Photo by Sara Ligorria-Tramp
THIS POST WAS ORIGINALLY PUBLISHED HERE.
