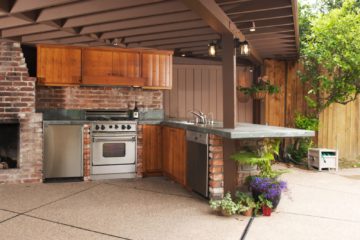
How to Create Your Ultimate Outdoor Kitchen

Create a beautiful outdoor cooking space for relaxing and entertaining all summer long.
As summer approaches and temperatures start to rise, no one wants to spend time inside sweating over a hot stove. With an outdoor kitchen, you can make the most of the beautiful warm nights by spending them with your friends and family.
Whether you have thousands to spend or a just few hundred to splurge, create your own outdoor kitchen and enjoy all it has to offer.
Upgrade your grill
A rusty, dusty grill doesn’t inspire lingering outdoor evenings. Upgrade your outdoor grill and take care of it all year round for a stand-out outdoor kitchen. A standard grill will cost you $150 to $300, and top-of-the-line outdoor ranges may be upwards of $1,500.
Before buying the biggest and best grill, consider how you will use one. Will you be feeding the whole soccer team? Or perhaps grilling some steaks for a romantic dinner for two? Look for a grill with features you will actually use and not just the latest trends.
Enhance your seating
If your basics are up to date, then you’ll want to upgrade your patio furniture and seating options too. If you plan on dining outside often, invest in an actual dining table and appropriate chairs. Eating a gourmet dinner off your lap downgrades an otherwise luxurious experience.
If you’re looking for more versatile pieces, sleek contemporary options coordinate nicely with most outdoor kitchen setups. Expect to spend a good chunk of change on quality furniture, but remember: With the proper care and maintenance, it can last as long as high-end interior pieces. Make sure you have a plan for the off-season, whether that’s moving outdoor furniture to indoor storage or securely covering it to protect it from the elements.
Add the extras
Want a prep sink? Wine fridge? Ice machine? Built-in smoker? You got it. The sky’s the limit when it comes to custom additions — or rather, your budget is the limit. Think carefully about your space before making a wish list.
Perhaps a full chef’s kitchen won’t quite fit in your backyard, but a beautiful wine fridge and some extra counter space are just what you need to take your outdoor kitchen to the next level.
Some features require installing or extending utilities (think: water or electricity), so don’t forget about portable additions such as a bar cart — which adds class without hassle.
Make it comfortable
Think about how you will provide amenities to make being outdoors comfortable, such as shade, heat (if using your space year-round), and perhaps even a few extras like a TV or audio equipment.
Tucking the seating close to the house may help you take advantage of a porch or awning. Otherwise, structures such as a light-strung pergola add shade during the day, light at night and atmosphere all the time.
If you have the room, the addition of a fireplace allows for a longer entertaining season. Outdoor kitchens don’t have to be just for summer, after all.
If you like to have some indoor comforts while enjoying your beautiful outside oasis, television and music can be connected outside — although it can be expensive. Bluetooth or portable speakers, a projector and a large sheet, or even an old-fashioned radio are more budget-sensitive options for those looking to add a little fun to their outdoor space.
Apply your own style
Create an outdoor kitchen that suits your style and taste. If you’re working with an existing space, be sure to embrace the style and play up the features, such as dark wood, stone and classic columns.
If you’re starting from scratch, take a look at your indoor design and see what features you like. Then consider incorporating those color schemes, design styles or even furniture shapes into your outdoor kitchen.
While you can’t go wrong designing your outdoor space, consider designs and colors that are versatile so you’re not limited if you want to mix things up in the future.
Make it yours
Your outdoor kitchen should be a comfortable, relaxing space for entertaining or unwinding after a long day of work. Make yours an escape that works for you.
When planning your outdoor kitchen, think about adding one or two small luxuries that will make you excited to enjoy your space. These can be as small as pretty tea lights scattered around or as large as a wood-burning pizza oven.
Related:

Originally published June 2016.… Read More

How to Plan the Perfect Patio

Starting to daydream about dining under the stars? Make that dream a beautiful patio reality.
For many homeowners, the patio borders on magical: a place to relax, entertain, cook out and take a break from the day-to-day. It’s surrounded by vibrant hues, and a meal prepared in an outdoor kitchen somehow tastes better than anything that comes from its indoor counterpart.
Creating that perfect outdoor space for you and your family all starts with the literal foundation of this alfresco living room: the patio materials. Your selection can have a huge effect on the appearance, durability and functionality of your favorite home addition.
Getting started
Before you commit to a type of patio, first envision the finished space. You probably have a good idea of the location and approximate size, so go grab a chair, take it outside, and position it in the intended spot. Then sit, and picture each material in your mind’s eye.
Your patio should not only complement your home and landscape, it should also enhance your lifestyle. If you have a large space to work with, consider incorporating a combination of paving materials; some of the best patio designs include two or more. Using multiple materials lets you integrate inlaid borders that can visually separate an area for lounging from the outdoor kitchen.
When you’ve dreamed up your ideal design, consider which materials would best bring it to life, in terms of both aesthetics and practical issues, such as maintenance requirements and cost.
Concrete
Poured concrete is the patio material of choice for many homeowners because it’s structurally sound, inexpensive, and can even be stamped or dyed to mimic higher-end paving materials. It’s best suited for moderate to warm climates where frost heave is not a concern.
Planning tip: A standard concrete patio is four inches thick, but if you intend to construct something very heavy, such as a built-in fireplace, ask the contractor to reinforce that particular area before you pour.
Bricks
Available in a variety of colors, bricks create a warm and attractive patio. This classic patio style typically costs more than one constructed from concrete, not just for the materials themselves, but also for labor — a significant consideration when every brick must be set by hand, leveled and grouted.
Should you decide to invest, you can design the space with any number of patterns, from a traditional running bond to something with added textural appeal like a boxed basket-weave or herringbone.
Planning tip: For patios, solid 1- or 2-inch-thick paving bricks are the best choice, either dry-laid or mortared in place. Be wary about extending your brick patio into deep shade, or else you’ll need to watch out for a slick surface after every rainfall.
Pavers
Often manufactured from cement, cinder or stone, pavers top the DIY patio wish list for their low price and super simple installation — they’ll have you out there grilling in record time.
If you’re planning to lay your own patio, you’ll need a suitable substrate consisting of at least three inches of sand, and a permanent border, such as a poured concrete curb, to keep the pavers from shifting.
Planning tip: Pavers may be dry-laid by butting them tightly, or installed with uniform mortar joints. If the patio lies over utility lines, know that dry-laid pavers will be simpler to remove and replace if (or when) you need to access the utilities below.
Stone
The highly desirable look of stone comes with a steeper price tag — particularly if your pick isn’t locally sourced — but you can’t beat it for natural appeal. Flat, irregularly shaped stones offer a calm and meandering effect, while uniform-cut slabs of granite, travertine, slate, or bluestone can produce a formal patio that’s fitting for any backyard.
Planning tip: Natural stone is extremely durable for any patio, but if you happen to be planning one poolside, opt for a nonslip variety, such as coral stone.
Tile
Available in ceramic, glass, porcelain, terra cotta and natural stone, tile creates beautiful mosaic patio designs that are refreshingly cool underfoot in hot climates. Because tile is thin, it requires the installation of a concrete slab.
Planning tip: Even if you plan to lay the tile yourself, it’s a good idea to have a professional pour an even slab. Also note that not all tile is suitable for patio construction. To withstand weather, all your materials — tile, thinset, grout and sealer — must be labeled for exterior use.
Crushed stone, pea gravel and sand
If you’re not a fan of rock-solid patios, crushed stone, pea gravel or sand could be more your style. Both crushed stone and gravel offer a variety of colors and textures at low prices, and even sandy Zen gardens can double as patio areas.
You will, however, need to install a solid perimeter to keep the loose material from spreading outside its intended border.
Planning tip: It can be difficult to remove snow and fallen leaves when the seasons change, so consider your climate and environment carefully. To maintain a manicured look, count on refreshing the surface every few years.
Related:

Originally published April 2016.… Read More

Spring Cleaning 101: Make It Fast, Easy and Effective

Because you want to enjoy your space now without added fuss.
Spring is the perfect time to open up the windows in your house and clean every surface inch, but there’s no reason to spend more time on this task than necessary.
Use these tips to quickly get your home spic and span.
Have a plan
When it comes to spring cleaning, the best approach is an organized approach. “I recommend having a plan, which includes an outline of the areas you plan to clean, a schedule with time slotted to do that work (for you and any family members), as well as a list of products, tools and even cleaning techniques or tips pertaining to those areas,” says Melissa Maker, blogger and host of the popular YouTube show “Clean My Space.”
Choose the right supplies
When you’re making your spring cleaning plan, take inventory of what supplies you need to gather to begin cleaning. Once you figure out what you need, be sure to choose the most effective and powerful cleaning supplies so that the product is doing most of the work — not you.
Clean room by room
It’s easy to feel overwhelmed when you are going from room to room to complete various tasks. Choose to target one room at a time so you can see the results of your productivity quickly and not get discouraged.
Work smarter, not harder
Don’t scrub any more than necessary. Simple steps like soaking pots and pans before you scrub them, waiting for cleaning products to sit before you wipe down surfaces, and using the self-cleaning setting on your oven can save you tons of time.
Clean your cleaning supplies
Did you know your cleaning supplies, such as sponges or microfiber cloths, are most likely the dirtiest items in your home? It goes without saying that you can’t effectively clean your home with dirty supplies. So be sure to disinfect sponges or other cleaning supplies in a mixture of one part bleach and nine parts water for 30 seconds.
Don’t forget the …
There are several items in our homes that we often forget to clean on a regular basis. Among forgotten items, Maker recommends cleaning behind the oven, bathroom exhaust fans, refrigerator coils and window coverings.
Focus on the MIAs
Spring cleaning can be a huge undertaking (especially depending on the size of your home), so Maker suggests focusing on the MIAs, or the Most Important Areas. When deciding which area to choose, think about the most visible ones, like the living room or home office.
Get rid of the clutter
You can never truly have a clean and tidy home if you are buried in your own stuff. When cleaning out your things, remember the 80/20 rule: Only 20 percent of the items we own are truly important — so 80 percent of our belongings are just getting in the way.
Figure out ways to be more efficient in the future
While you are cleaning and organizing your home, take note of all the clutter that you most often find. For example, if you are finding that most of your clutter is paper, figure out the best ways to go paperless throughout the year.
Related:

Originally published March 24, 2016.… Read More

1 161 162 163 164 165 166 167