Good news, friends. We have some solid hardscape before the rain begins and it turned out STUNNING. There is a lot left to do of course (a full tour coming at you very soon) but this side of the house is coming along and I feel so so grateful that we can walk in and out of the house without tracking in as much mud or dirt. And it’s just so gorgeous – I’m extremely relieved, impressed, grateful – all the things. So here we go …
The Yardzen Plan
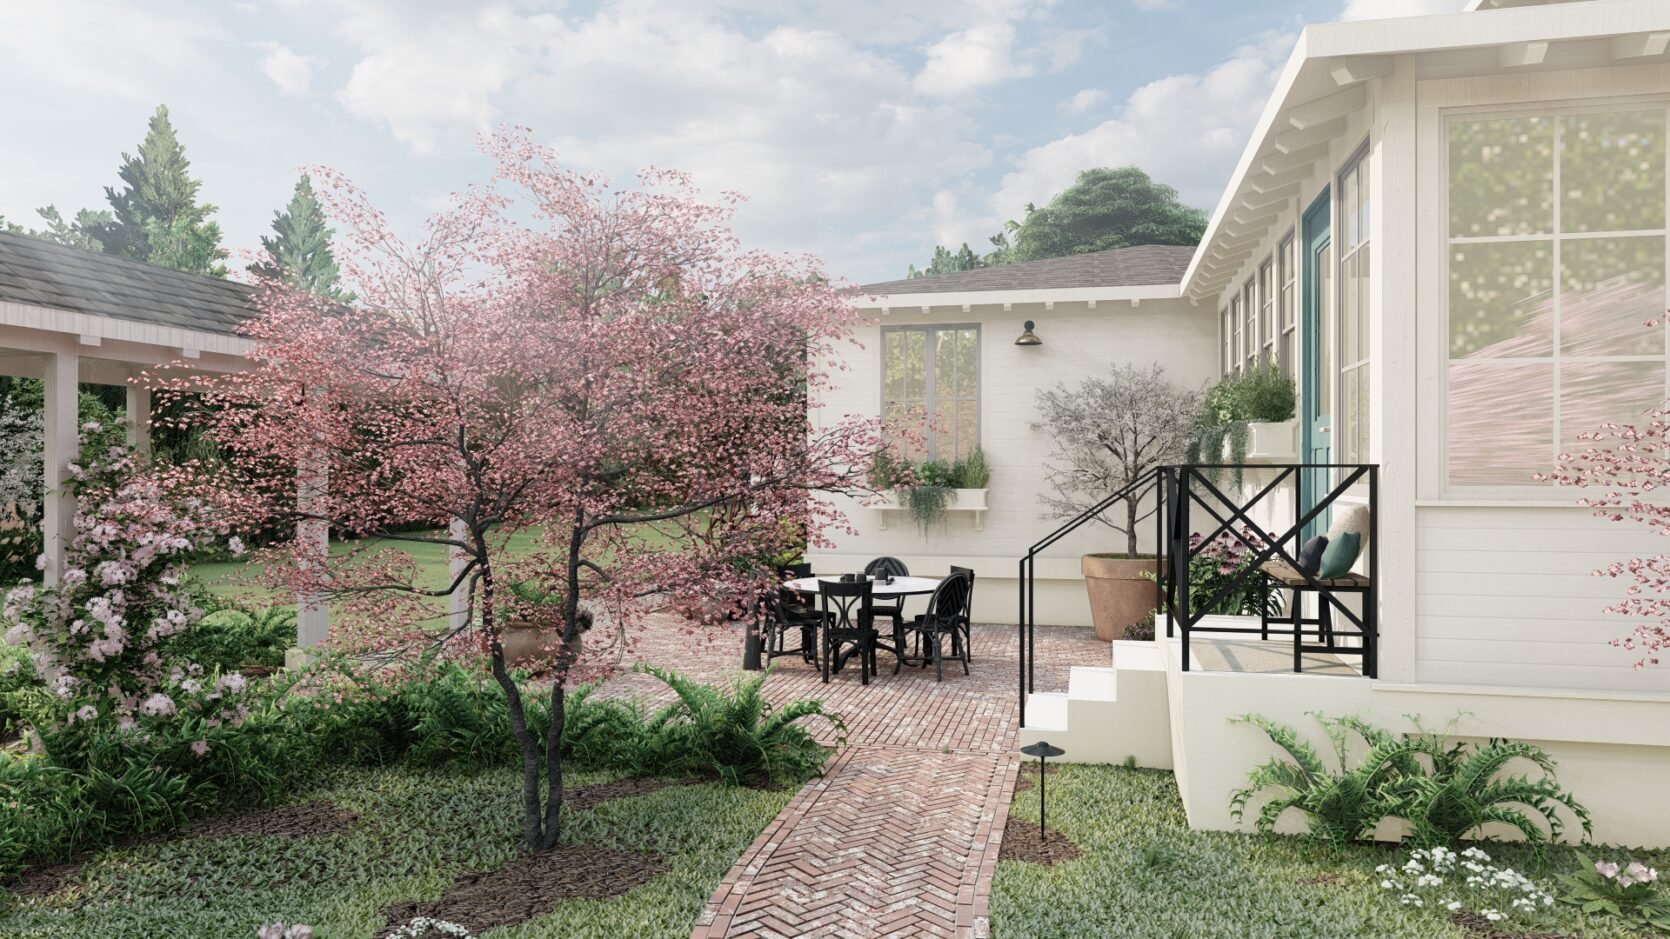
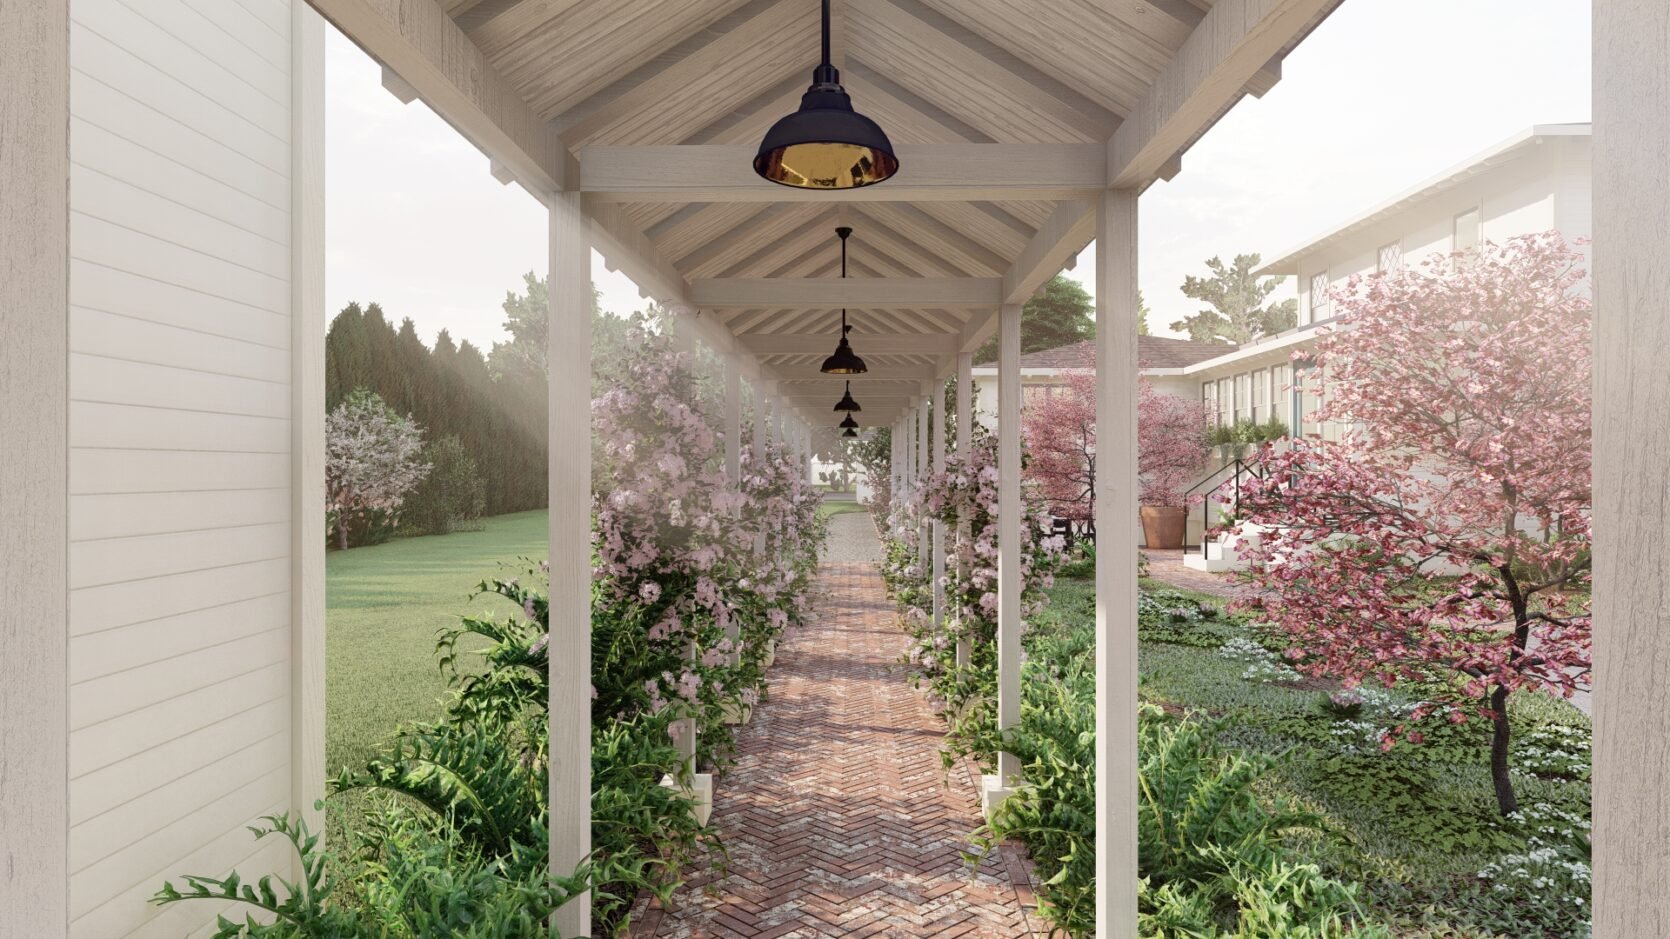
Here’s a reminder that we worked with Yardzen to do the design of this area, so I had hope that this was going to look beautiful – these renderings were proof.
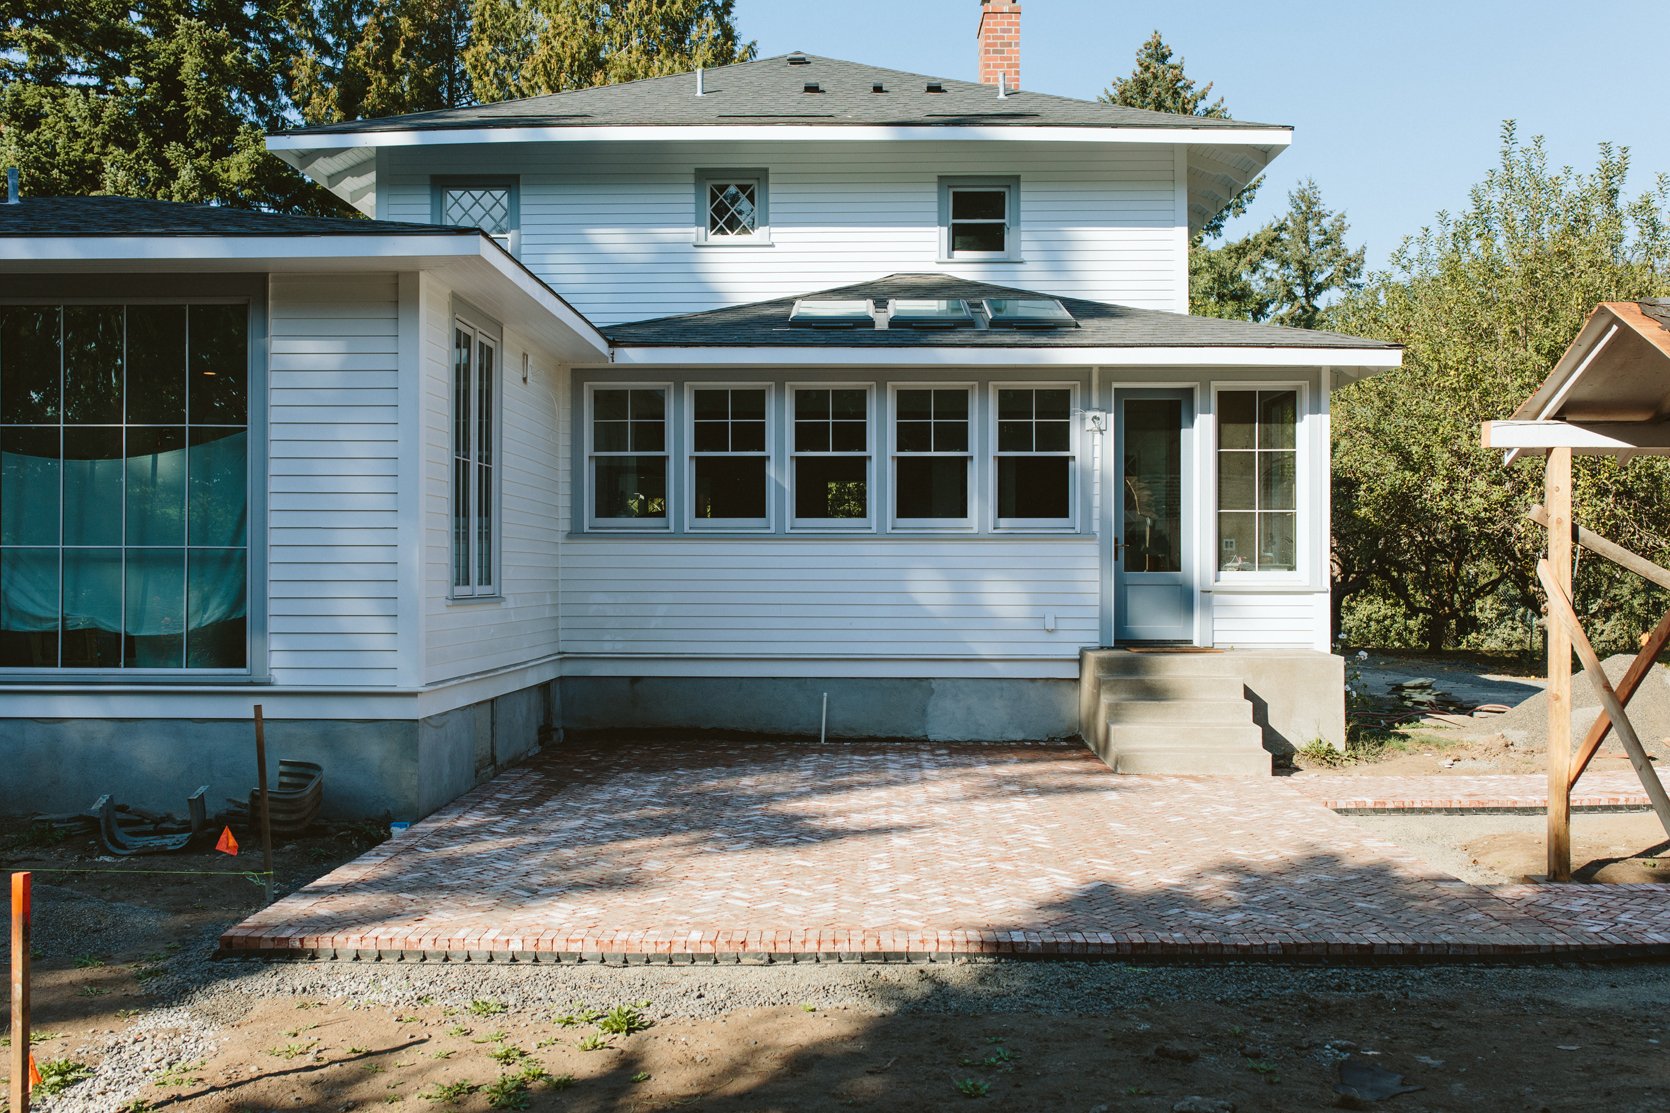
A few things to note that have to do with the brick. 1. We chose to go all the way to the house instead of leaving a planting zone. I think/hope this was the right decision. I know that a bed of plants would have softened the wall obviously and hid the foundation (that looks great in the renderings but less great in the photos), but we’ve been told by countless Oregonians to give ourselves some hardscape areas without dirt (aka mud). Now as of right now this area isn’t covered so can we really hang out there in the rain? Nah. But I hope that having less dirt there means just a cleaner winter for us. So right now the brick up to the foundation looks a little ‘meh’. Nothing some pretty pots can’t fix 🙂
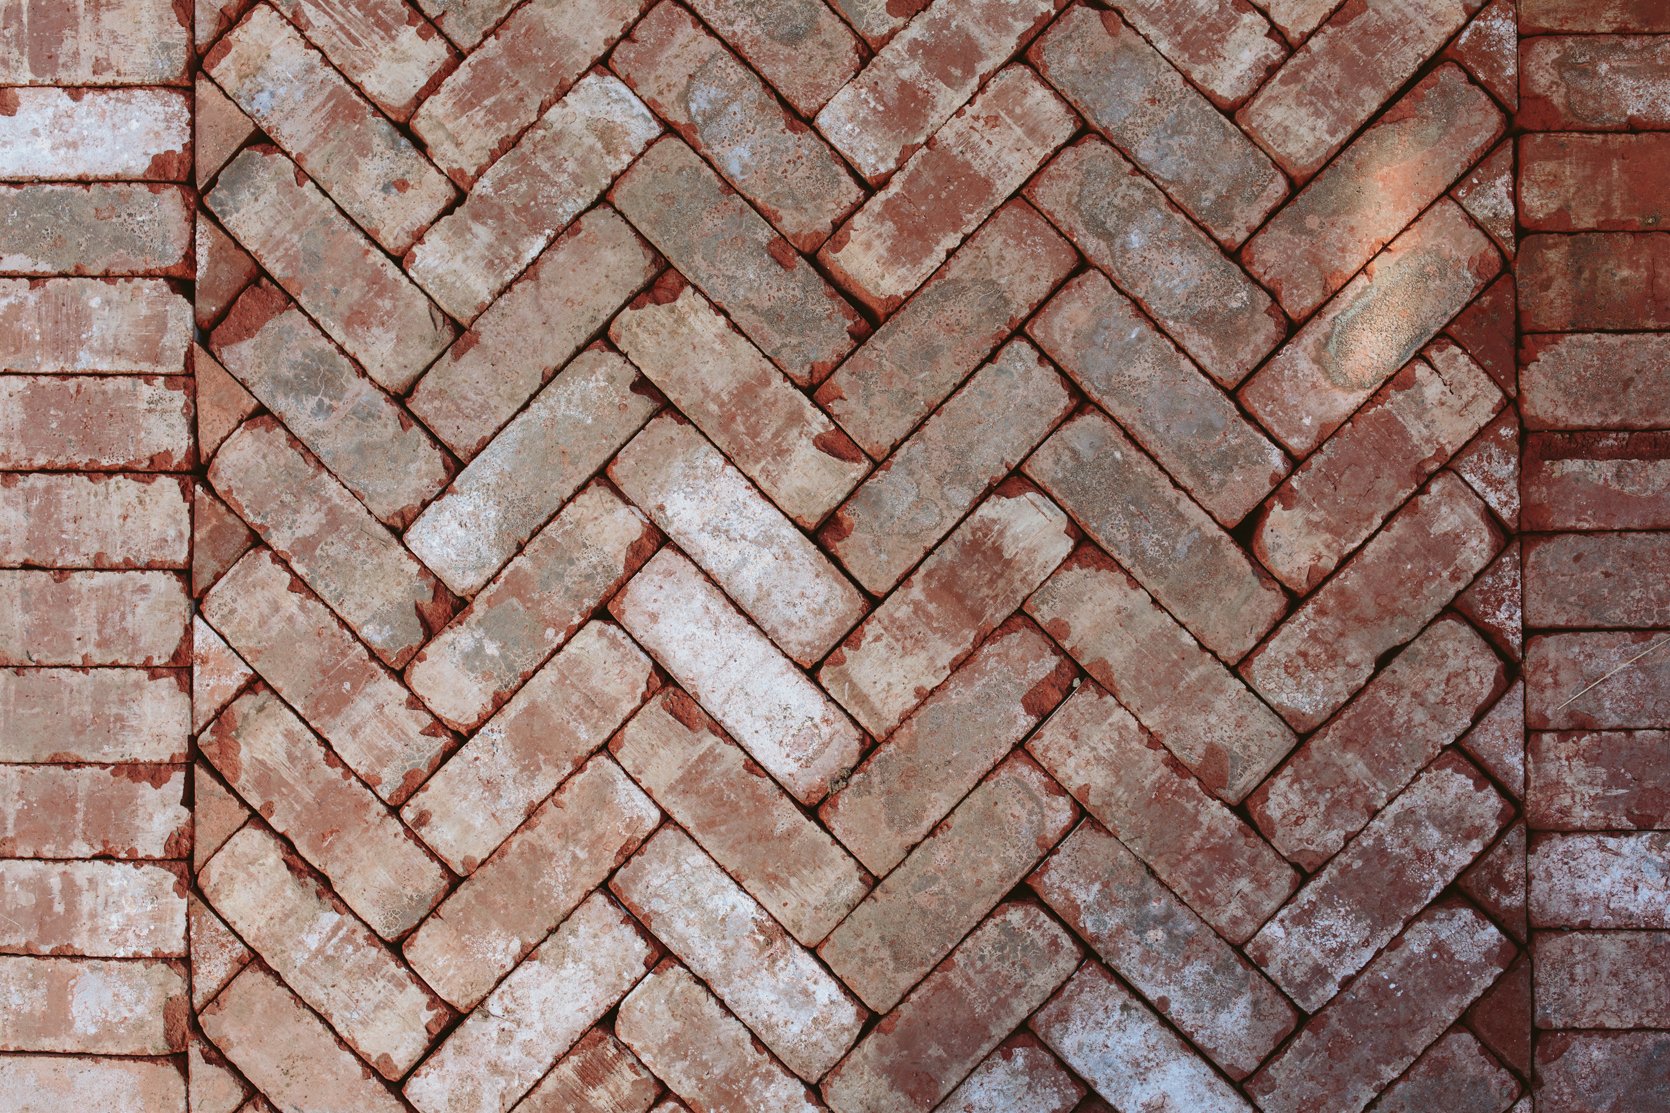
Also, the brick pattern has changed. The plan was to do this Spanish running bond – a pattern where all the brick comes into the center. We requested this because we thought it would be more interesting and less expected than a herringbone, but I wasn’t convinced it was going to have the payoff that we wanted. So we switched to a classic herringbone and I’m so happy we did.
We have also changed the pea gravel to flagstone – mostly to keep down the mess – and we extended the brick to go to the edge of the house. I’m sure you all have different experiences with this but the reason that we went with pea gravel originally was that the material is a lot cheaper, but I guess the prep work to do it right can be comparable. Mostly, we decided to switch it because we wanted it to be more rustic and natural throughout the entire property, which meant that we wouldn’t have these steel edge liners everywhere or rocks to keep the gravel in. It was honestly a month-long debate and came down to our personal preference of wanting the more organic shape of the stone. More on that later (it won’t be mortar set together, instead more like stepping stones embedded in the grass).
It’s going to look like that someday!!!! We didn’t do brick everywhere for cost reasons (which I’ll break down below). It’s also more formal which we didn’t want everywhere.
Some Brick Facts:
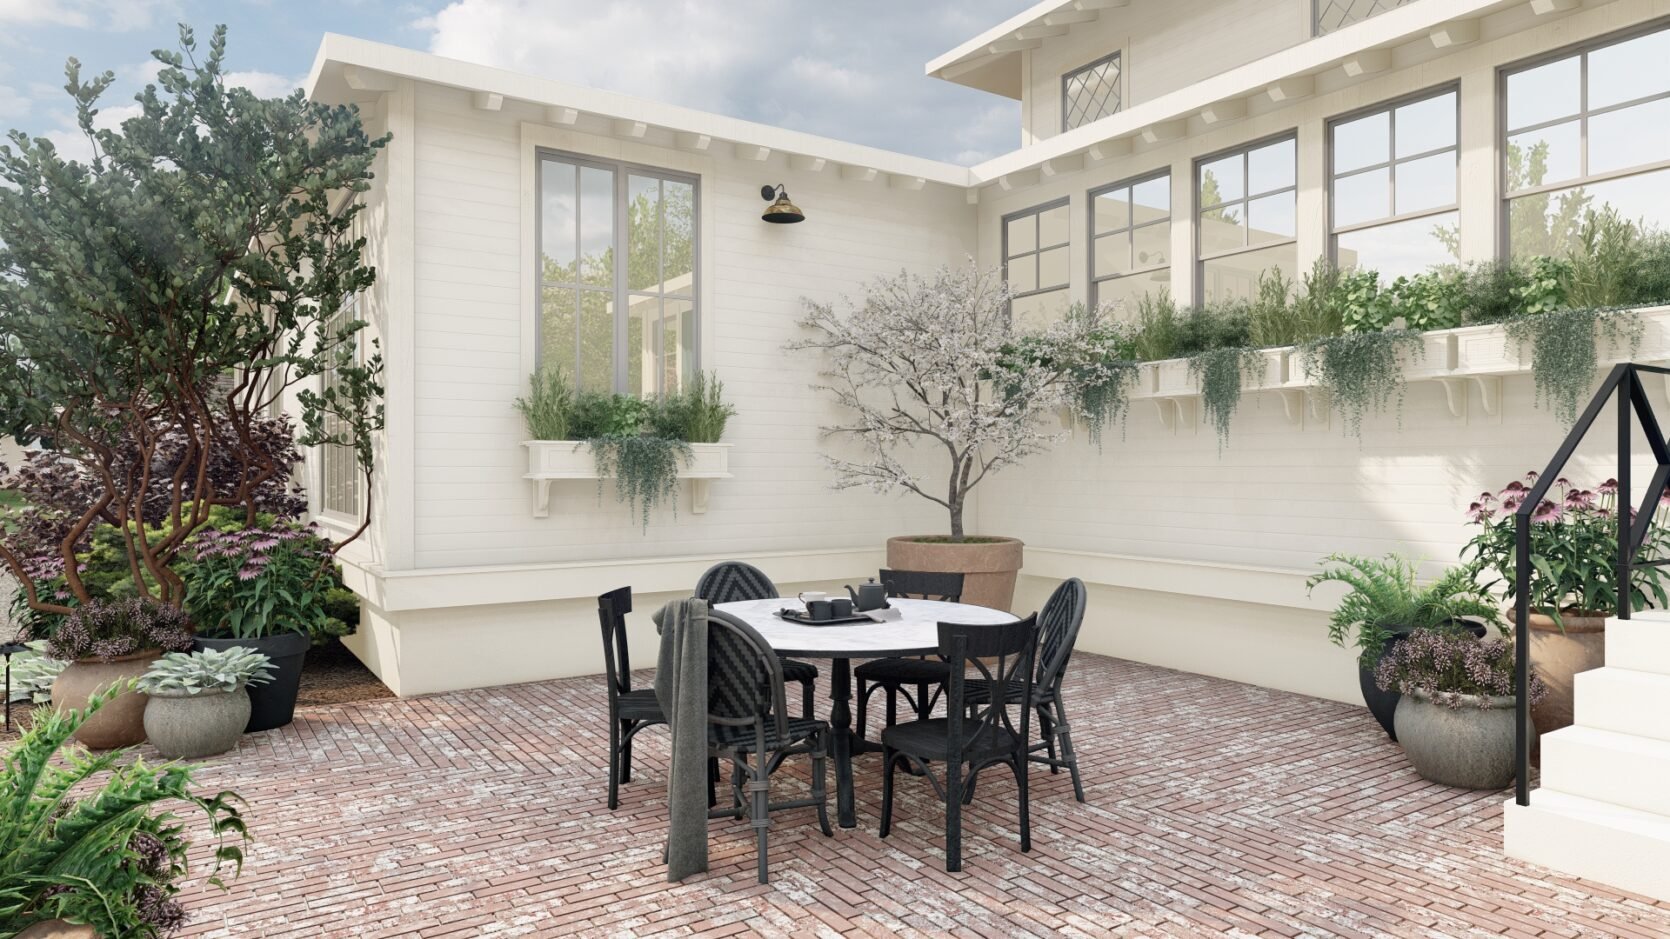
- This install is very laborious. If you are attempting to do this there are obviously multiple steps to do it right – grading, prepping with gravel, compacting the gravel, they had to build a dry well that met up with the downspout for proper drainage, irrigate and stub up underneath the brick for future pots, measure extremely accurately for the pattern to look perfect, etc. Our team did about a week of prep before they even touched the brick. Then a full 6 days of install with 3 guys (it’s the cutting, y’all). They did an EXCELLENT job (I will of course credit/link them as we get closer to the end of the project).
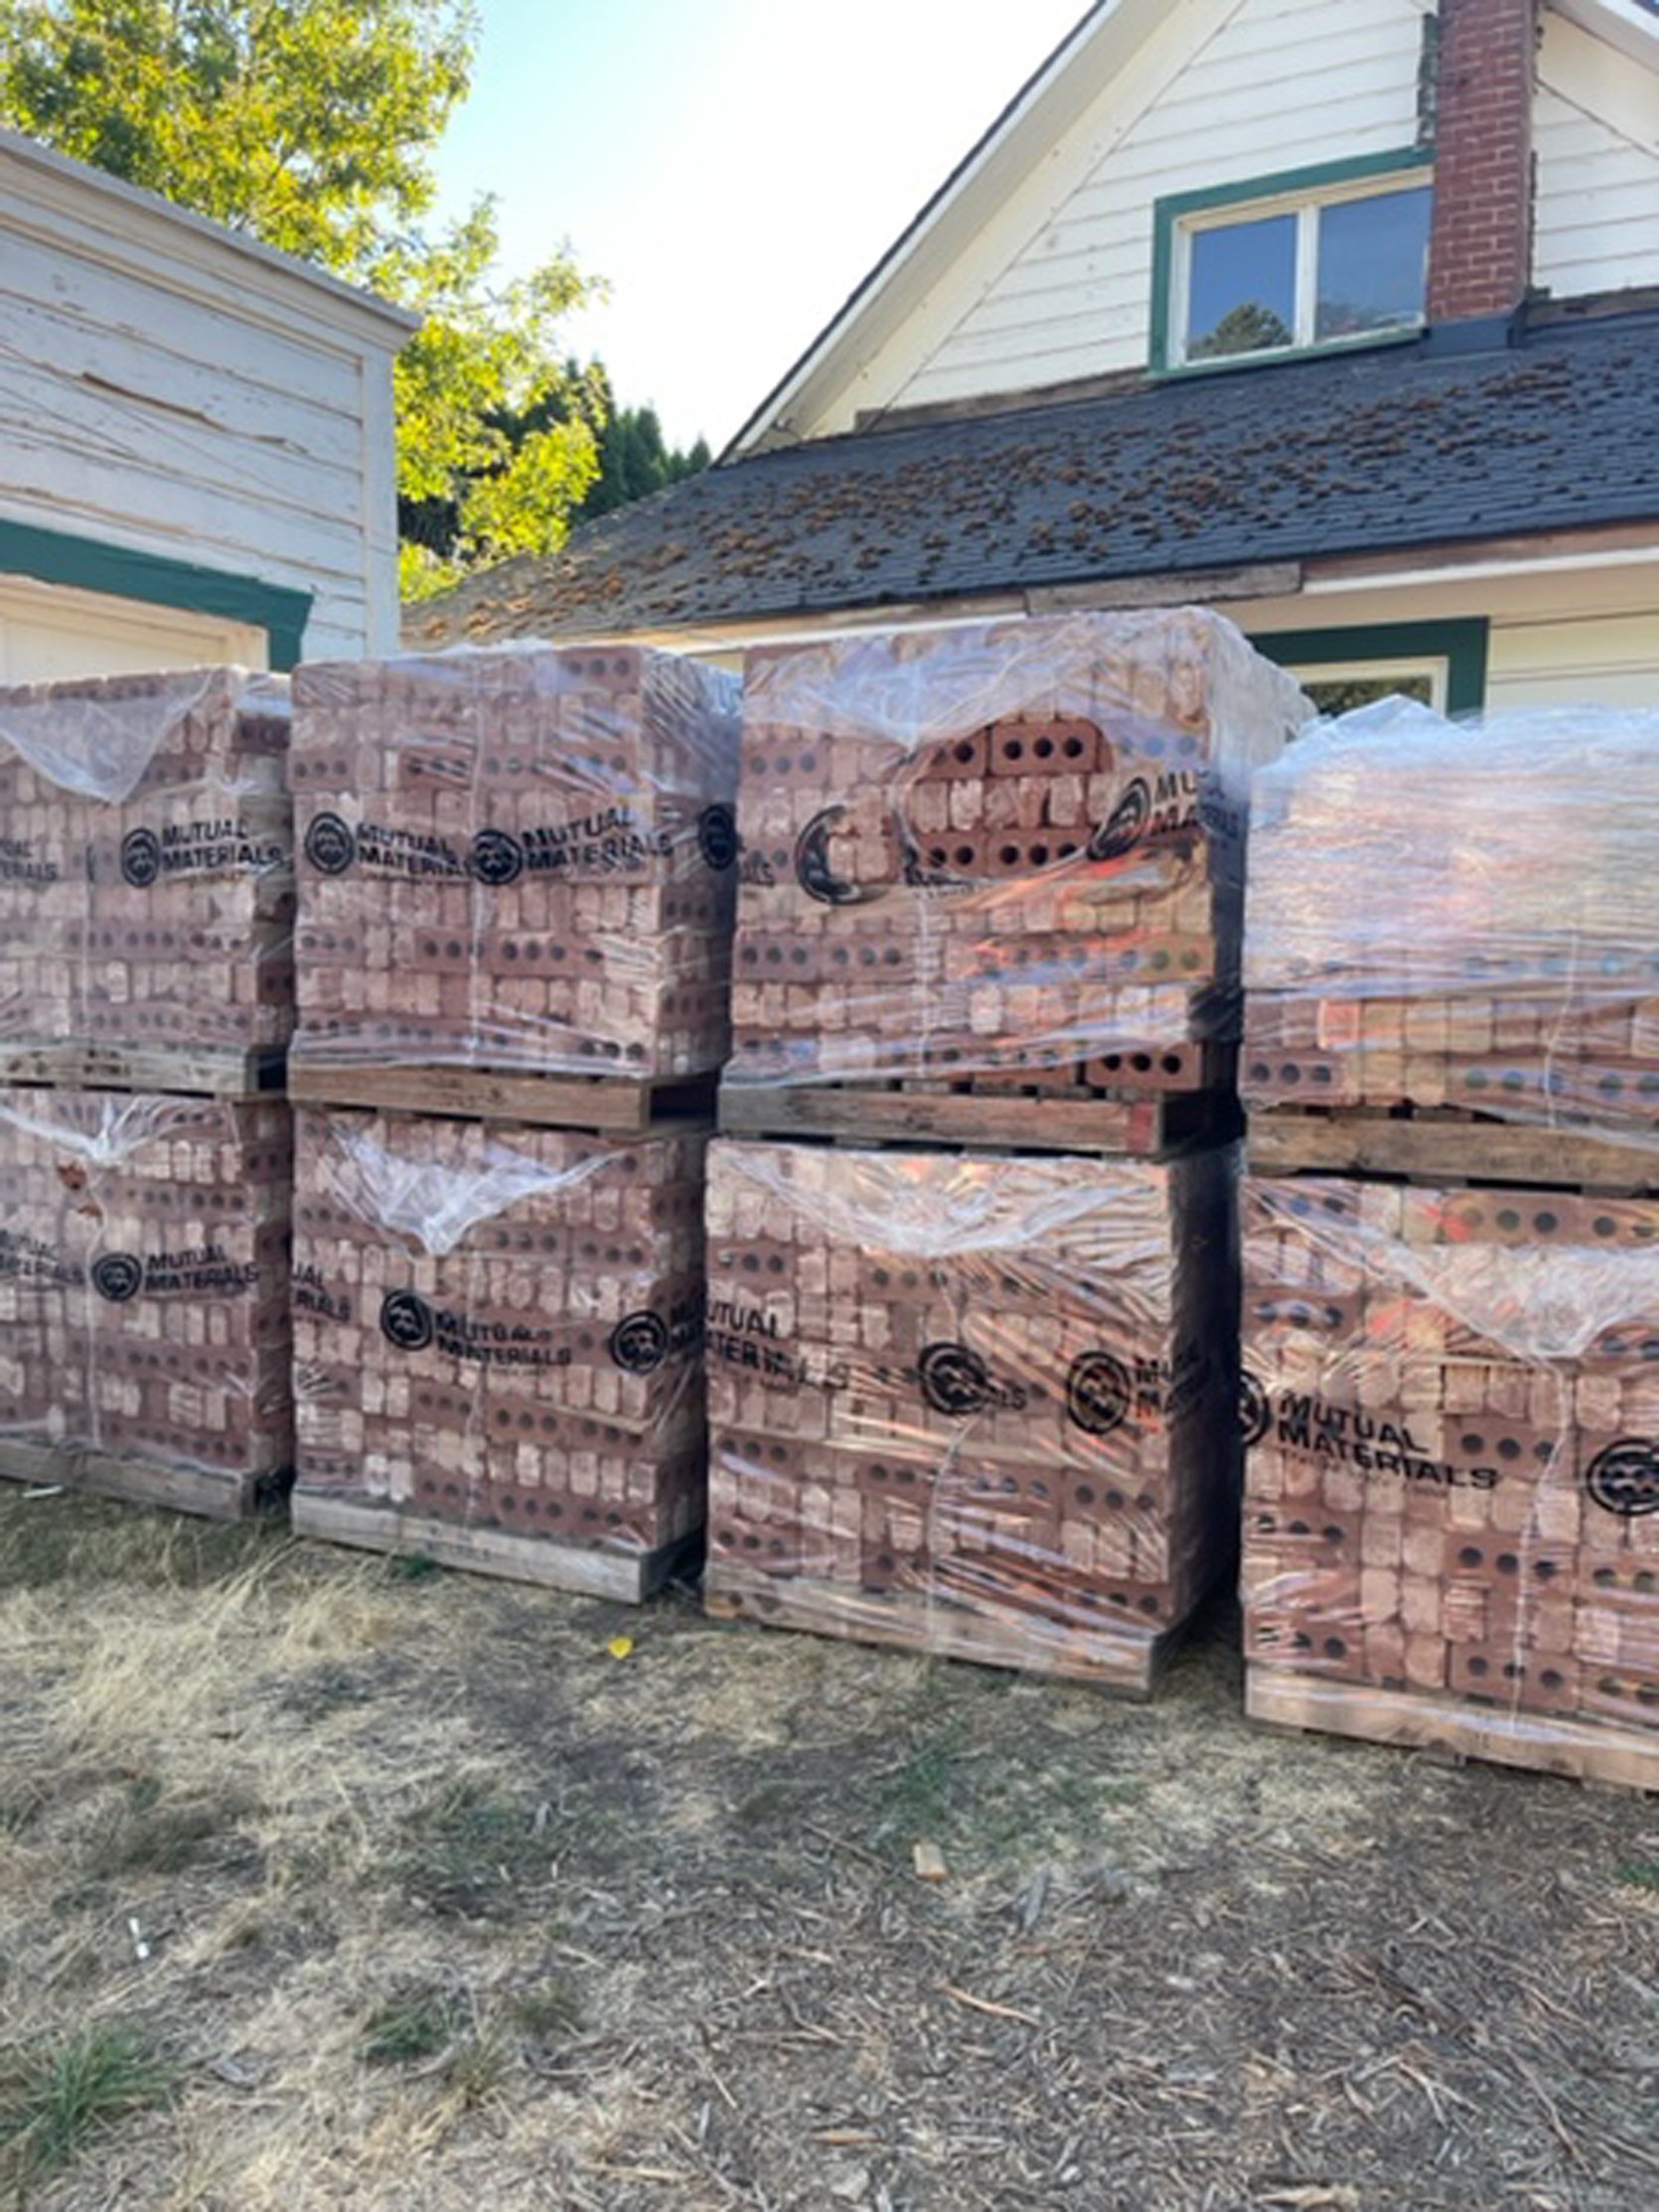
- We needed about 1k square feet of brick which cost around $9k. I’m not totally sure how much the install costs (it’s wrapped up in other costs and was only an initial budget number) but I think around 10k. Not nothing, folks. But those are the facts – and remember our patio is pretty large.
- We bought the brick from Mutual Materials, based in PNW. We used the Ashland tumbled full brick, 2×8 laid on its side (because the tops and bottoms don’t have the aged look). I personally think it’s the perfect aged brick, but I’m sure there are others out there that are pretty, too.
- There are a few ways to set this – mortar (where you could use a thin brick – not necessarily cheaper from what we are told), or sand set – which is laid in sand. We did sand set, but I guess because there are three holes in our brick our installers had to do some extra prep to ensure they stay in place. I think they still are going to grout and seal, though. Sorry, I don’t feel totally qualified walking you through the step-by-step but I do know some basic facts.
The Process
I’m always so humbled when I get to see the process from experts outside of my field. When you hear that it’s 10-15k to install of course the first reaction is like, WHAT? But then when you see how much work and expertise goes into it you are fully schooled.
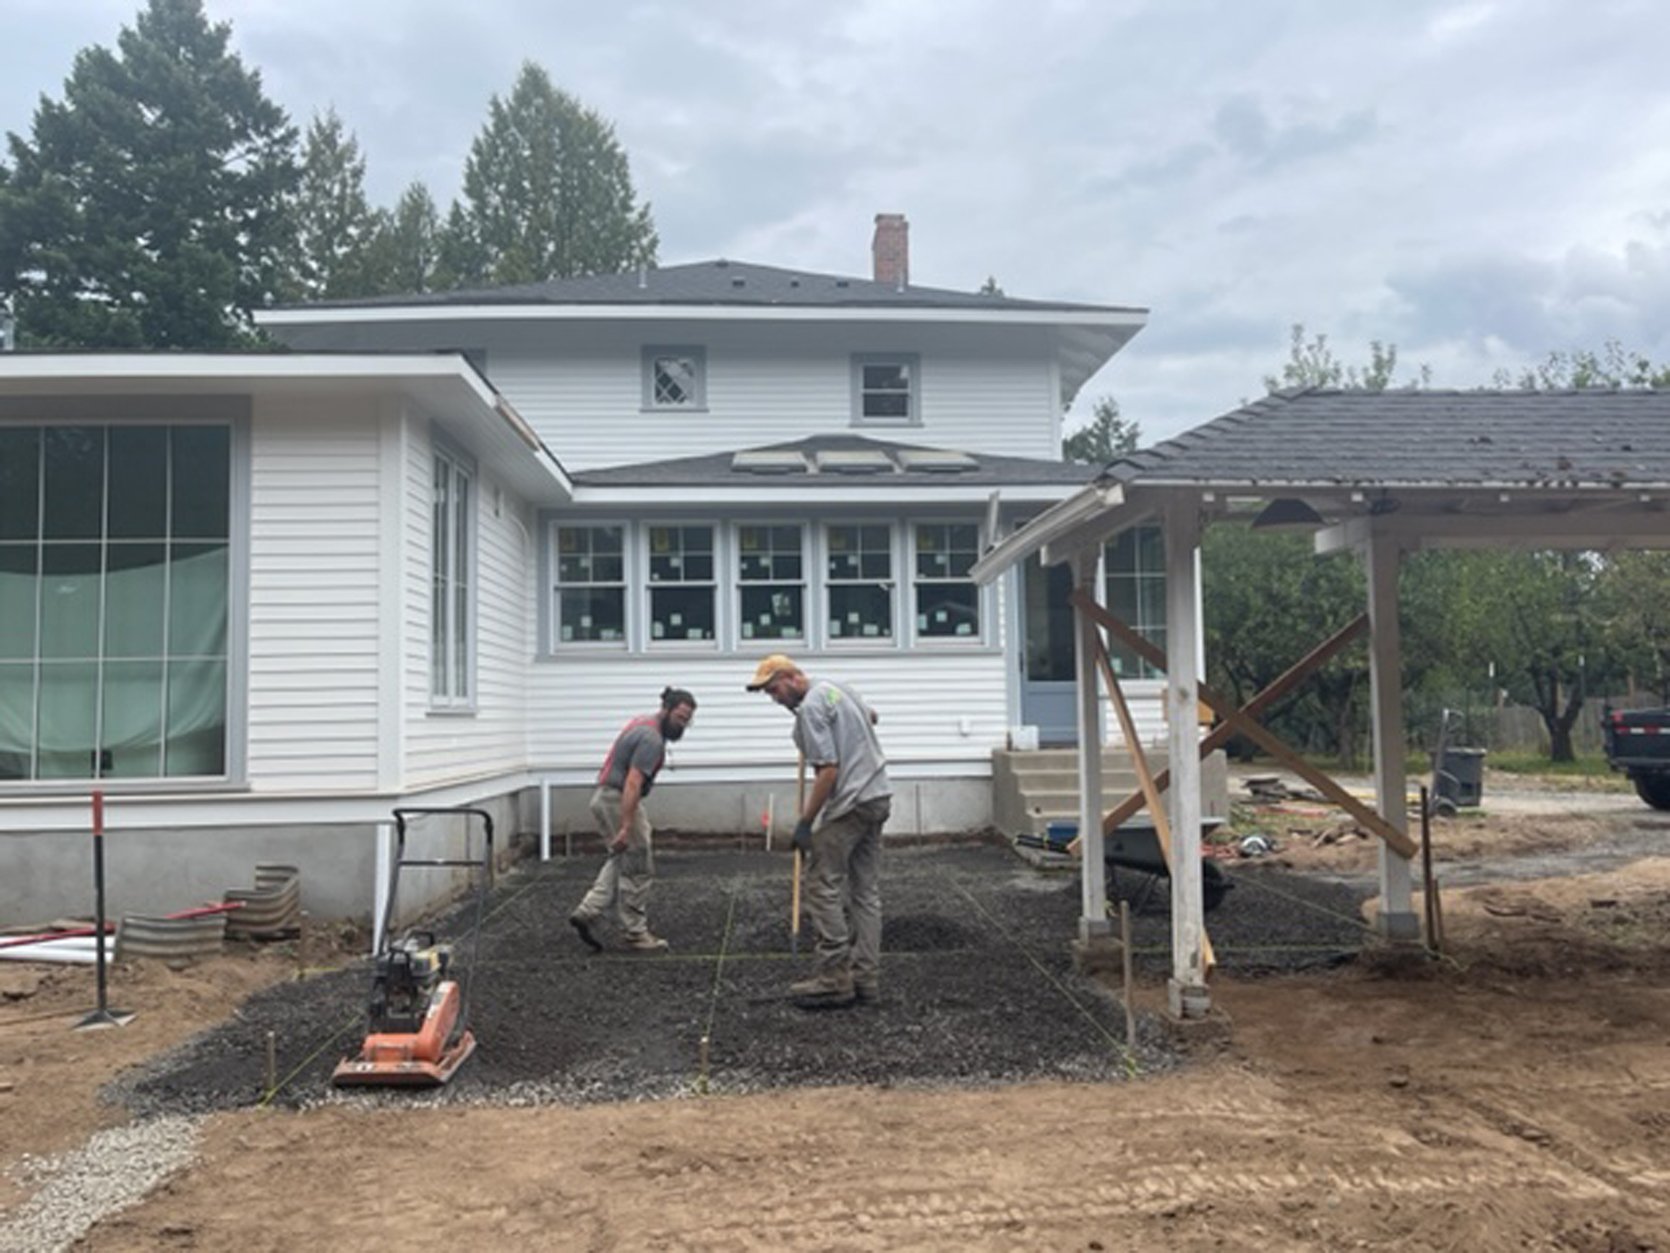
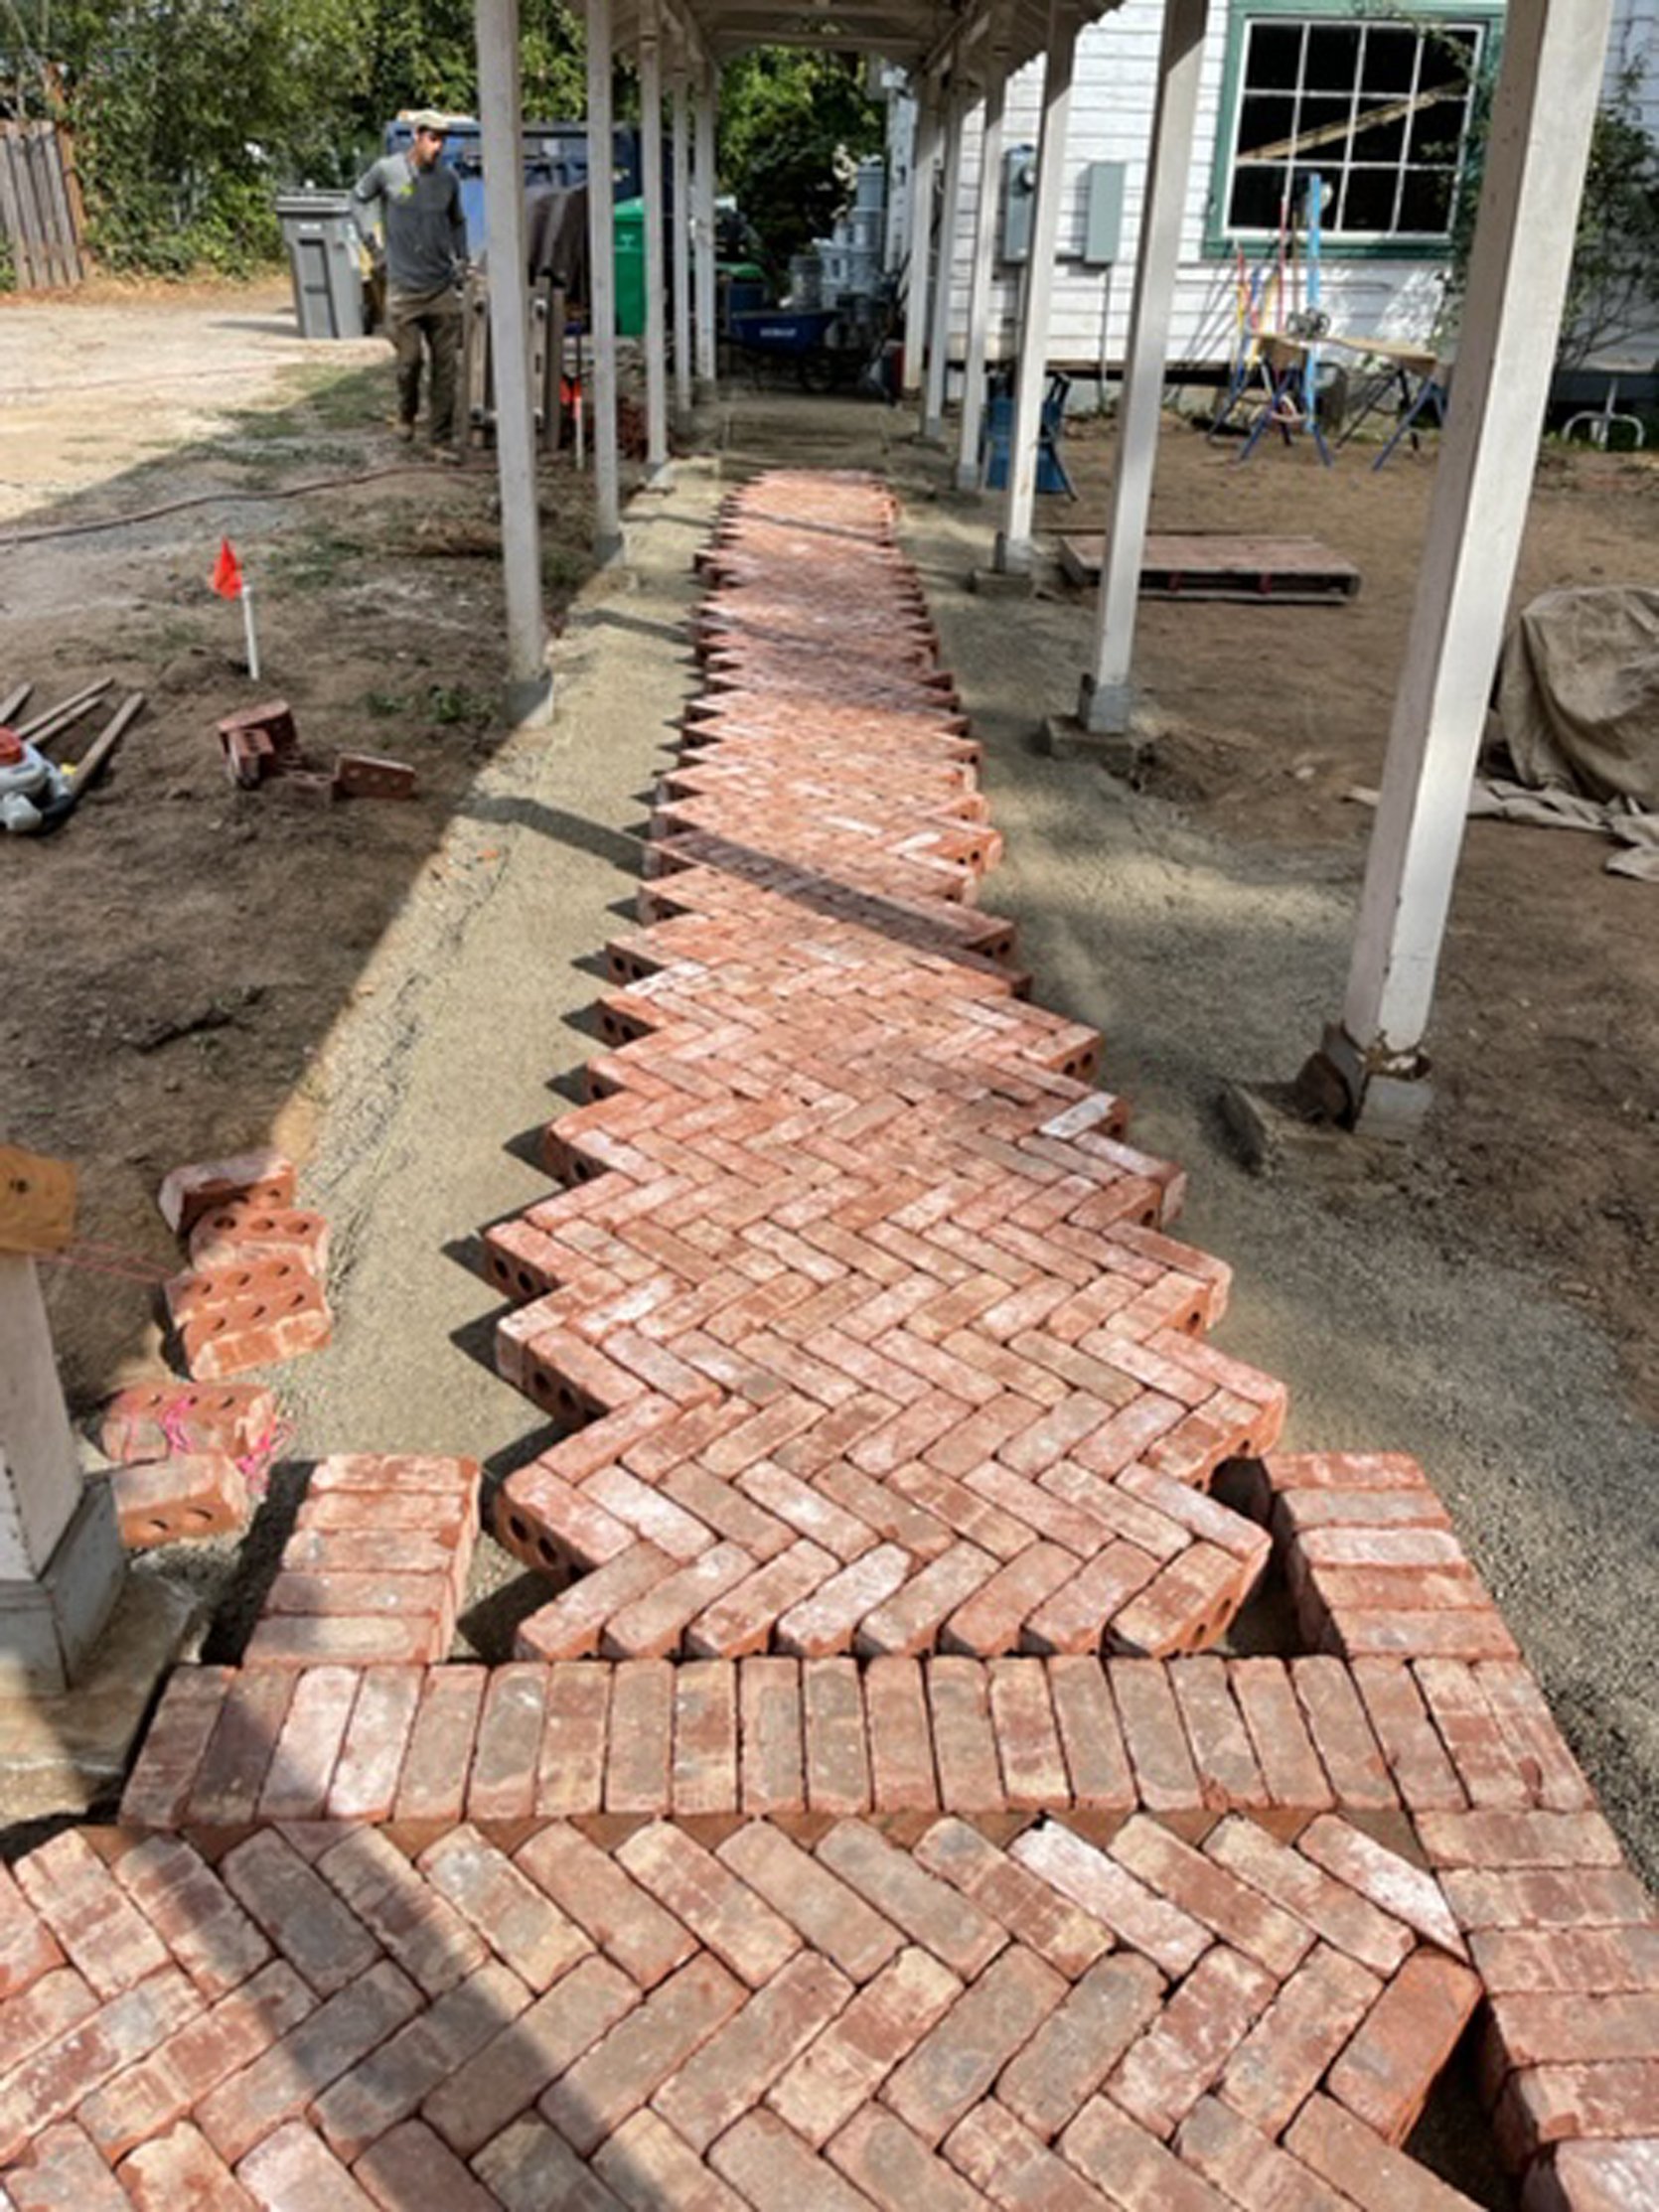
At first, they laid the brick with the arrows facing the sides but I really wanted the arrows to go in line with the path – aka forward and backward. It was a 4-hour change that I felt bad about, but it was really important to me. This is a case of the ‘Not talking enough about the details before execution’ and I think a lot of people might not have changed it, but I’m SO glad that we did.
Where We Are Now

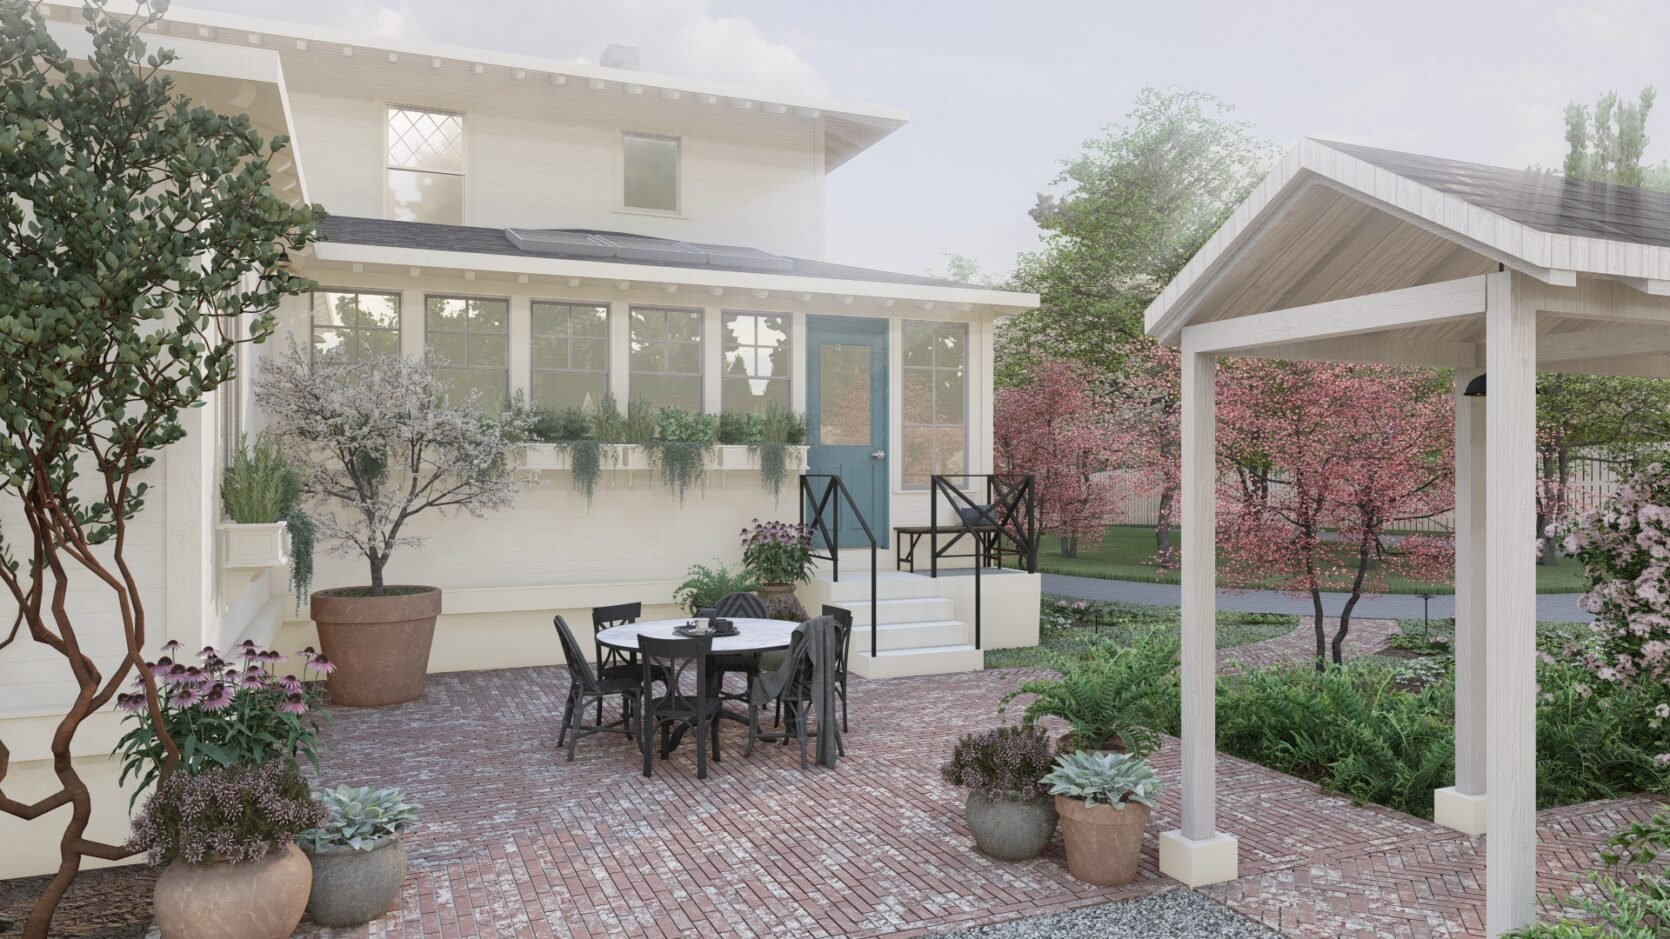
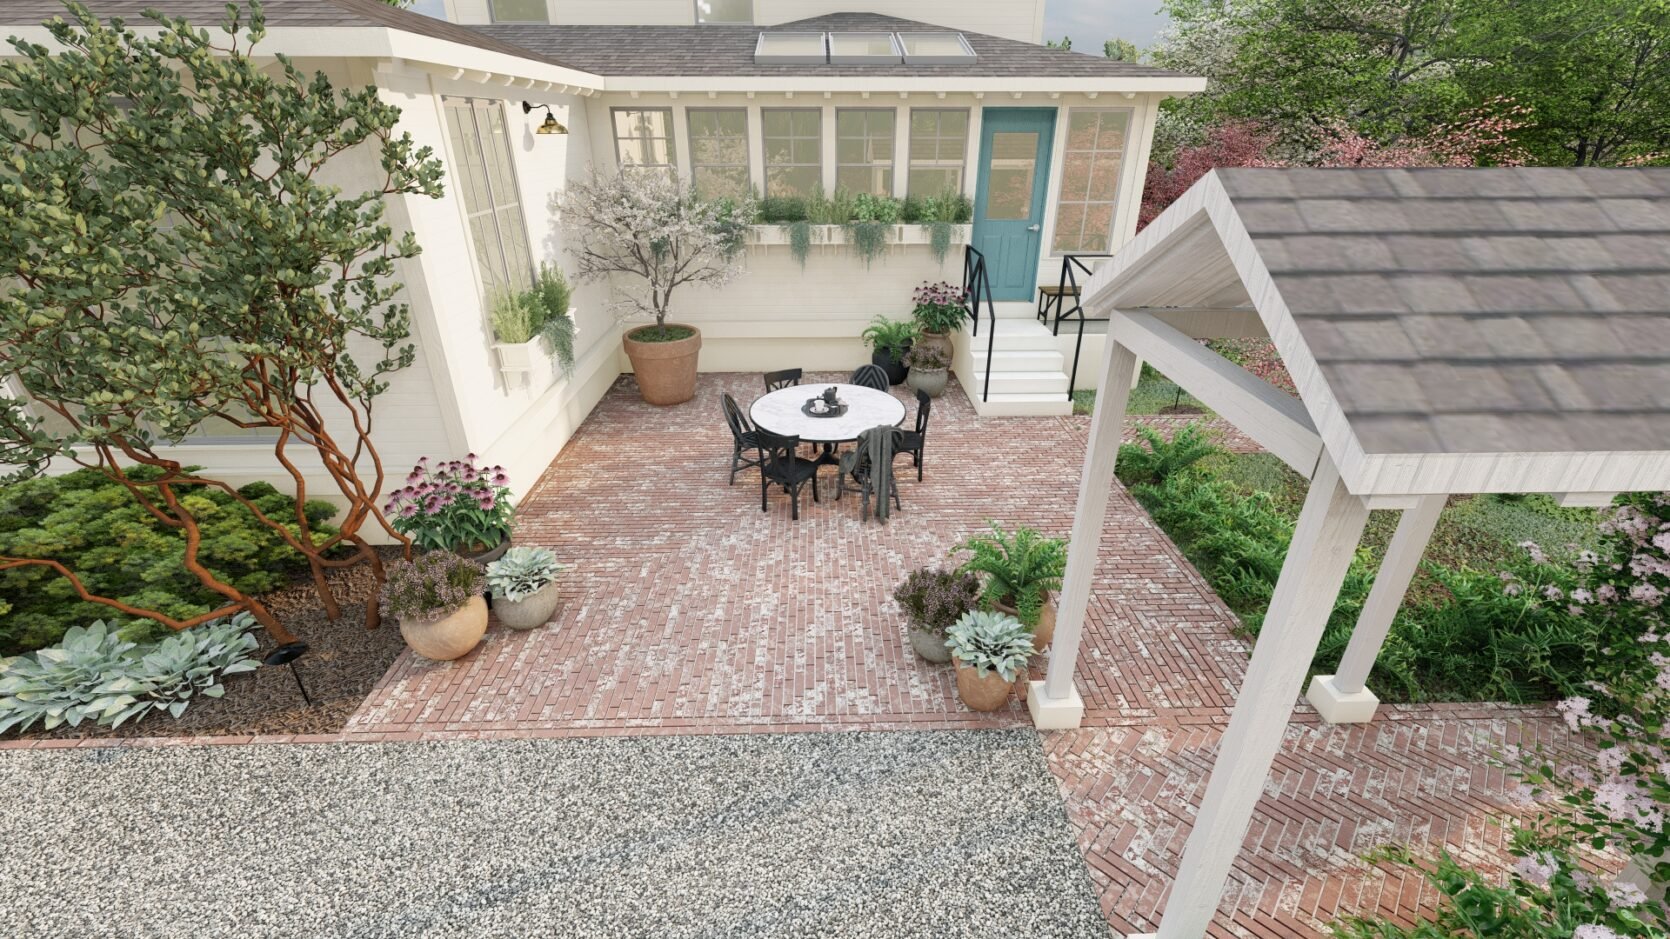
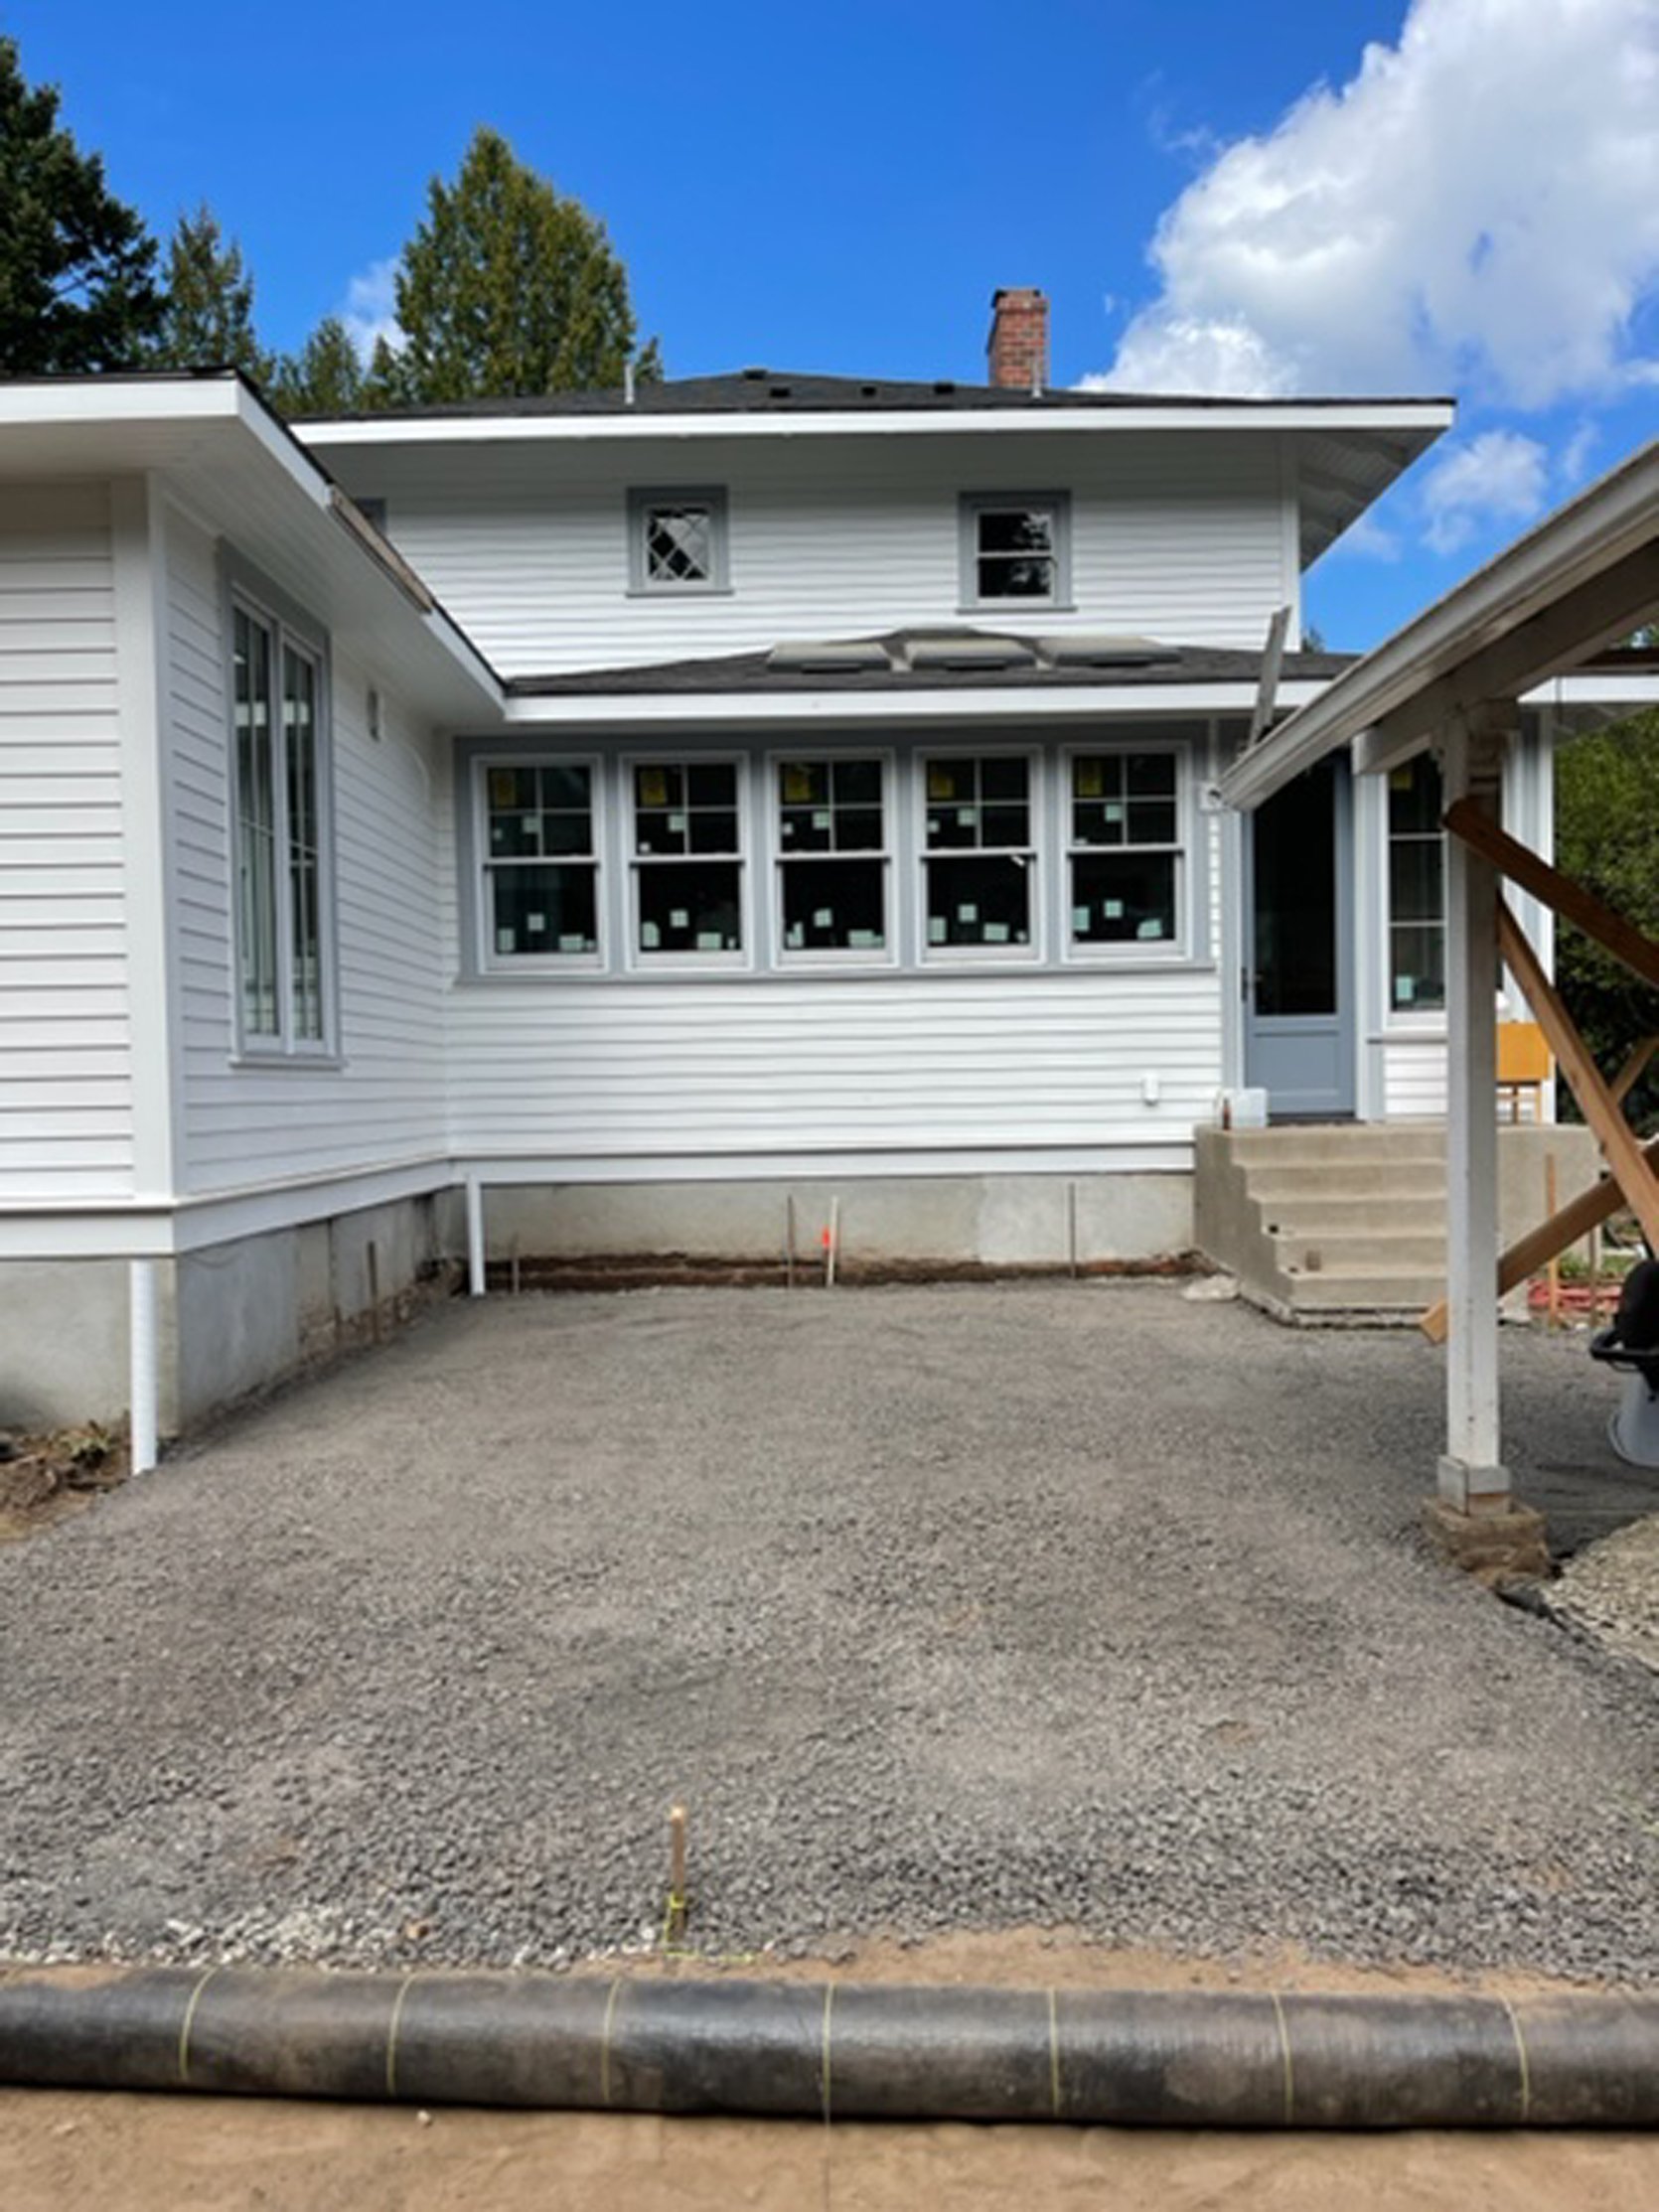
So as you can see we did a curved pathway from the driveway and we have new cement stairs (that I might paint TBH because they underwhelm me – railing coming soon), and it’s a pretty large space to fill. We now realize we could fit a floating island kitchen for the summer, and tuck it away in the winter. We could of course cover it with a structure but we don’t want to stare out of the kitchen window into a structure. We are curious if we could do an awning with a crank, but as you can see we chose to put the windows so close to the roofline that I’m not sure there is anywhere to attach it! This area gets eastern light (morning) and is shaded by 4 pm in the summer so it’s great for summer grilling. We still don’t totally know how we are going to use the property so I’m glad we didn’t stub in a gas line for a permanent BBQ. Instead, we figure we can move it around until it makes sense. I also was advised to reduce our natural gas usage as much as possible (we have two gas fireplaces so we aren’t perfect). This way we are planning on using propane (still a fossil fuel) until the technology of the electric BBQs becomes good enough. We also didn’t want to put a grill near the white house (it would stain with soot) and didn’t want to commit to floating it, so as of now – we have full flexibility but are still unsure where it will land. For the winter we still grill a lot for lunches so we’ll put it on the back covered porch. Goodness, that was a lot of exposition about where the heck we are going to grill our winter chicken … Still TBD but we have options.
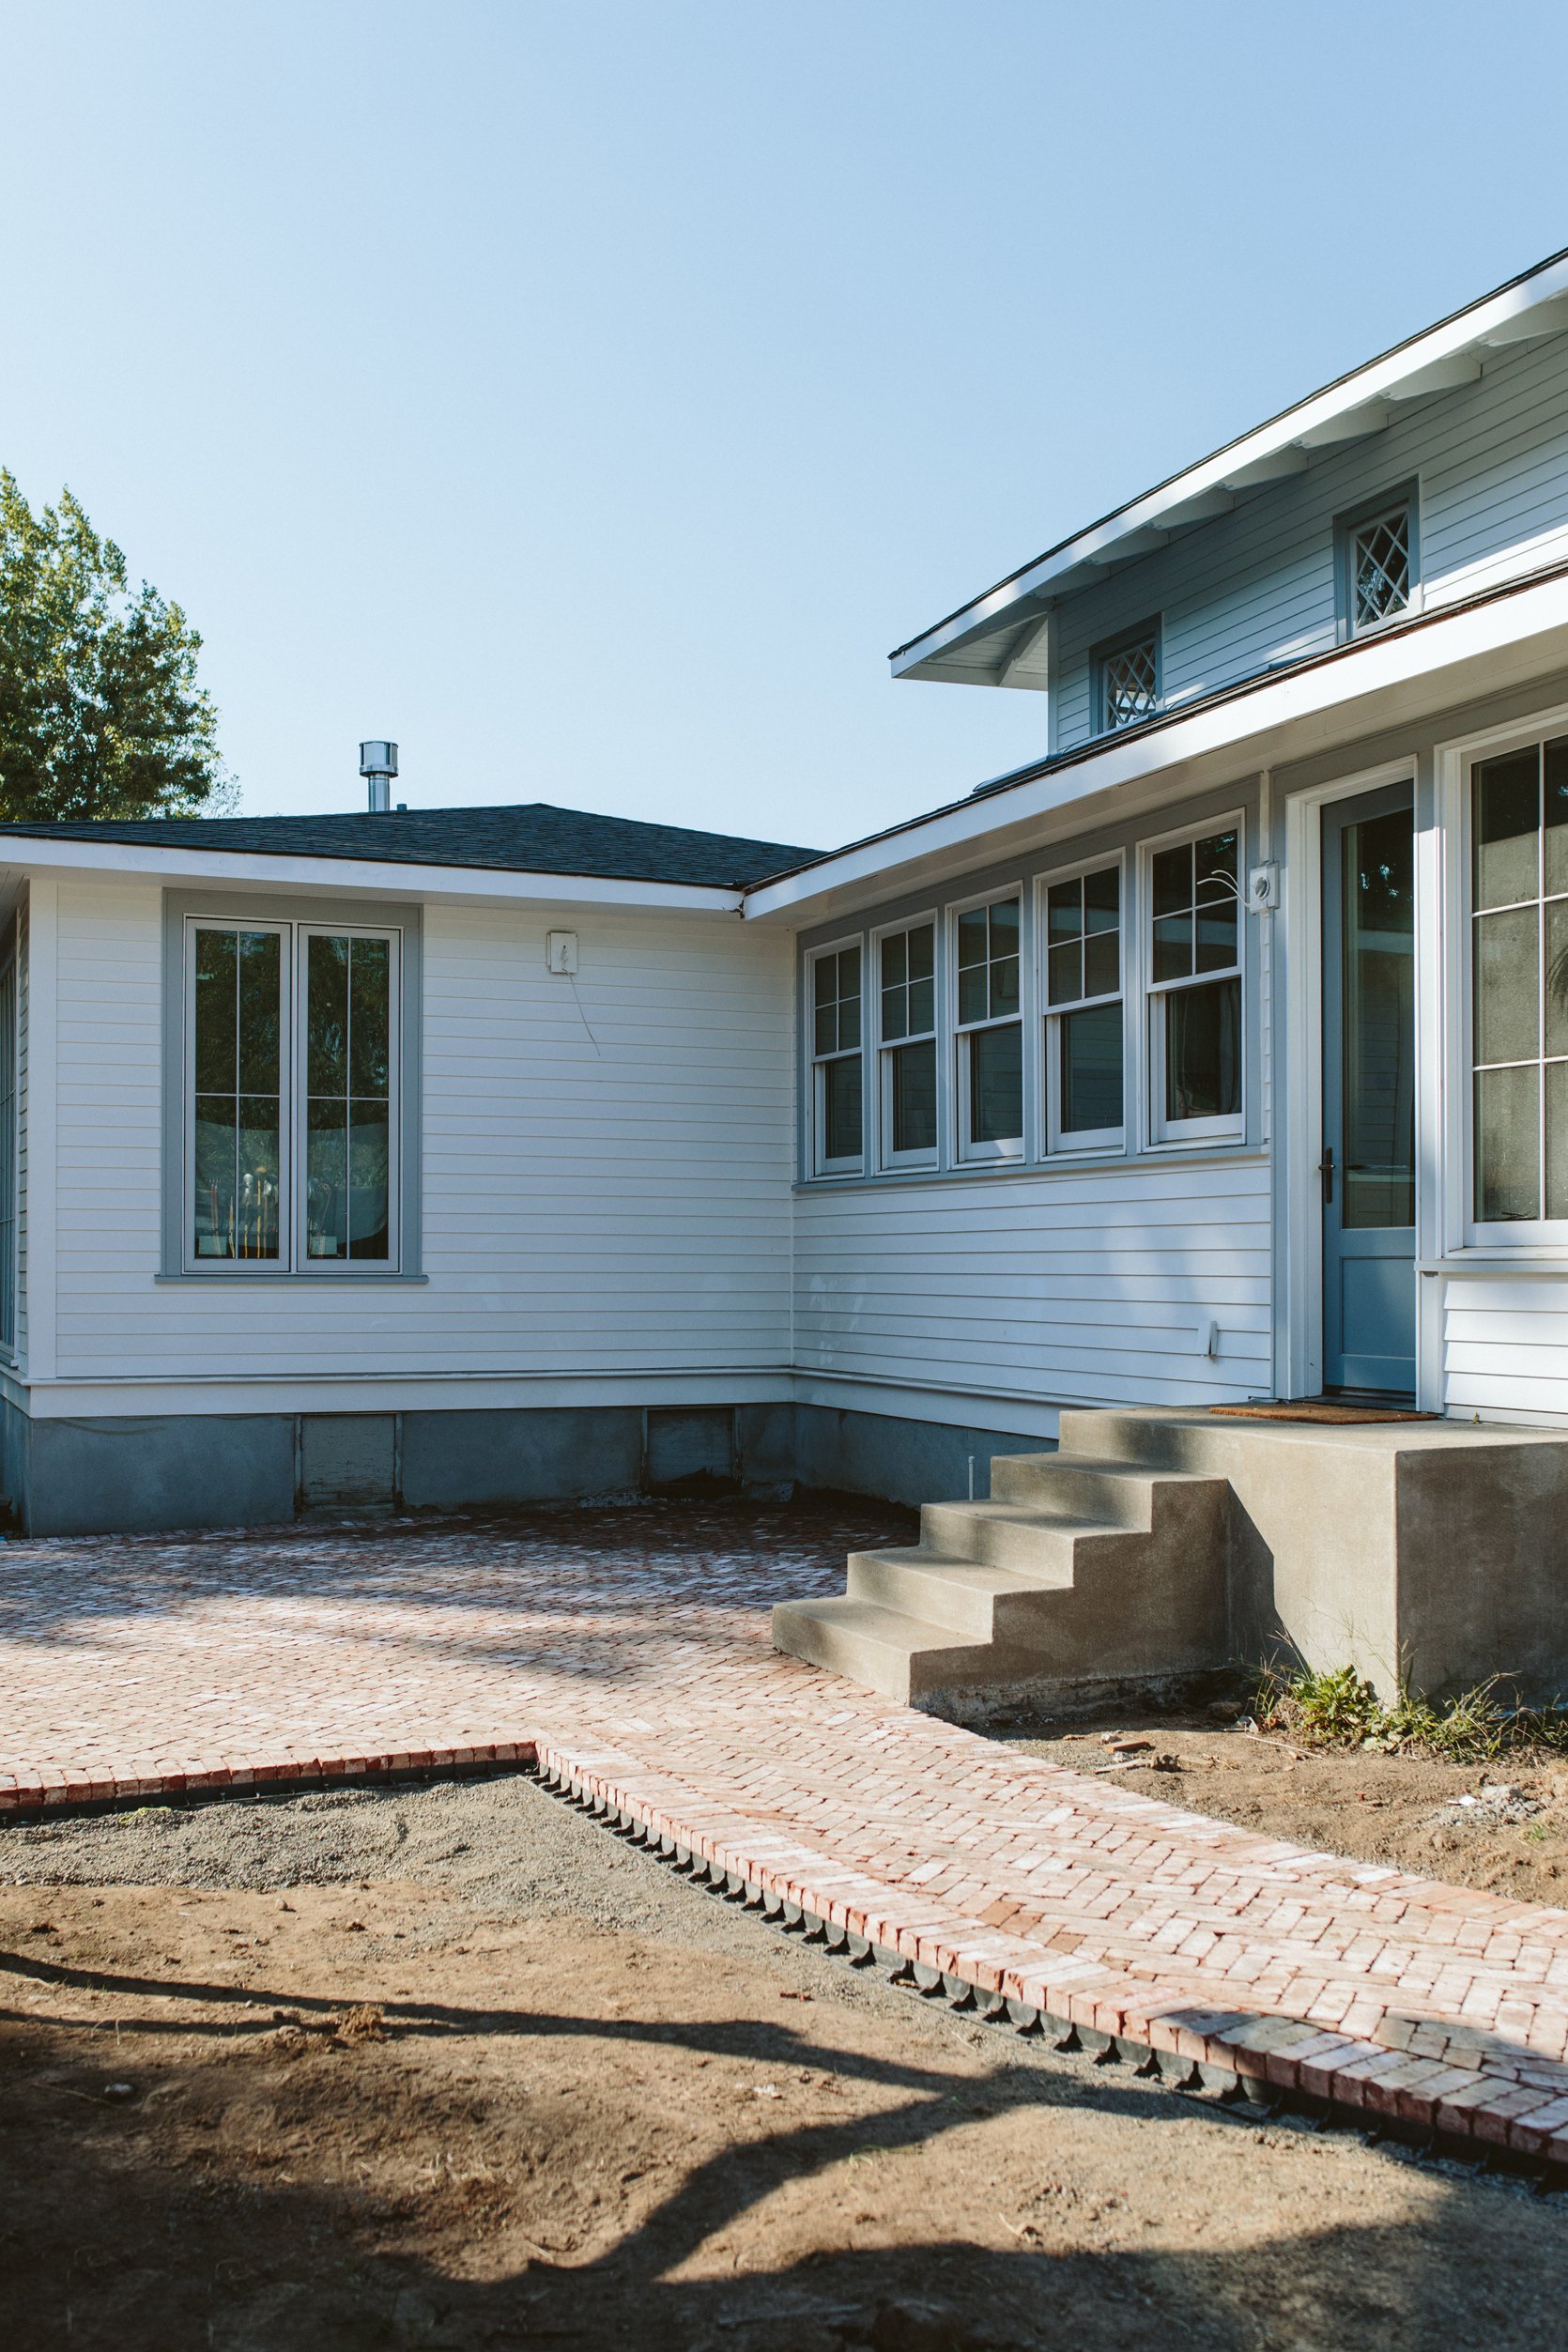
We’ll have a big pot on the far left with a substantial tree, window boxes, and possibly even some rectangular planter boxes on the ground. I know that without anything in there all I see is the ugly foundation, but it’s very much in my wheelhouse to decorate this space to look pretty. Stay tuned.
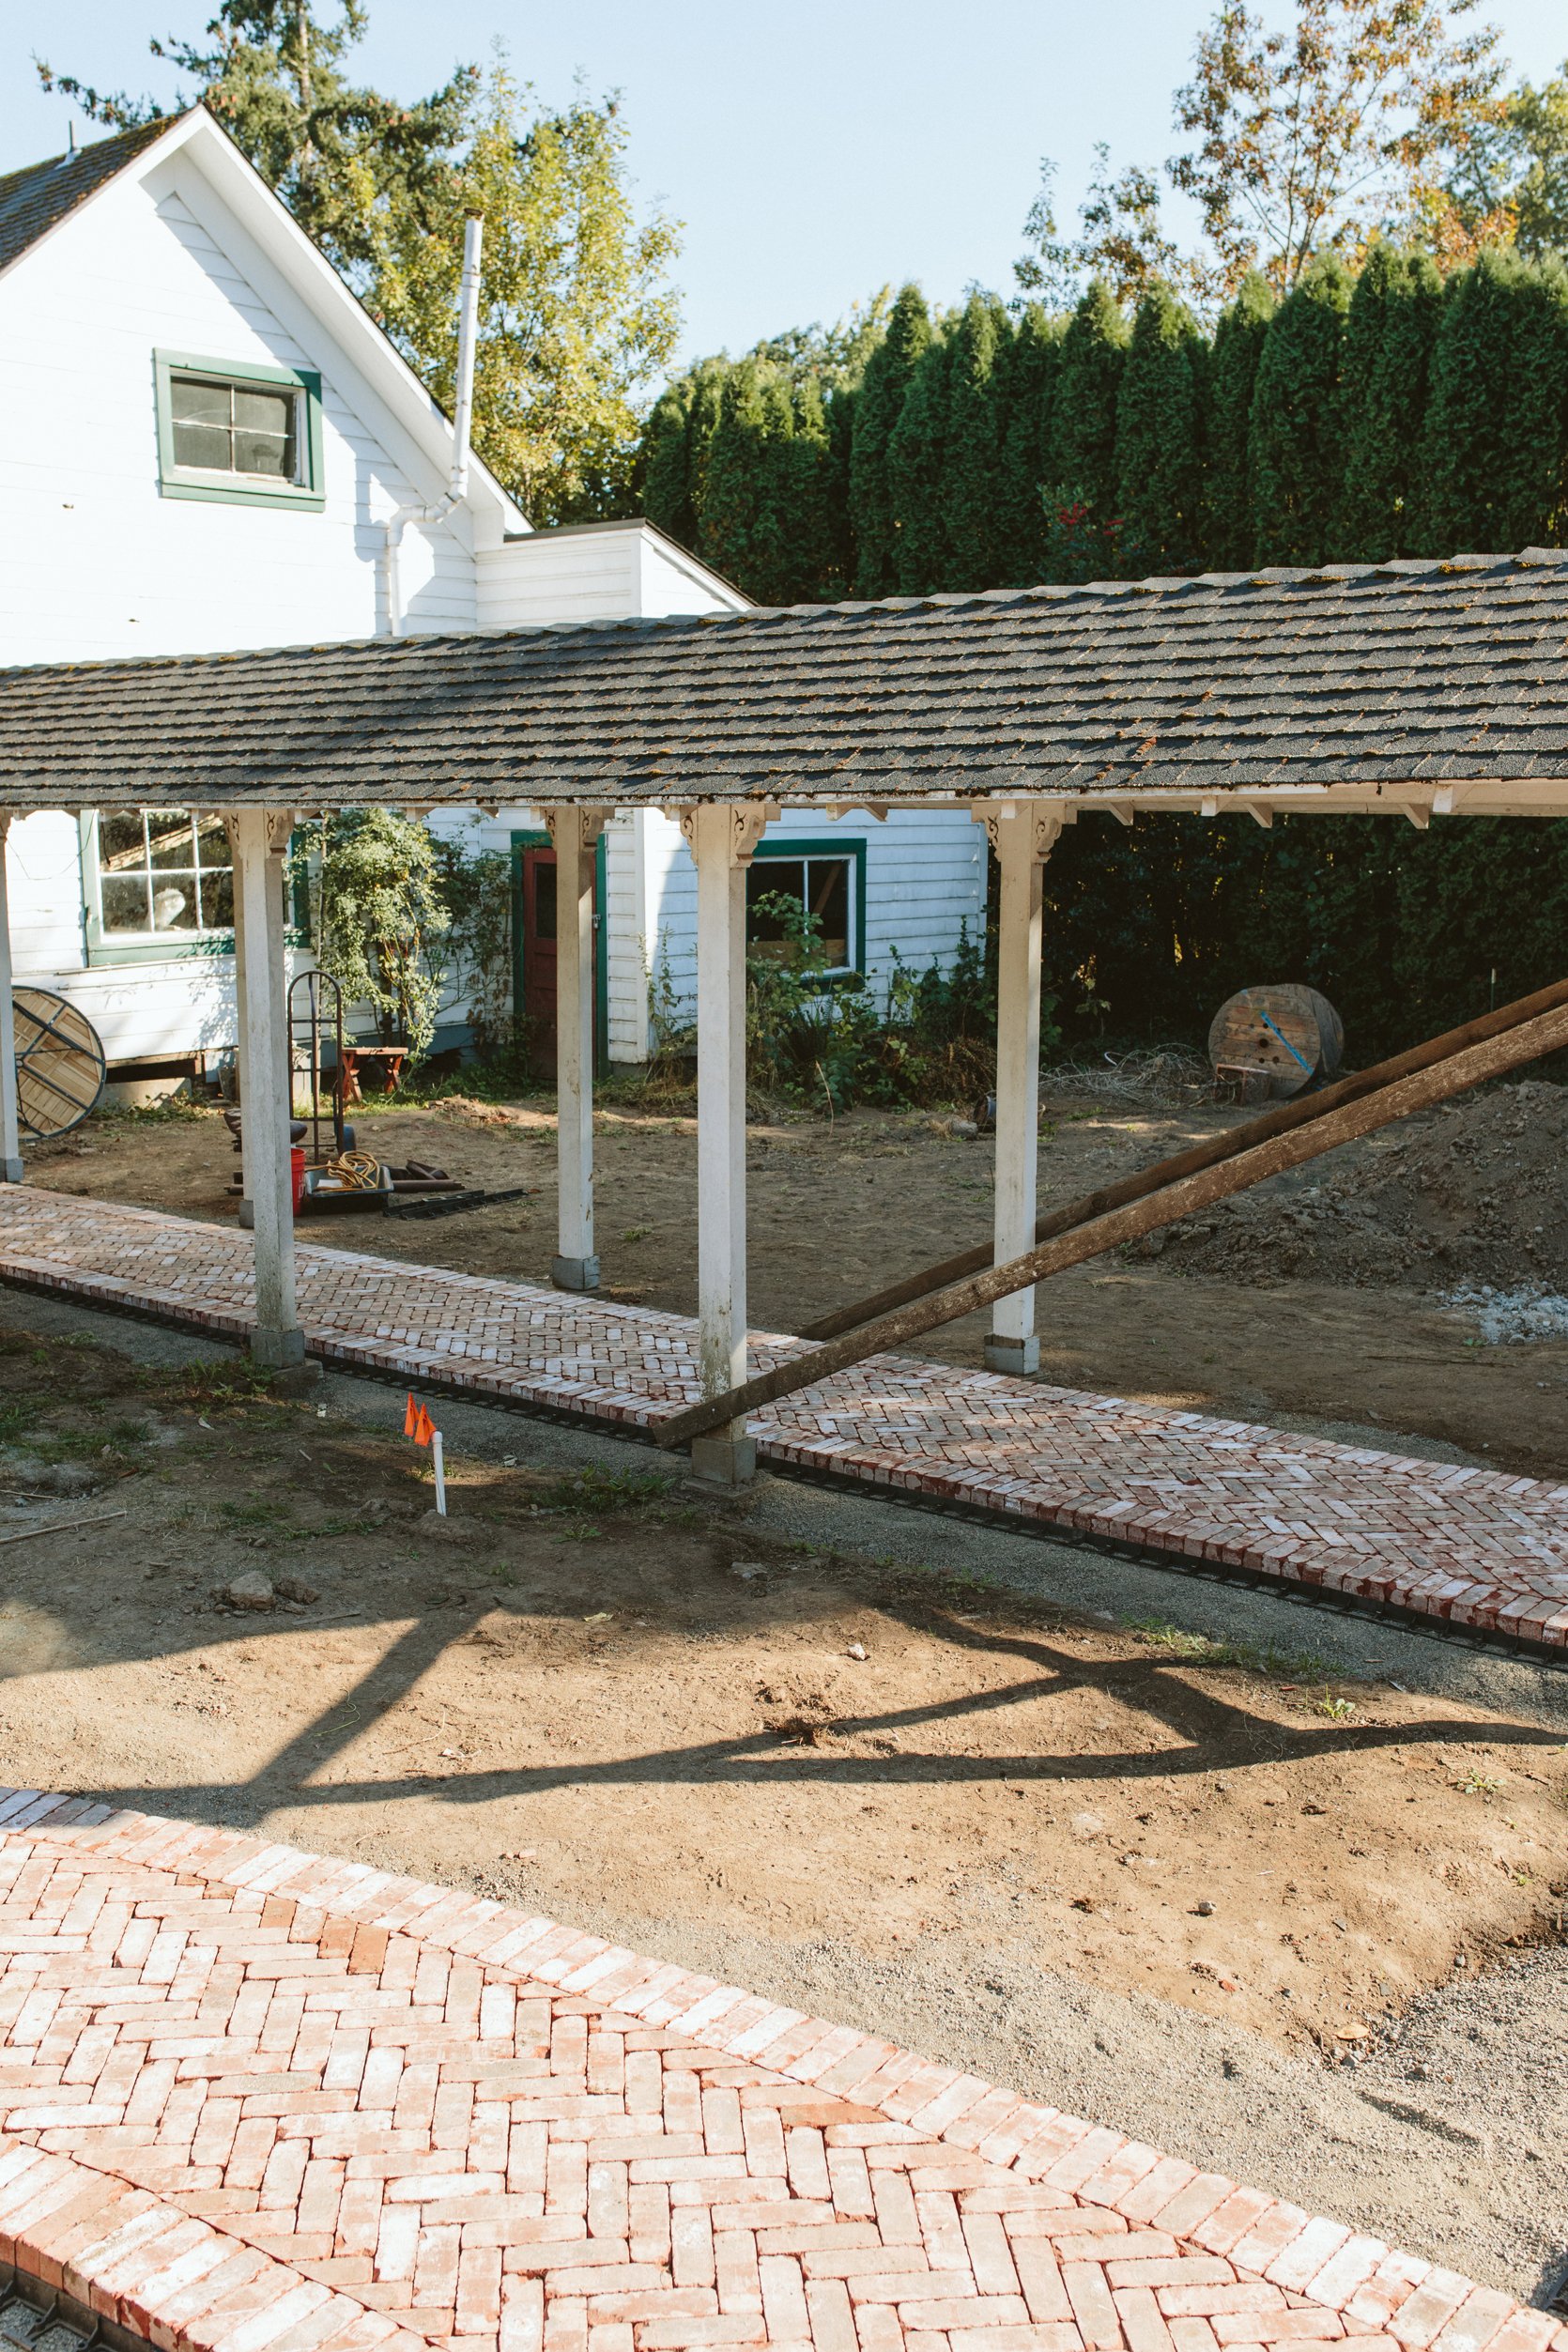
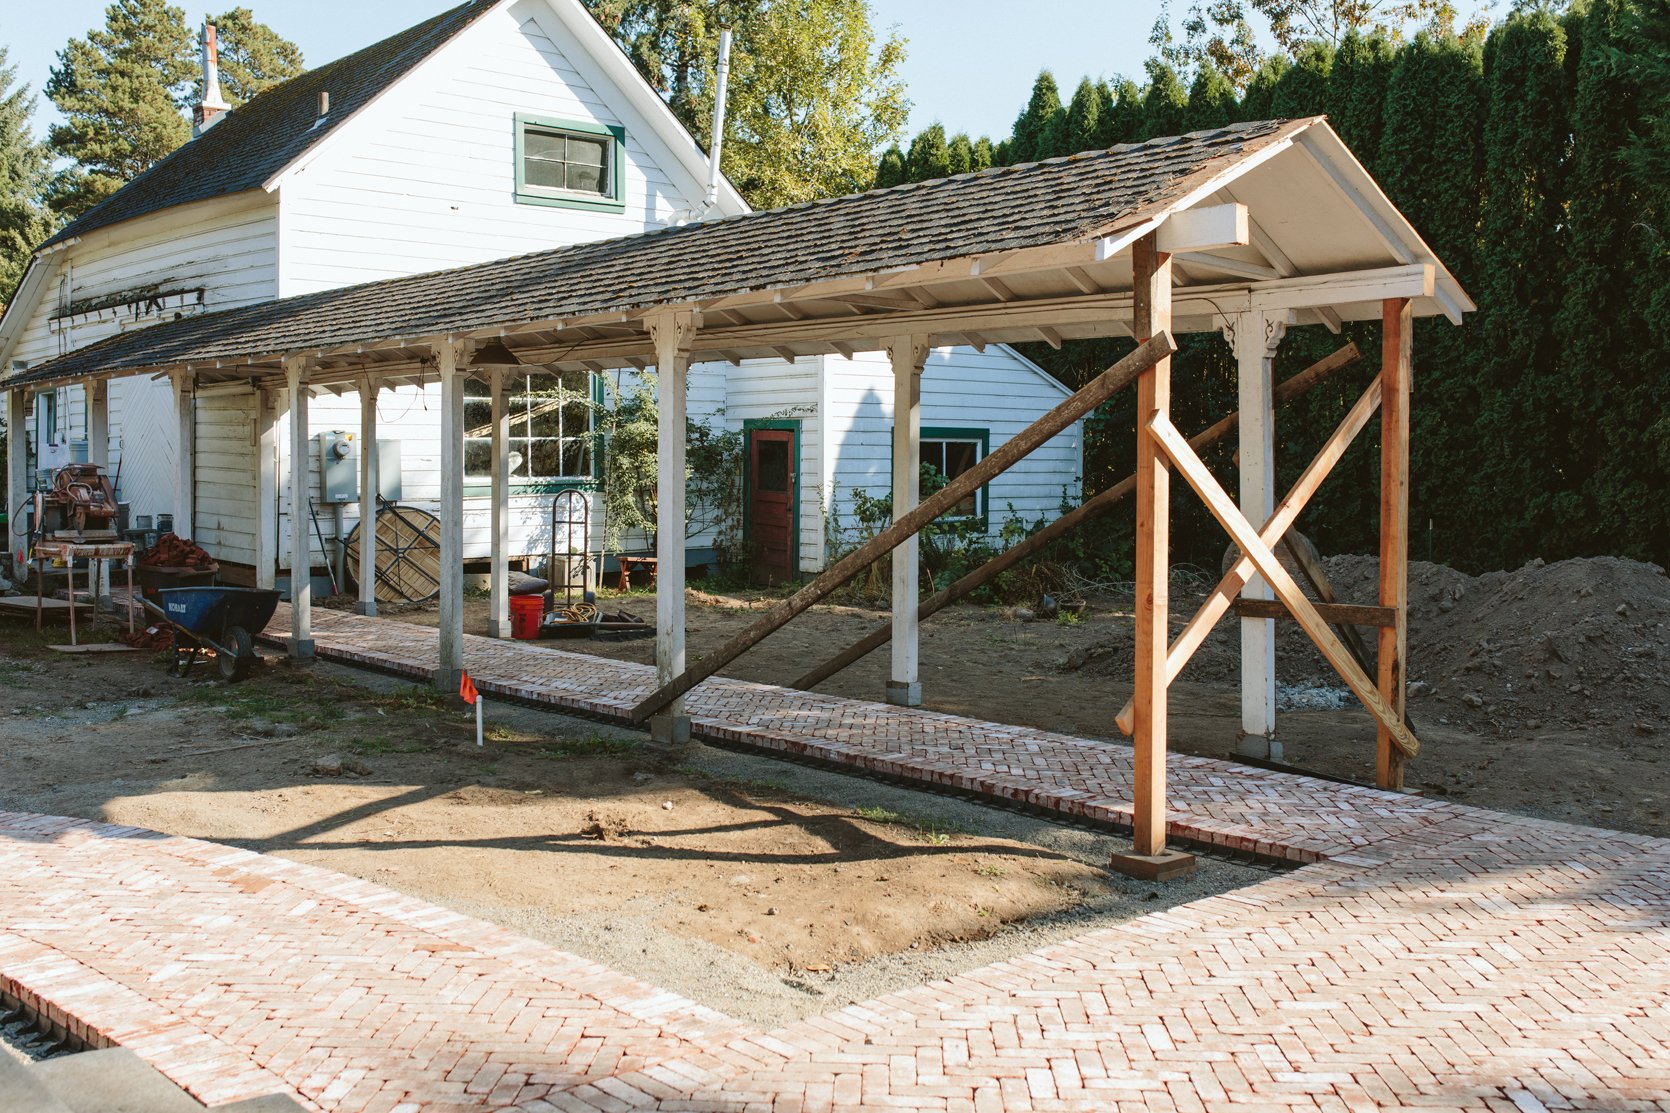
Wait What About The Covered Walkway?
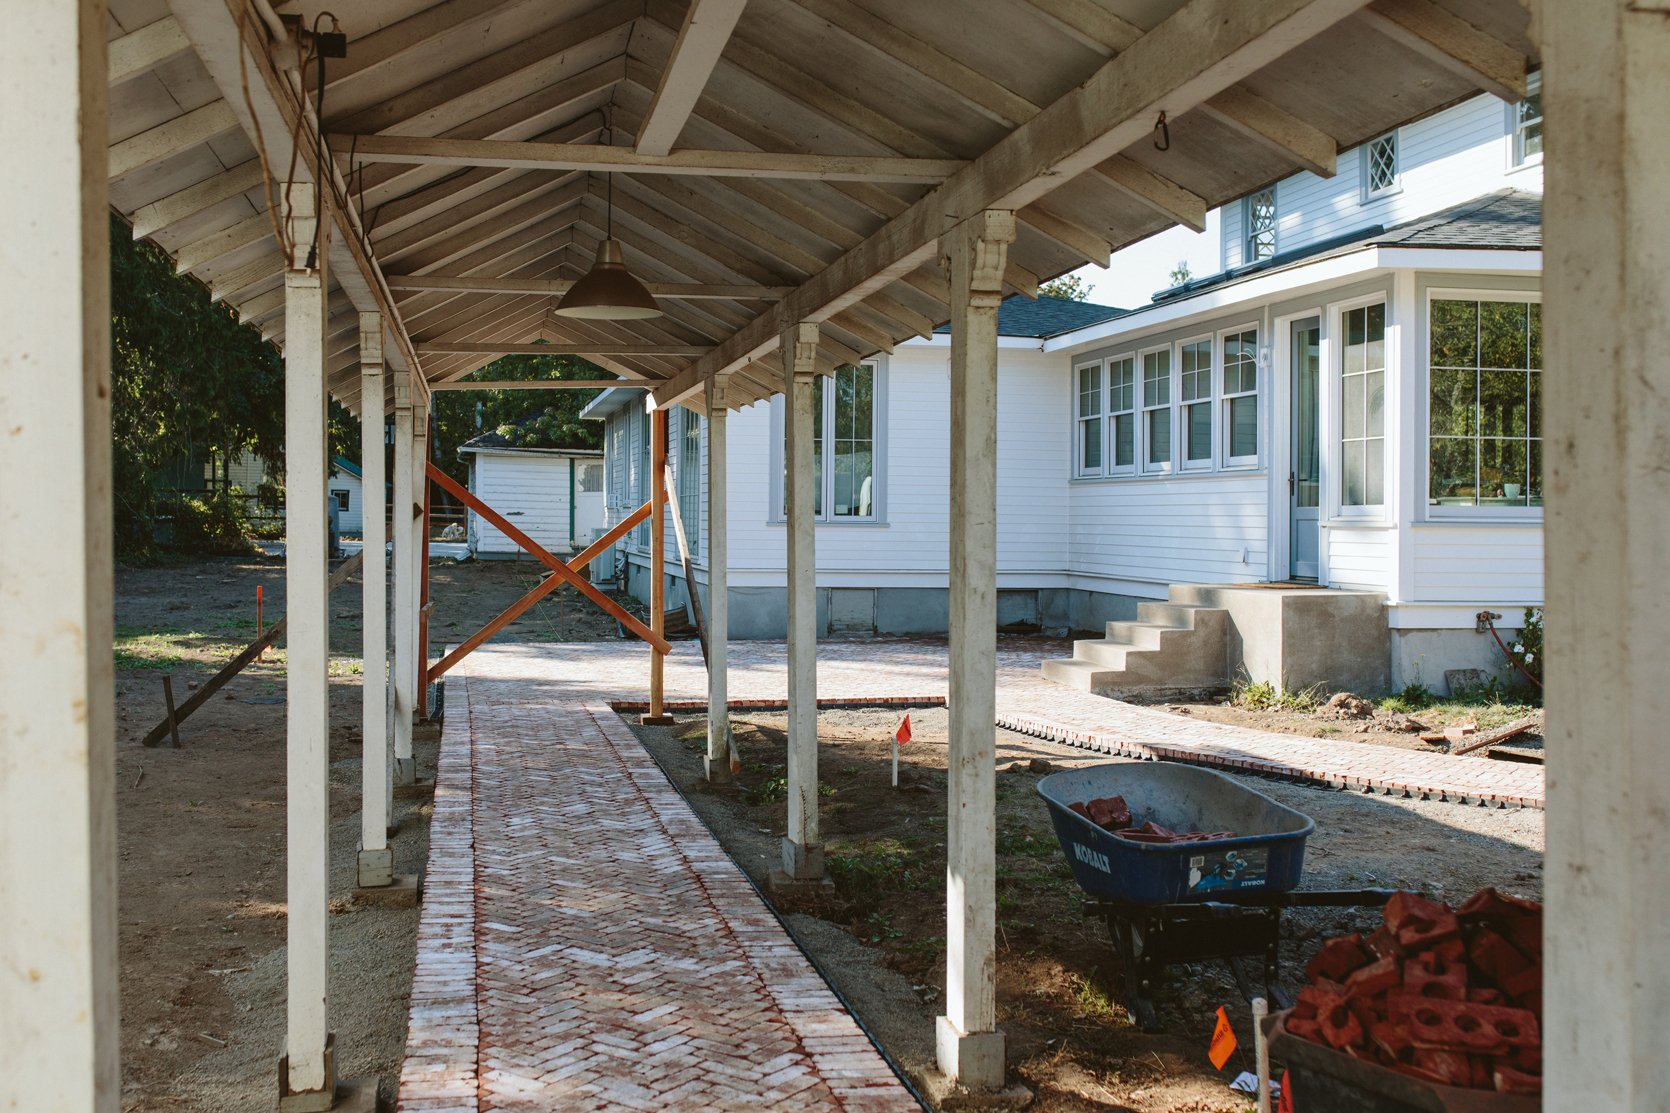
We ended up cutting off the covered path where it made the most sense with the roofline. I think had we thought of this earlier we would have rebuilt it to line up with the kitchen door (it was very off-center before and looked super odd when you were outside as well as when you looked out the kitchen window). Now it looks a bit random, tbh, but I think that a tree in that gap will solve that problem. If not then we might rebuild that return walkway to the kitchen door. WHO KNOWS. We also had to bring the brick pathway inside the posts because none of them lined up and you’d be able to tell really easily with the soldier-course border, so we reduced the footprint of the path altogether. We have to repair some of the bases of the posts that are not properly set in concrete (just dirt) and are rotting. And then we can plant a lot of ground cover and ferns to mask the posts. Would it have been cheaper/easier to tear the whole thing down and rebuild it to the exact specs that we wanted? Of course. But we didn’t want to and I don’t regret it. Of course, now that we see the old roof, covered in moss (which we previously thought was charming) next to our brand new roof on our house we wish we had re-roofed it, too. But listen, we haven’t even started to clean it up and of course will give it a power wash, a fresh coat of paint, and a few awesome hanging Rejuvenation pendants. It’s just so sweet and one of the reasons we fell in love with the property.
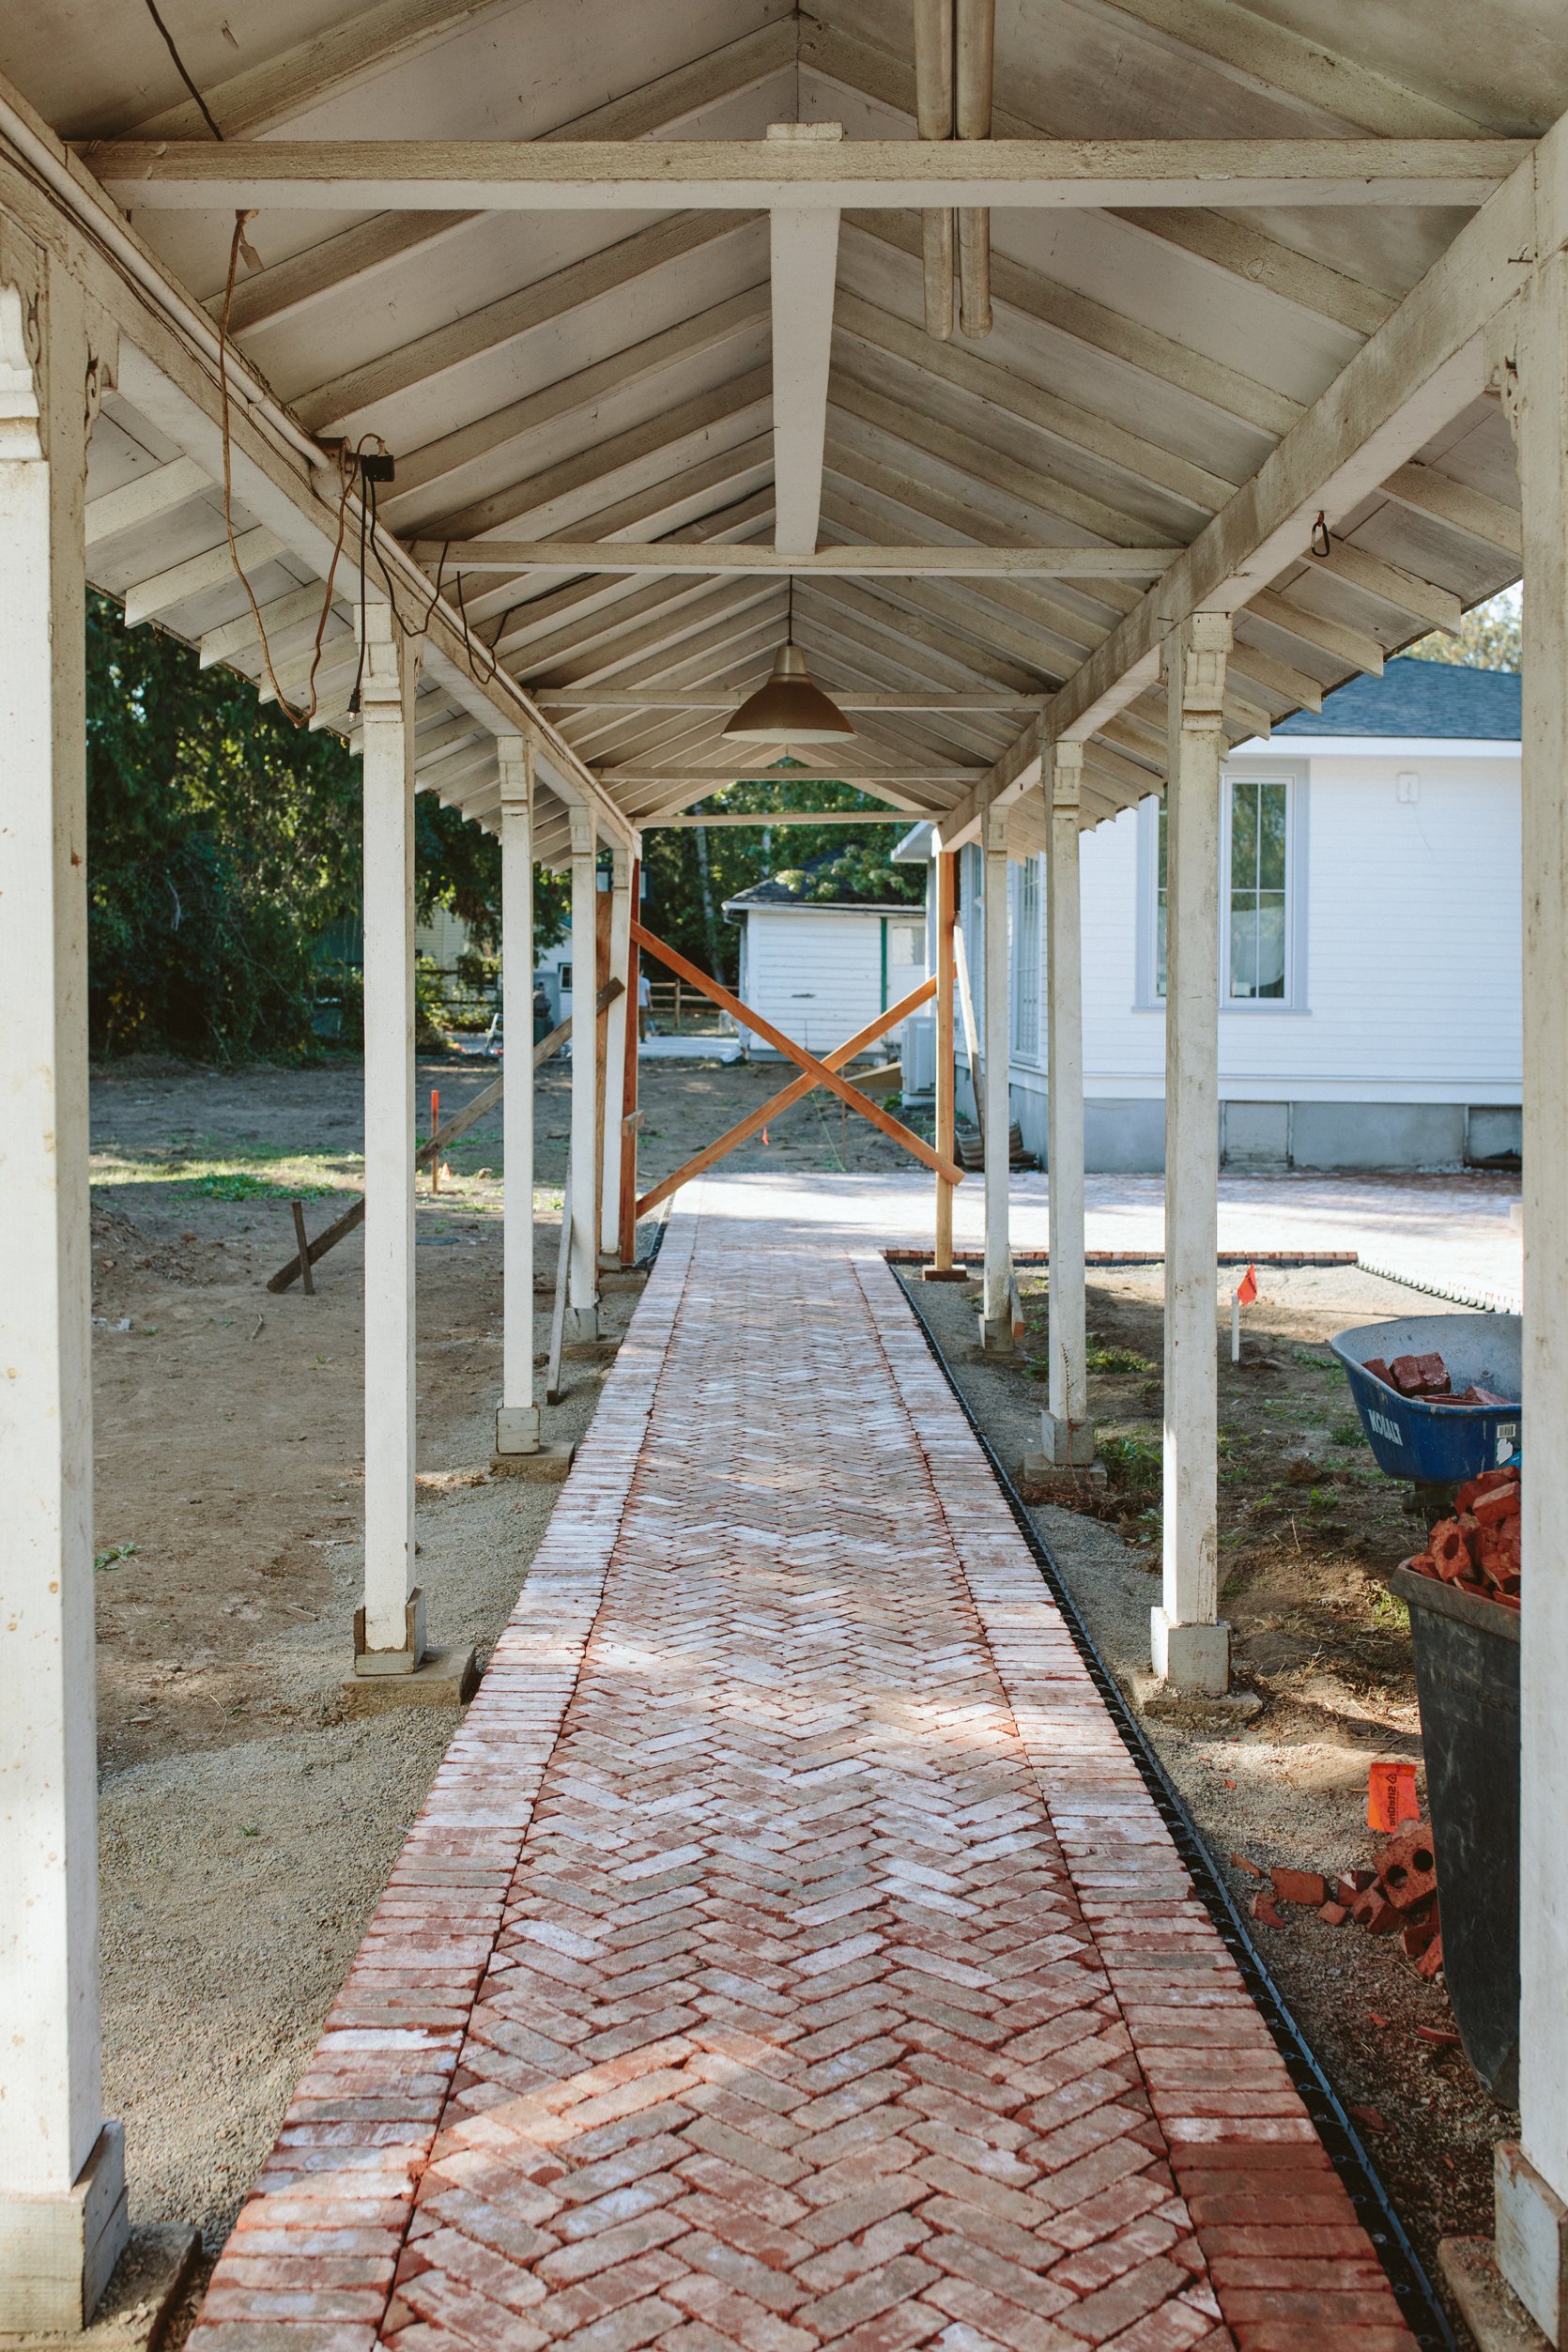
Oh, that herringbone with the soldier course border is so so lovely. Look at all those triangle cuts that had to be EXACT. These guys did an EXCELLENT job!!!
It’s honestly so exciting and the crew has now finished and moved on, prepping the rest of that side of the house for planting and laying the flagstone (we chose variegated bluestone). We are waiting on some sewer issues that finally got cleared by the city, but haven’t heard back from our sub in a while to see when it can be fixed which is very frustrating. Once we clear that the rest of the yard can be finalized and put on the schedule (we can’t trench for electrical, plumbing, or irrigation until the sewer is repaired underneath). We’re hoping to plant in a month. OH AND THIS IS VERY EXCITING – our well that we thought was empty and broken is not. Not only does it still have a ton of water, but it is being repaired now with a new pump to work again, and our irrigation contractor is tying our entire property into the well (thus reducing our summer dependence on the city water, which reduces my guilt and of course saves us money). We had the well contractor come out to assess it before the city could decommission it, and he was like, “oh it’s full and we can make it work again”. So we are moving and grooving on the exterior and as soon as I get my head on straight (after a long weekend celebrating Brian’s birthday) I’m going to write the exterior design plan post for you. Coming at you sooooon.
xx E
THIS POST WAS ORIGINALLY PUBLISHED HERE.
